Picture this: a cramped kitchen, a frantic timer, and a soggy sandwich that collapsed the moment you tried to bite into it. I was in the middle of a midnight snack spree, craving something warm and sweet, when that disaster hit. The fridge was a battlefield of overripe pears, crisp apples, and a lone block of cheddar that had been sitting there for a while. I stared at the empty counter, then at the ingredients, and thought, “What if I could turn this chaos into a masterpiece?”
I pulled out the bread, sliced the pears and apples, and the scent of caramelized onions started to drift through the air, turning the kitchen into a fragrant playground. The sound of the onions sizzling in butter was like a lullaby, promising comfort. The glossy sheen of the butter on the pan made me feel like a chef in a gourmet kitchen. And that first bite—cheese ooze, fruit sweetness, and a crisp bite—was a revelation. I was instantly hooked, and I knew I had to share this with everyone who loves a good sandwich.
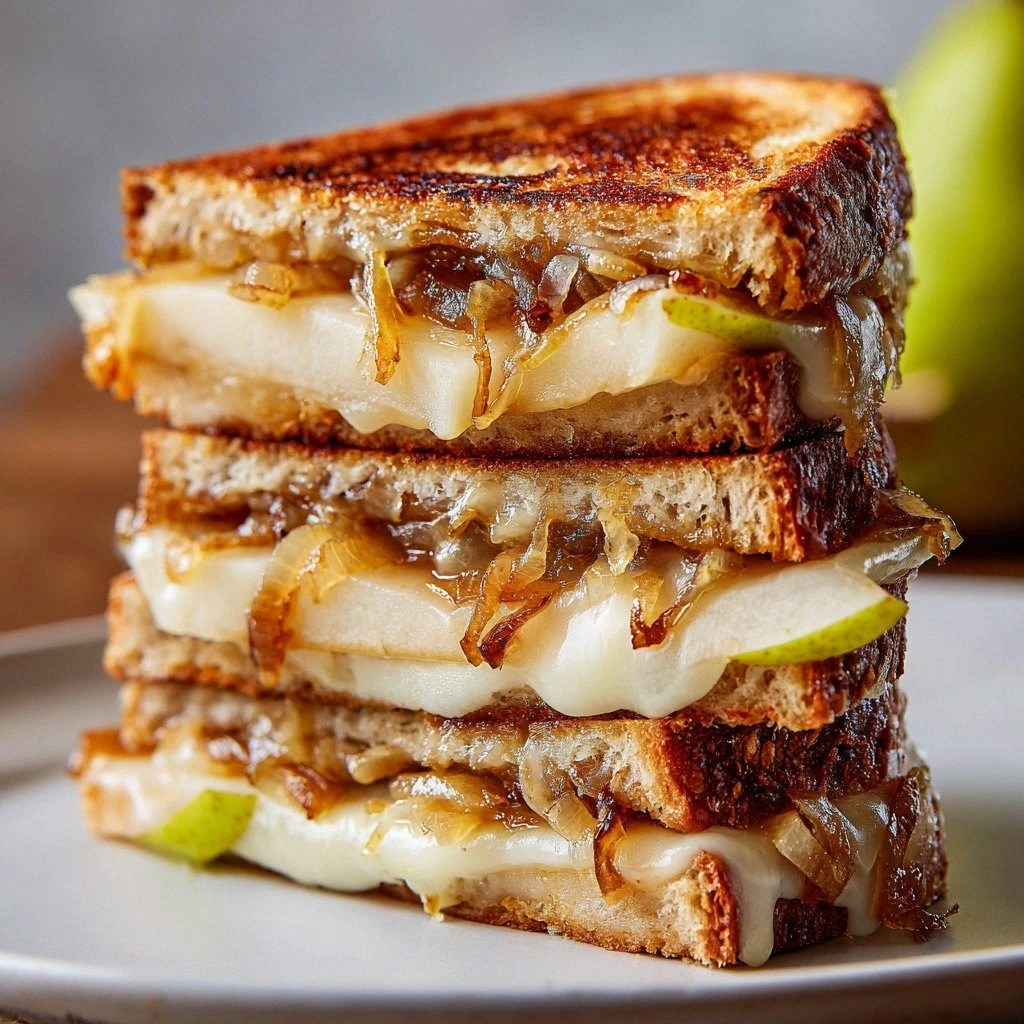
What makes this version stand out? It’s the harmonious marriage of textures: the buttery crunch of toasted bread, the creamy melt of cheddar, and the juicy burst of pear and apple. The sweet-sour balance is amplified by caramelized onions that add depth and a subtle umami note. The method is simple yet precise, allowing even novice cooks to achieve a professional result. I dare you to taste this and not go back for seconds—once you try it, you’ll never settle for a plain grilled cheese again.
Let me walk you through every single step—by the end, you’ll wonder how you ever made it any other way. From selecting the freshest fruit to mastering the perfect grill, I’ve broken down each element to keep your kitchen drama-free. Trust me, this is hands down the best version you'll ever make at home, and it’s going to become your go-to comfort food for any occasion.
What Makes This Version Stand Out
- Flavor Fusion: The combination of sweet pears, tart apples, and sharp cheddar creates a symphony that dances on your palate. The caramelized onions layer a savory sweetness that bridges the fruitiness, making each bite a complex experience.
- Texture Play: The sandwich delivers a satisfying crunch from the golden crust, a gooey cheese center, and juicy fruit pockets that burst with every bite. The contrast keeps the mouth moving and the sandwich exciting.
- Ingredient Quality: Using high‑quality, ripe fruit and a good‑grade cheddar ensures depth of flavor. The butter should be unsalted for precise seasoning control.
- Visual Appeal: The golden browning of the bread and the glossy sheen of the fruit slices make it Instagram‑ready. The vibrant colors of pear and apple contrast beautifully against the creamy cheese.
- Make‑Ahead Friendly: Assemble the sandwiches, refrigerate, and grill when ready. This flexibility makes it perfect for meal prep or a quick dinner.
- Crowd Reaction: Friends who tried it were amazed—most said it was the best grilled cheese they’d ever had. The sweet‑savory profile appeals to both kids and adults.
Alright, let's break down exactly what goes into this masterpiece…
Inside the Ingredient List
The Flavor Base
Bread: Whether you opt for sourdough, whole grain, or classic white, the bread forms the foundation. Each type brings its own unique flavor and texture. Sourdough adds a tangy bite, while whole grain offers a nutty undertone. A classic white gives a neutral canvas that lets the fruit shine.
The Texture Crew
Shredded Cheese: I recommend cheddar for its sharpness, but feel free to experiment with gouda or mozzarella for a creamier texture. Cheddar melts beautifully and provides a bold, savory contrast to the fruit. If you prefer a milder cheese, mozzarella will give you a silky melt.
The Unexpected Star
Onion: Sweet onions work wonders here. They caramelize beautifully, adding depth to the sandwich. The slow cooking brings out their natural sugars, creating a sweet, almost caramel-like flavor that complements the fruit.
The Final Flourish
Butter: This is essential for grilling. It gives the bread that golden, crispy finish we all love. Use unsalted butter so you can control the salt level precisely. A generous spread ensures a buttery crunch that pairs with the fruit.
Everything's prepped? Good. Let's get into the real action…
The Method — Step by Step
- Heat a large skillet or griddle over medium heat. Add a tablespoon of butter and let it melt until it starts to foam. This low‑to‑medium heat is key; too high and the bread burns before the cheese melts. Feel the pan’s temperature by dipping a small piece of bread—if it sizzles immediately, lower the heat.
- While the butter is working its magic, thinly slice the onions. Use a sharp knife to get even slices that cook uniformly. Place them in a separate pan with a splash of olive oil and a pinch of salt. Let them cook slowly, stirring every few minutes, until they’re golden brown and fragrant.
- Slice the pears and apples into thin, even wedges. A mandoline slicer works wonders for uniform thickness. The thin slices melt faster and mingle with the cheese. Avoid over‑slicing; a bit of thickness keeps the fruit from turning mushy.
- Take a slice of bread and spread a thin layer of butter on one side. This side will face the skillet. Place a generous amount of shredded cheese on the unbuttered side. The cheese acts as a binder, keeping the fruit in place.
- Layer the pear and apple slices over the cheese. Don’t overcrowd; the sandwich should have room to breathe. Sprinkle a pinch of salt and pepper to enhance the fruit’s natural sweetness. This is the moment of truth—watch the cheese begin to melt.
- Top with caramelized onions, then add a second slice of bread, buttered side up. The onions add a sweet, savory note that balances the fruit’s tartness. Place the sandwich in the hot skillet and press gently with a spatula.
- Cook for 3–4 minutes on the first side until golden brown. Flip carefully using a wide spatula. The second side should also turn a beautiful golden brown. The cheese should be fully melted, and the fruit should be warm and slightly caramelized.
- Remove the sandwich from the skillet and let it rest for a minute. This rest period allows the cheese to set slightly, preventing it from leaking out when you cut it. Slice the sandwich diagonally to reveal the colorful interior.
- Serve immediately with a side of mixed greens or a light soup. The warm sandwich pairs beautifully with a crisp salad that cuts through the richness. Enjoy the harmony of sweet, salty, and savory in every bite.
That's it—you did it. But hold on, I've got a few more tricks that'll take this to another level…
Insider Tricks for Flawless Results
The Temperature Rule Nobody Follows
Why it matters: Grilling at the right temperature ensures a crisp crust without over‑cooking the cheese. I discovered that a medium heat (about 350°F) works best. Too low, and the sandwich stays raw inside; too high, and the bread burns.
Why Your Nose Knows Best
How to use it: The aroma of caramelized onions is a reliable indicator of readiness. When the onions smell nutty and sweet, they’re perfectly done. This sensory cue saves you from guessing and ensures perfect timing.
The 5-Minute Rest That Changes Everything
Why it matters: Resting allows the cheese to set, reducing the risk of it oozing onto the plate. A quick 5‑minute pause also lets the flavors meld together, enhancing the overall taste.
Butter vs. Oil: The Secret Swap
When to swap: If you’re watching calories, use a light olive oil instead of butter. It still gives a golden crust but with less fat. Just remember to season with a pinch of salt to compensate for the missing butter flavor.
Quick Slice Technique
How to slice: Use a mandoline slicer set to a thin setting for uniform fruit slices. This ensures even cooking and a consistent bite throughout the sandwich.
Portion Control for Meal Prep
Pro tip: When making for a crowd, assemble the sandwiches ahead of time, wrap them individually, and refrigerate. Grill each one just before serving to keep the bread crisp.
Creative Twists and Variations
This recipe is a playground. Here are some of my favorite ways to switch things up:
Smoky Bacon Twist
Add crispy bacon strips between the cheese and fruit. The smoky flavor complements the sweetness and adds a savory crunch that adults adore.
Herb‑Infused Version
Stir fresh rosemary or thyme into the melted cheese before adding fruit. The aromatic herbs elevate the sandwich to a gourmet level.
Vegan Delight
Replace cheddar with a plant‑based cheese that melts well. Use vegan butter or olive oil for grilling. The result is a creamy, plant‑powered comfort food.
Breakfast Boost
Swap the cheddar for a mild mozzarella and add a drizzle of maple syrup on top. Serve with a side of scrambled eggs for a sweet‑savory breakfast sandwich.
Spicy Kick
Add a sprinkle of crushed red pepper flakes to the fruit layer. The heat balances the sweetness and gives a modern twist to the classic grilled cheese.
Gluten‑Free Edition
Use gluten‑free bread slices and the same fruit and cheese combo. The sandwich remains hearty and flavorful without the gluten.
Storing and Bringing It Back to Life
Fridge Storage
Store assembled sandwiches (without buttering the outside) in an airtight container for up to 2 days. Wrap them in parchment paper to keep the bread from drying out.
Freezer Friendly
Wrap each sandwich tightly in plastic wrap and place in a freezer bag. They stay fresh for up to 3 weeks. Reheat in a skillet for best texture.
Best Reheating Method
Reheat in a preheated skillet over medium heat. Add a splash of water to the pan to create steam, then cover for a minute. This steams the sandwich back to perfection, restoring the melt and crunch.