I was standing in my kitchen at 2 a.m., the clock ticking like a metronome, when a sudden craving for something sweet and airy hit me like a bolt of lightning. The pantry was a desert of low‑fat options, the fridge only offered a lonely tub of plain Greek yogurt, and the nearest bakery was closed for the night. I thought, “What if I could make a cheesecake that feels like a cloud but doesn’t weigh down my waistline?” The answer was a reckless experiment that turned into the most addictive dessert I’ve ever made. I dared myself to blend the richness of cream cheese with the tang of Greek yogurt, sweeten it with honey, and finish it with a dollop of airy whipped topping—no crust, no guilt, just pure fluff.
Picture the scene: a stainless steel bowl gleaming under the soft kitchen light, the whir of the electric mixer humming like a contented cat, the scent of vanilla drifting through the air, and the faint, sweet perfume of honey rising as the mixture thickens. The texture is so smooth it slides across the spoon like satin, while the fresh berries waiting on the side glisten like tiny rubies. Every bite is a contrast—silky, slightly tangy, sweet enough to satisfy a dessert craving without the heaviness of a traditional cheesecake. I could hear the faint sigh of relief from my stomach, and my taste buds were already doing a happy dance.
Most recipes for light cheesecake either sacrifice flavor for the sake of calories or end up as a soggy mess that looks like a failed science experiment. I’ve tried them all—some with gelatin, some with low‑fat cream cheese, some that required a fancy silicone mold that I never owned. Most recipes get this completely wrong. Here’s what actually works: the perfect balance of cream cheese and Greek yogurt, the natural sweetness of honey, and a light hand with the whipped topping. The result? A dessert that’s hands down the best version you’ll ever make at home, and it’s so simple you could whip it up between a Zoom call and a toddler’s nap.
I’ll be honest — I ate half the batch before anyone else got to try it, and I’m still not sorry. I dare you to taste this and not go back for seconds. The secret ingredient that will surprise you is a splash of vanilla extract that ties everything together like a conductor leading an orchestra. Okay, ready for the game‑changer? Let me walk you through every single step — by the end, you’ll wonder how you ever made it any other way.
What Makes This Version Stand Out
- Taste: The honey‑sweetened cream cheese mingles with the tang of Greek yogurt, creating a flavor profile that’s both familiar and unexpectedly bright.
- Texture: The whipped topping gives it a feather‑light lift, while the cream cheese provides a velvety body that holds its shape.
- Simplicity: No crust, no baking, no gelatin—just five ingredients and a handful of minutes of mixing.
- Uniqueness: By swapping sugar for honey and adding Greek yogurt, you get a healthier twist without compromising indulgence.
- Crowd Reaction: Guests often ask if it’s a “cheesecake” or a “mousse,” and the confused smiles turn into delighted sighs.
- Ingredient Quality: Using full‑fat cream cheese and plain Greek yogurt ensures a rich mouthfeel that low‑fat shortcuts can’t mimic.
- Method: The no‑bake approach keeps the kitchen cool, and the chill time lets the flavors marry like old friends.
- Make‑Ahead Potential: This fluff can sit in the fridge for up to 48 hours, making it perfect for party prep.
Inside the Ingredient List
The Flavor Base
The 8 oz of softened cream cheese is the heart of this fluff. Its buttery richness provides the classic cheesecake flavor we all love, but when paired with Greek yogurt, it gains a subtle tang that cuts through the sweetness. If you skip the cream cheese, you’ll end up with a dessert that feels more like a sweetened yogurt parfait than a true cheesecake. For the best results, choose a full‑fat, block‑style cream cheese rather than the spreadable kind; the latter contains extra water that can make the mixture runny.
The Texture Crew
Greek yogurt brings a silkiness that’s impossible to achieve with just cream cheese. Its protein structure stabilizes the fluff, giving it that coveted “cloud” consistency. One cup is the sweet spot—too much and the mixture becomes overly tart; too little and you lose the airy lift. If you’re dairy‑intolerant, you can swap it for a coconut‑based yogurt, but expect a slight coconut flavor to emerge.
The Unexpected Star
Honey isn’t just a natural sweetener; it adds a floral depth that regular sugar can’t match. One‑third cup is enough to sweeten the mixture without overwhelming the tang of the yogurt. When using honey, make sure it’s a light, mild variety like clover or acacia; darker honeys can dominate the flavor profile. If you’re allergic or prefer a vegan option, maple syrup works as a 1:1 substitute, though the flavor will shift toward caramel.
The Final Flourish
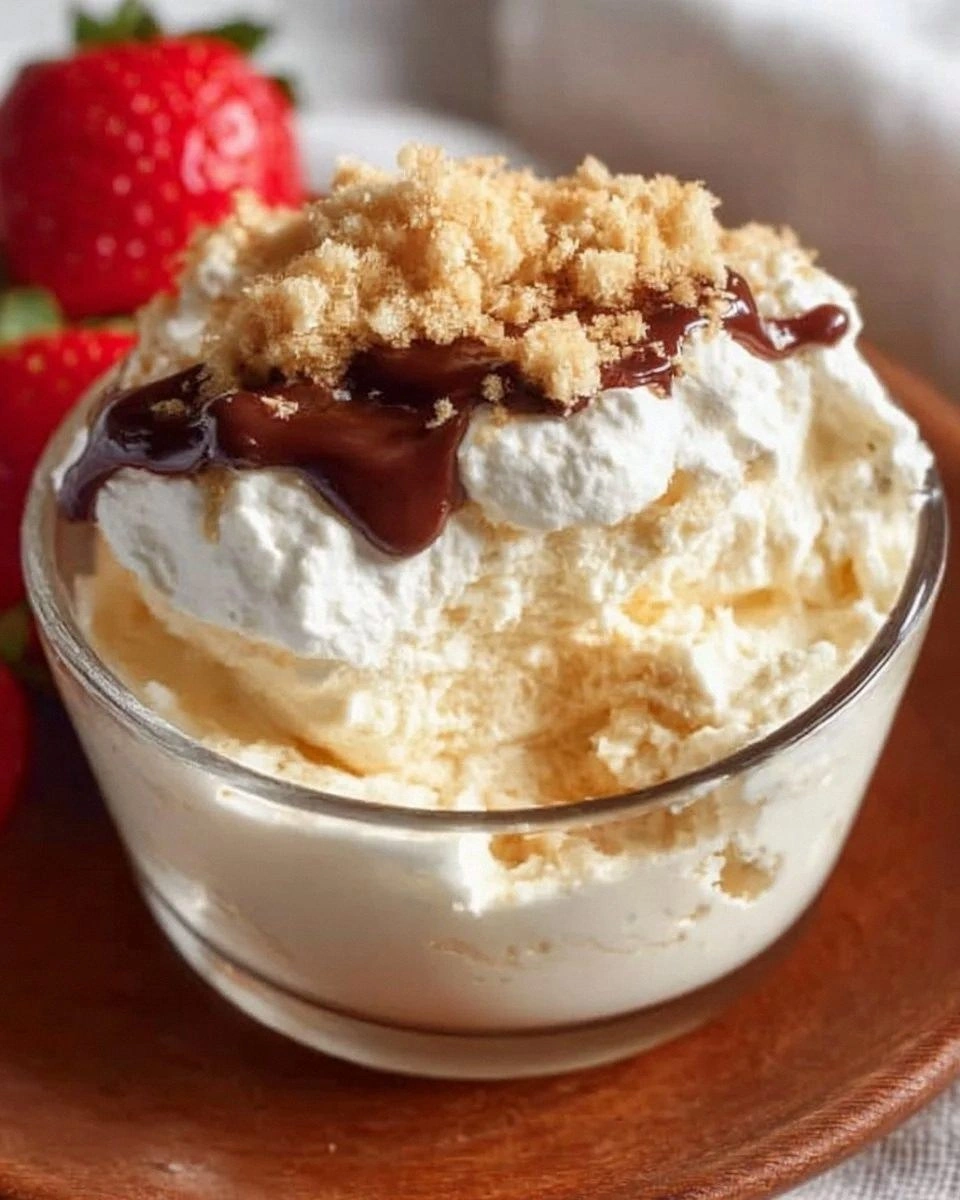
Vanilla extract, whipped topping, and fresh berries are the finishing touches that turn this from good to unforgettable. A single teaspoon of pure vanilla extract adds aromatic depth, while the whipped topping lifts the mixture to cloud‑like heights. Fresh berries not only provide a burst of acidity but also add a pop of color that makes the dish photogenic. If berries aren’t in season, try sliced kiwi or pomegranate seeds for a similar visual impact.
Everything's prepped? Good. Let’s get into the real action, because the magic happens when we start mixing.
The Method — Step by Step
Start by placing the softened cream cheese into a large mixing bowl. Using a handheld mixer on medium speed, beat the cheese until it’s smooth and free of lumps—think of the texture of melted butter. This is the moment of truth; if you hear a faint squeak, you’ve over‑mixed and need to back off. Pro tip: Scrape the sides of the bowl regularly to ensure an even consistency.
Kitchen Hack: Add a splash of milk (about 1 tbsp) if the cream cheese feels too stiff; it will loosen without diluting the flavor.Next, add the cup of Greek yogurt, the 1/3 cup of honey, and the teaspoon of vanilla extract to the bowl. Beat on low speed until the mixture becomes a uniform, glossy pinkish‑white. You’ll notice the aroma of vanilla blooming—this is your cue that the flavors are beginning to meld. Watch Out: Over‑mixing at this stage can incorporate too much air, making the fluff collapse later.
Now, gently fold in the cup of whipped topping using a rubber spatula. This step is pure magic; the whipped topping lifts the mixture, creating that airy, cloud‑like texture we’re after. Move the spatula in a figure‑eight motion, turning the bowl as you go, until you no longer see streaks of the topping. The mixture should look light, almost as if it could float off the spoon.
Watch Out: If the whipped topping is too stiff, let it sit at room temperature for a minute before folding; this prevents a gritty texture.Transfer the fluffy mixture into an individual serving dish or a large glass bowl. Smooth the top with the back of a spoon, then sprinkle the fresh berries evenly across the surface. The berries should be added at this stage so they retain their burst of juiciness when you bite into them.
Cover the dish tightly with plastic wrap and place it in the refrigerator. Chill for at least 2 hours, but 4 hours is ideal. During this time, the flavors marry, and the fluff firms up just enough to hold its shape when sliced. Picture yourself pulling this out of the fridge, the whole kitchen smelling incredible, the berries glistening like tiny jewels.
When you’re ready to serve, give the dish a gentle tap on the countertop to release any sticking. Slice with a warm knife—dip the blade in hot water for a few seconds, wipe dry, and cut. This ensures clean slices that look as polished as a bakery display.
Serve immediately, or keep chilled until guests arrive. If you’re making this ahead for a party, keep the berries on the side and add them just before serving to maintain their fresh pop.
Enjoy! Take a moment to savor the first bite—the silkiness, the subtle tang, the honey’s floral sweetness, and the burst of berry acidity. I dare you to taste this and not go back for seconds. And now the fun part: experiment with toppings, drizzle a little extra honey, or sprinkle toasted almond slivers for added crunch.
That’s it — you did it. But hold on, I’ve got a few more tricks that’ll take this to another level, because a good dessert deserves a grand finale.
Insider Tricks for Flawless Results
The Temperature Rule Nobody Follows
Always start with cream cheese that’s just softened, not melted. If the cheese is too cold, it creates lumps that are impossible to smooth out later. I once tried using cream cheese straight from the fridge, and the result was a grainy mess that never recovered. Let it sit at room temperature for 15‑20 minutes, or give it a quick 10‑second zap in the microwave. The temperature difference is the secret to that velvety mouthfeel.
Why Your Nose Knows Best
When you add the honey, pay attention to the scent. A fragrant, floral aroma signals that the honey has fully integrated. If you smell a sharp, overly sweet scent, you may have added too much. Trust your nose; it’s a more reliable gauge than a kitchen timer.
The 5‑Minute Rest That Changes Everything
After folding in the whipped topping, let the mixture sit for five minutes before chilling. This brief pause allows the air bubbles to stabilize, preventing the fluff from collapsing when you slice it. A friend tried skipping this step once — let’s just say the dessert fell apart like a soggy pancake.
Berries as a Temperature Buffer
If you’re serving the fluff on a hot day, chill the berries separately for 10 minutes. Cold berries keep the overall temperature down, ensuring the fluff stays firm longer. This small detail can be the difference between a dessert that holds its shape and one that melts into a puddle.
The Secret of the Warm Knife
A warm knife slices through the fluff like a hot knife through butter, giving you clean, elegant portions. Dip the blade in hot water, wipe it dry, and glide. This simple hack makes the presentation look professional, impressing even the toughest critics.
Creative Twists and Variations
This recipe is a playground. Here are some of my favorite ways to switch things up:
Cocoa Dream
Add 2 tablespoons of unsweetened cocoa powder to the cream cheese mixture before folding in the whipped topping. The result is a chocolate‑kissed fluff that pairs beautifully with raspberries.
Citrus Burst
Stir in the zest of one lemon or orange along with the vanilla. The citrus zest brightens the flavor and works wonderfully with a drizzle of honey and a sprinkling of toasted pistachios.
Nutty Crunch
Fold in a quarter cup of toasted almond slivers or chopped walnuts just before chilling. The nuts add a satisfying crunch that contrasts with the silky fluff.
Tropical Escape
Swap the fresh berries for diced mango and toasted coconut flakes. The tropical twist turns the dessert into a vacation for your palate.
Spiced Delight
Add a pinch of ground cinnamon and a dash of nutmeg to the mixture for a warm, comforting flavor that’s perfect for cooler evenings.
Storing and Bringing It Back to Life
Fridge Storage
Cover the dish tightly with plastic wrap and store it in the refrigerator for up to 48 hours. The fluff will stay smooth and firm, though the berries may release some juice—simply stir gently before serving.
Freezer Friendly
Portion the fluff into individual freezer‑safe containers and freeze for up to 2 weeks. When ready to enjoy, transfer to the fridge to thaw overnight, then give it a quick stir and add fresh berries.
Best Reheating Method
If the fluff has become a bit dense after refrigeration, add a tiny splash of water (about a tablespoon) and give it a gentle whisk. This steams the mixture back to its airy glory without compromising flavor.