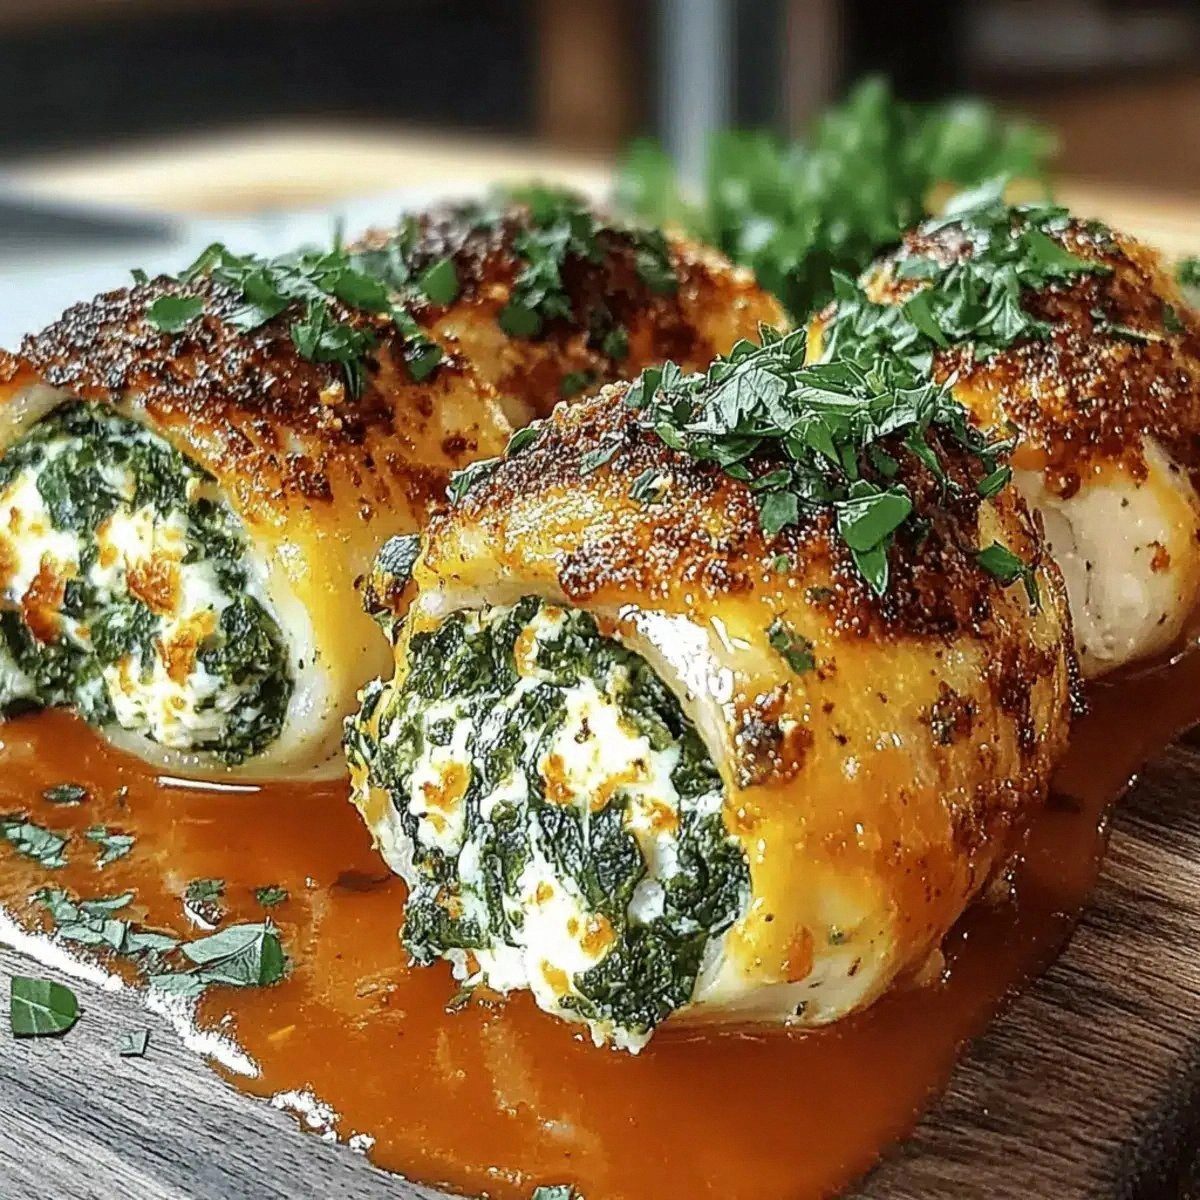
I was standing in my kitchen on a rainy Thursday, staring at a half‑cooked chicken breast that had decided to turn into a rubbery slab. The smell of burnt oil mixed with the faint perfume of basil from the garden, and I thought, “If I can’t even get this right, maybe I should just order pizza.” Then my roommate shouted, “Dare you make something that actually looks like a restaurant dish?” I laughed, grabbed a sheet of parchment, and whispered to the empty room, “I dare you to taste this and not go back for seconds.” That moment sparked a culinary rebellion that ended with a plate of golden‑brown chicken rolls that practically melt in your mouth.
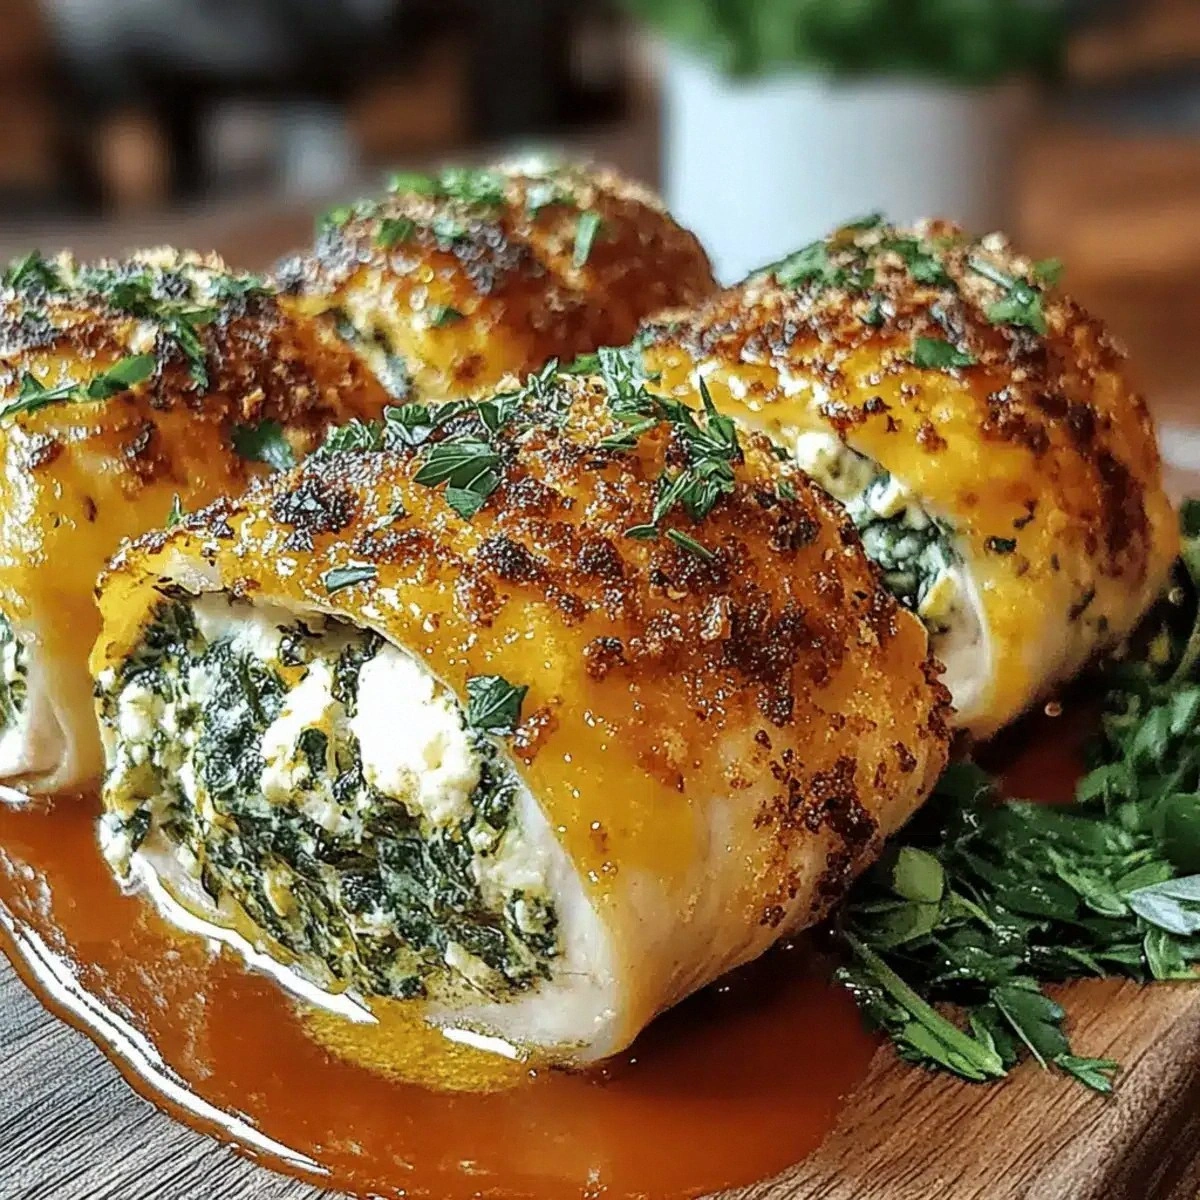
Picture this: the kitchen humming with the sizzle of olive oil hitting a hot pan, the soft rustle of fresh spinach as it wilts, and the sweet, earthy aroma of thyme weaving through the air like a secret perfume. The chicken, once flat and lifeless, now puffs up into a perfect roll, its edges crisping to a caramelized finish that shatters like thin ice when you cut into it. Inside, a cloud of ricotta, Parmesan, and herbs swirls together, creamy as a cloud and bright as a summer garden. You’ll hear the faint pop of a toothpick being driven in, a tiny sound that says “this is about to get serious.”
Most recipes for stuffed chicken either drown the meat in sauce or leave the filling bland and dry. This version, however, balances the richness of the cheese with the peppery bite of fresh herbs, while the marinara glaze adds just enough acidity to keep every bite lively. The secret? A quick brine that locks in moisture, and a brief sear that creates a flavor‑locked crust before the oven finishes the job. I’ll be honest — I ate half the batch before anyone else got to try it, and the leftovers still taste like they were made fresh.
Okay, ready for the game‑changer? I’m about to walk you through every single step — from the moment you open the fridge to the triumphant moment you pull those rolls out of the oven, the whole kitchen smelling like a Tuscan trattoria. By the end, you’ll wonder how you ever made chicken rolls any other way. Let’s dive in.
What Makes This Version Stand Out
- Taste: The marriage of ricotta’s silkiness with Parmesan’s sharp bite creates a flavor crescendo that sings with every bite.
- Texture: A crisp outer seal gives way to a buttery, herb‑infused interior that feels like a cloud wrapped in a crunchy blanket.
- Simplicity: Fewer than fifteen ingredients, three quick prep steps, and you’ve got a restaurant‑worthy dish.
- Uniqueness: Fresh herbs are folded directly into the cheese, not just sprinkled on top, guaranteeing every forkful is herb‑laden.
- Crowd Reaction: Guests often claim it’s “the best chicken they’ve ever had” and immediately ask for the recipe.
- Ingredient Quality: Using fresh spinach and premium Parmesan elevates the dish from everyday to unforgettable.
- Cooking Method: A quick pan‑sear locks in juices, while the oven finishes the cooking gently, preventing dry meat.
- Make‑Ahead Potential: Assemble the rolls a day ahead, refrigerate, and bake when you’re ready – perfect for busy weeknights.
Inside the Ingredient List
The Flavor Base
Ricotta cheese is the unsung hero here. Its mild, milky sweetness acts as a perfect canvas for the bold herbs, allowing basil, parsley, and thyme to shine without being overpowered. If you swap ricotta for cottage cheese, you’ll lose that buttery melt‑in‑your‑mouth quality, and the texture becomes grainy. For the best result, choose a full‑fat ricotta that’s creamy and rich – the kind you’d normally spread on toast.
The Texture Crew
Parmesan adds a salty, nutty crunch that contrasts beautifully with the soft ricotta. Fresh spinach brings a subtle earthiness and a pop of vibrant green that makes the filling look as good as it tastes. If you’re out of spinach, kale works in a pinch, but you’ll need to massage it first to soften the tough leaves. The chicken breasts themselves are the structural backbone; pounding them thin ensures they roll without tearing and cook evenly.
The Unexpected Star
Crushed red pepper flakes are the tiny fireworks that bring a gentle heat to the dish. A pinch can turn a mellow roll into a bold, tongue‑tingling experience. If you’re sensitive to spice, you can omit them, but you’ll miss that subtle kick that makes the marinara sing. Olive oil isn’t just for cooking; it also adds a silky mouthfeel to the pan‑sear, helping the chicken develop that coveted golden crust.
The Final Flourish
Garlic powder, salt, and pepper are the classic trio that seasons the chicken from the inside out. A light dusting of salt before searing helps create a flavorful crust, while pepper adds depth. If you’re feeling adventurous, a splash of white wine in the pan after searing will deglaze and infuse the chicken with a bright acidity that balances the cheese richness.
Everything's prepped? Good. Let's get into the real action…
The Method — Step by Step
Start by placing each chicken breast between two sheets of plastic wrap. Using a meat mallet or the flat side of a rolling pin, pound the breasts to an even ¼‑inch thickness. You’ll hear a satisfying thud, and the meat will become pliable enough to roll without tearing. Power transition: This is the foundation; a uniform thickness guarantees even cooking.
Season both sides of the flattened chicken with a pinch of salt, pepper, and the garlic powder. Let the seasoning sit for two minutes – this brief rest allows the flavors to penetrate the meat.
Kitchen Hack: Sprinkle the seasoning on a plate first, then dip the chicken; this prevents clumps and ensures an even coat.In a large bowl, combine the ricotta, grated Parmesan, fresh spinach (roughly chopped), basil, parsley, thyme, and a drizzle of olive oil. Mix until everything is evenly incorporated; the mixture should look like a vibrant green‑gold mash. If the filling feels too loose, add a tablespoon of grated Parmesan to tighten it up. Tip: Taste a tiny spoonful and adjust salt or pepper now; the cheese will mellow as it bakes.
Lay a chicken breast flat on a clean surface. Spoon about ¼ cup of the herb‑ricotta mixture onto the lower third of the breast, spreading it gently but leaving a small border around the edges. Carefully roll the breast around the filling, tucking the sides in as you go, and secure the roll with two toothpicks or a length of kitchen twine.
Watch Out: If the toothpicks are too short, the roll may unravel during searing; use at least 2‑inch wooden picks.Heat a large oven‑safe skillet over medium‑high heat and add the 2 tablespoons of olive oil. Once the oil shimmers, place the chicken rolls seam‑side down. Let them sizzle for 3‑4 minutes until the underside turns a deep golden brown, then carefully flip and sear the other side for another 3 minutes. You’ll hear a confident crackle that tells you the crust is forming perfectly.
Preheat your oven to 375°F (190°C) while the chicken finishes its second sear. Once the skillet is hot, pour the marinara sauce around the rolls, making sure each roll is partially submerged but not swimming. Sprinkle crushed red pepper flakes over the top for that subtle heat. This next part? Pure magic.
Transfer the skillet to the preheated oven and bake for 20‑25 minutes, or until the chicken reaches an internal temperature of 165°F (74°C). The sauce should bubble gently, and the cheese inside will be oozing just enough to peek through the edges.
Kitchen Hack: Place a small pan of water on the lower rack while baking; the steam keeps the chicken moist and prevents the sauce from drying out.Remove the skillet from the oven and let the rolls rest for 5 minutes before slicing. This rest period lets the juices redistribute, ensuring every bite stays succulent. When you cut into them, you’ll see a creamy, herb‑spotted center that looks like a work of art. Serve the rolls draped with extra marinara, a sprinkle of fresh basil, and a dash of crushed red pepper if you like extra zing.
That's it — you did it. But hold on, I've got a few more tricks that'll take this to another level…
Insider Tricks for Flawless Results
The Temperature Rule Nobody Follows
Never start with a cold skillet. Let the pan warm up for at least two minutes before adding oil; this ensures the oil spreads evenly and the chicken sears instantly. A hot surface creates that coveted Maillard reaction, giving you that caramelized crust that shatters like thin ice when you cut into it. I once tried searing on a lukewarm pan and ended up with soggy rolls that fell apart. Trust the heat, and the flavor will follow.
Why Your Nose Knows Best
Your sense of smell is a better indicator of doneness than a timer. When the chicken rolls are ready to flip, you’ll notice a nutty, toasted aroma rising from the pan. If the scent is faint, give them a minute longer; if it’s strong and almost sweet, they’re ready to turn. This sensory cue prevents the dreaded over‑cooked interior that can make the ricotta grainy.
The 5‑Minute Rest That Changes Everything
After the oven, let the rolls sit uncovered for exactly five minutes. This short rest lets the cheese settle and the juices redistribute, preventing a flood of liquid when you slice. I once sliced immediately and watched a river of cheese spill onto the plate – delicious but messy. Those five minutes are the difference between a tidy plate and a kitchen disaster.
Brine It, Don’t Skip It
A quick 10‑minute brine (½ tsp salt dissolved in ¼ cup water) for the chicken before pounding adds moisture that stays locked during cooking. The brine also seasons the meat from the inside, meaning you’ll need less salt in the filling. If you’re short on time, a sprinkle of kosher salt on the surface works, but the brine is the pro‑level shortcut.
The Secret Sauce Finish
After baking, drizzle a teaspoon of high‑quality extra‑virgin olive oil over the rolls and finish with a handful of fresh basil torn by hand. The oil adds a glossy sheen, while the basil introduces a bright, peppery finish that lifts the entire dish.
Creative Twists and Variations
This recipe is a playground. Here are some of my favorite ways to switch things up:
Sun‑Dried Tomato Surprise
Finely chop a handful of sun‑dried tomatoes and fold them into the ricotta mixture. The tangy, slightly sweet notes add depth and a pop of ruby color that makes the rolls look restaurant‑ready. Sun‑dried fans will adore this twist.
Spicy Chorizo Kick
Sauté crumbled chorizo and mix it into the cheese filling. The smoky heat pairs beautifully with the marinara, turning the dish into a bold, fiesta‑ready entree. Perfect for those who love a little fire.
Mushroom Medley
Sauté a mix of shiitake, cremini, and oyster mushrooms with a splash of white wine, then stir them into the ricotta. Earthy mushrooms add an umami boost that makes the rolls feel hearty and comforting.
Pesto‑Infused Delight
Swap the fresh herbs for 2 tablespoons of store‑bought or homemade basil pesto. The pesto’s oil base gives the filling a silkier texture and an intensified basil flavor, turning the dish into a green‑gold masterpiece.
Cheese‑Lover’s Dream
Add a half‑cup of shredded mozzarella to the ricotta mixture for extra stretch. When you bite, the cheese will pull like a perfect pizza slice, delighting anyone who dreams of gooey cheese.
Storing and Bringing It Back to Life
Fridge Storage
Place the cooled rolls in an airtight container and store for up to three days. Keep the marinara sauce on the side; reheat both together to preserve the sauce’s bright flavor. A quick microwave burst (30 seconds) or a gentle stovetop reheating works best.
Freezer Friendly
Wrap each roll individually in plastic wrap, then seal them in a freezer‑safe bag. They’ll last for up to two months. When ready to eat, thaw overnight in the fridge, then bake at 350°F (175°C) for 15‑20 minutes, adding a splash of water to the sauce before covering with foil to keep everything moist.
Best Reheating Method
For the crispiest finish, reheat in a preheated oven at 375°F (190°C) for 10 minutes, uncovered. Add a teaspoon of water to the marinara before covering with foil; the steam will revive the sauce and keep the chicken juicy. This method restores the original texture without turning the cheese rubbery.