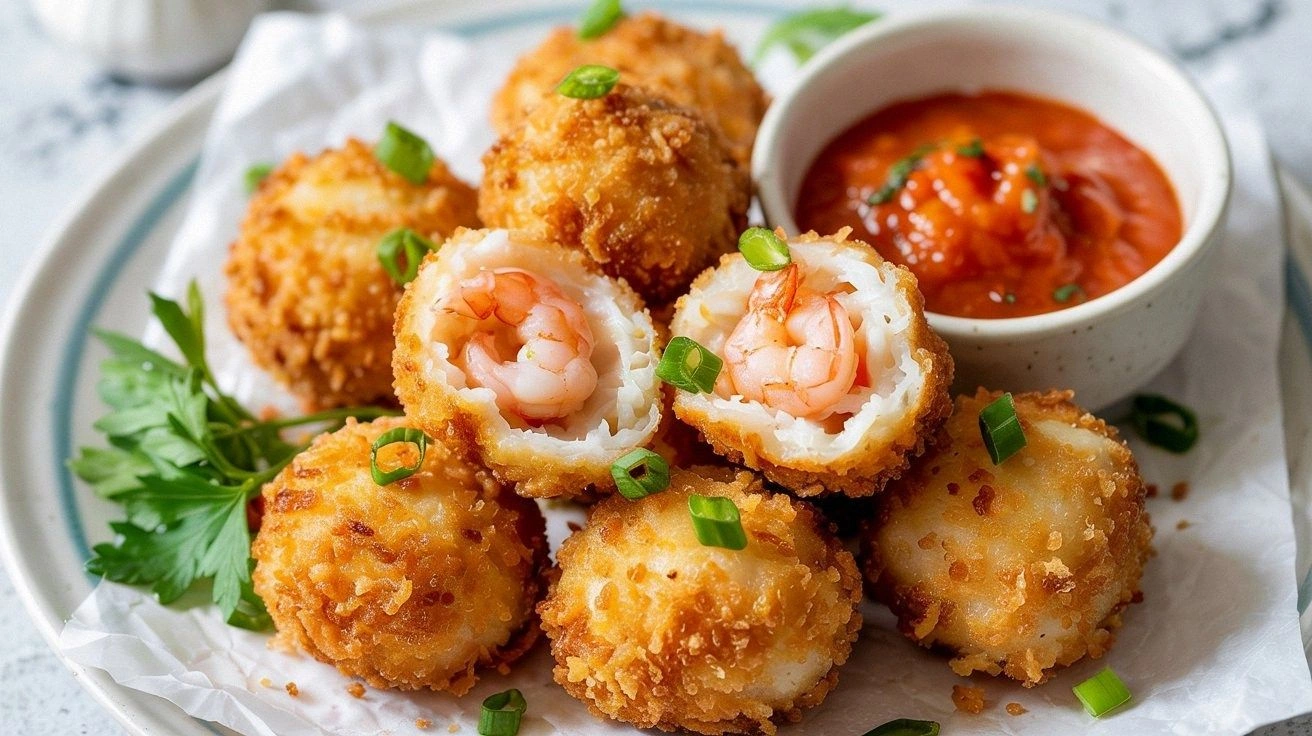
Crispy Shrimp Balls
The first time I tried to make shrimp balls, I had a kitchen disaster that still haunts me. I had tossed raw shrimp into a bowl of flour, thinking it would be a quick snack, only to watch a clump of batter stick to the bottom of the pan and burn to a black char. The smoke alarm screamed, the scent of burnt batter filled the air, and my confidence was as low as the temperature gauge on my stove. That night, I vowed to master the art of the perfect shrimp ball and share the secret with anyone who dared to try.
Fast forward to today, and I’m standing in a kitchen that smells of fresh garlic, citrus zest, and the faint promise of golden crunch. I can almost hear the sizzle when the first ball hits the hot oil, the way the surface crackles like a tiny fireworks display. The sound is accompanied by a subtle pop that signals the batter’s transformation from wet to dry, the edges sealing into a crisp shell that will hold a tender, juicy center. The texture is a marriage of lightness and crunch, a contrast that makes each bite feel like a revelation.
What sets this version apart isn’t just the combination of shrimp and panko; it’s the meticulous balance of flavors, the precise timing, and the small touches that elevate it from a simple appetizer to a crowd‑pleaser. The shrimp are marinated in lemon zest and garlic, adding brightness that cuts through the richness of the batter. The panko gives an airy, airy crunch that doesn’t overpower the shrimp’s delicate taste. The result is a bite that is both satisfying and indulgent without feeling heavy.
I’ll drop a hint now: the secret to that perfect crunch isn’t in the batter alone. A tiny splash of sparkling water in the mix creates steam that lifts the batter, creating a light, airy shell that still seals in the shrimp’s succulence. I dare you to taste these and not go back for seconds. Let me walk you through every single step — by the end, you’ll wonder how you ever made it any other way.
What Makes This Version Stand Out
- Flavor: The shrimp are infused with lemon zest and garlic, giving a bright, aromatic foundation that balances the savory batter.
- Texture: Panko breadcrumbs create an airy, golden crust that cracks delightfully with each bite, while the shrimp inside stay moist.
- Visual Appeal: The balls gleam with a buttery sheen, and the golden edges sparkle like tiny fireworks.
- Ease: The recipe requires no specialized equipment—just a skillet and a whisk.
- Versatility: Works as a party finger food, a side dish, or a protein‑rich snack on the go.
- Make‑ahead Friendly: Assemble the mixture ahead of time, refrigerate, and fry when ready—perfect for busy evenings.
- Ingredient Quality: Fresh shrimp, high‑quality panko, and fresh herbs elevate the dish beyond the ordinary.
- Audience: Even those who’ve never cooked shrimp can master this with minimal fuss.
Alright, let's break down exactly what goes into this masterpiece...
Inside the Ingredient List
The Flavor Base
The foundation of the shrimp balls starts with the shrimp themselves. Use 12 ounces of fresh, peeled, and deveined shrimp for a juicy core. Shrimp should be diced into bite‑sized pieces; if you leave them whole, the batter will be uneven and the texture will suffer. The shrimp’s natural sweetness is amplified when marinated briefly in lemon zest and minced garlic—this combination not only brightens the flavor but also infuses the shrimp with a subtle citrus note that balances the richness of the batter.
Next, whisk together 1 cup of all‑purpose flour and 1 cup of panko breadcrumbs. The flour provides structure, while the panko gives that airy crunch. The ratio of flour to breadcrumbs is critical; too much flour will make the balls dense, whereas too much panko can cause them to fall apart during frying. For a perfect balance, keep the ratio at 1:1.
The Texture Crew
Two beaten eggs act as the binder that holds everything together. The eggs also create a light, golden coating once fried. Add 1/4 cup of grated Parmesan for a subtle nutty undertone that complements the shrimp’s flavor. The Parmesan also helps the batter set faster, reducing the chance of the balls falling apart.
Fresh herbs are a game changer. 1 tablespoon of chopped parsley adds color and a fresh, slightly peppery note. A pinch of fresh black pepper and 1/4 teaspoon of red pepper flakes introduce a gentle heat that keeps the dish from feeling flat. Salt is essential—1 teaspoon will bring out the shrimp’s natural sweetness without overpowering it.
The Unexpected Star
A splash of sparkling water—about 2 tablespoons—adds steam during frying, creating a light, airy interior. The carbonation helps the batter rise and creates a subtle, crisp texture. Many people skip this step, but the difference is measurable. If you can’t find sparkling water, a small amount of club soda will work as a substitute.
The Final Flourish
The finishing touches are simple yet powerful. 2 tablespoons of oil—preferably a neutral oil with a high smoke point like vegetable or canola—will give the shrimp balls a crisp, golden crust. Keep the oil at 350°F (175°C); this temperature is hot enough to sear the exterior quickly while allowing the interior to cook through without burning. When the batter starts to puff and the edges lift, it’s time to flip the ball and let the other side crisp.
Everything's prepped? Good. Let's get into the real action...
The Method — Step by Step
- Marinate the Shrimp: Toss the diced shrimp with lemon zest, minced garlic, salt, pepper, and red pepper flakes. Let them rest for 10 minutes; this step allows the flavors to penetrate the shrimp and the citrus to brighten the overall dish. I keep the shrimp in a bowl covered with plastic wrap to prevent the garlic from drying out. After marinating, pat them dry with paper towels—excess moisture will make the batter soggy.
- Prepare the Batter: In a large bowl, whisk together the flour, panko, grated Parmesan, and parsley. In a separate bowl, beat the eggs and add sparkling water. Pour the wet mixture into the dry ingredients, stirring until just combined. The batter should be thick enough to coat the shrimp but not so thick that it clumps. If it seems too dry, add a splash of water; if it’s too wet, add more panko.
- Coat the Shrimp: Dip each marinated shrimp piece into the batter, ensuring it’s fully coated. Then roll it in the flour-panko mixture to form a double layer. Shake off any excess. For extra crunch, double‑dip by dipping again in the batter before the final coating. This step creates a thicker shell that stays intact during frying.
- Preheat the Oil: Pour 2 tablespoons of oil into a heavy skillet. Heat over medium heat until the oil shimmers but isn’t smoking. Use a thermometer to check; the ideal temperature is 350°F (175°C). This temperature is critical: too low and the balls will absorb oil and become greasy; too high and the exterior will burn before the interior cooks.
- Fry the Balls: Gently place the coated shrimp into the hot oil. Do not overcrowd the pan—frying in batches keeps the temperature stable. The first 2 minutes, the batter should puff and the edges will start to pull away from the surface. Flip when the underside is golden brown. The second side should take 1–2 minutes to crisp. The internal temperature of the shrimp should reach 145°F (63°C).
- Drain Excess Oil: Use a slotted spoon to remove the shrimp balls and place them on a paper towel-lined plate. This step removes excess oil and keeps the exterior crisp. While still hot, sprinkle a pinch of sea salt; the salt will cling to the hot surface, enhancing flavor.
- Rest Before Serving: Let the shrimp balls rest for 2 minutes on a wire rack. This allows steam to escape and prevents the interior from becoming soggy. The rest also lets the flavors meld together, giving a harmonious taste profile.
- Serve Immediately: Serve the shrimp balls hot, accompanied by a dipping sauce of your choice—perhaps a tangy aioli or a spicy mayo. The contrast between the crunchy exterior and the tender shrimp inside is best enjoyed while the balls are still warm. If you’re plating for a crowd, arrange them on a platter with fresh herbs for a pop of color.
That's it — you did it. But hold on, I've got a few more tricks that'll take this to another level...
Insider Tricks for Flawless Results
The Temperature Rule Nobody Follows
Many cooks assume that any hot oil will do. In reality, oil temperature is the single most important factor. I always keep a thermometer on hand; the ideal range is 350–360°F. If you’re frying at a lower temperature, the batter will soak up oil and the shrimp will be greasy. If it’s too hot, the exterior will burn while the interior remains raw. Keep the temperature steady by adding a few drops of batter to test; if it sizzles immediately and rises, you’re good.
Why Your Nose Knows Best
The scent of the batter as it begins to sizzle is a reliable indicator of readiness. When the batter starts to puff and you smell a nutty, toasted aroma, it means the oil is at the right heat and the exterior is forming. If you smell a sharp, acrid scent, the oil is too hot. Trust your nose; it’s a seasoned chef’s secret weapon.
The 5-Minute Rest That Changes Everything
After frying, let the shrimp balls rest on a wire rack for at least 5 minutes. This allows the steam inside to escape without cooling the exterior. A quick rest also lets the flavors settle, giving the shrimp a deeper, more cohesive taste. I’ve seen people skip this step, and the result is a soggy, uneven texture.
Double‑Dip for Extra Crunch
If you want the ultimate crunch, double‑dip the shrimp in the batter before the final coating. This creates a thicker shell that crisps beautifully. I’ve experimented with adding a small amount of cornstarch to the batter for an ultra‑crisp finish. It’s a simple tweak that makes a noticeable difference.
Use Fresh Shrimp, Not Frozen
Fresh shrimp hold up better during frying; frozen shrimp often release extra moisture, leading to soggy balls. If you must use frozen shrimp, thaw them completely, pat dry, and ensure no ice crystals remain. The drier the shrimp, the crisper the final product.
Creative Twists and Variations
This recipe is a playground. Here are some of my favorite ways to switch things up:
Spicy Cajun Shrimp Balls
Swap the parsley for Cajun seasoning and add a tablespoon of smoked paprika. The result is a smoky, spicy flavor that pairs well with a cool yogurt dip. This variation is perfect for those who like a bit of heat without overwhelming the shrimp.
Herb‑Infused Parmesan Balls
Add 1 teaspoon of dried oregano and 1 teaspoon of dried basil to the batter. The herbs give a Mediterranean twist, making the dish a great match for a light salad or a Mediterranean spread.
Coconut‑Rice Shrimp Balls
Replace the flour with coconut flour and use cooked jasmine rice instead of panko. The coconut gives a subtle sweetness, while the rice adds a chewy texture. Pair this with a sweet chili sauce for a tropical flair.
Pesto Shrimp Balls
Stir in 2 tablespoons of basil pesto into the batter for a burst of herbaceous flavor. The pesto also adds a vibrant green hue, making the dish visually striking.
Asian‑Inspired Shrimp Balls
Add 1 tablespoon of soy sauce and 1 teaspoon of sesame oil to the batter, and sprinkle toasted sesame seeds on top after frying. This gives a savory, umami profile that works wonderfully with a ginger‑lime dipping sauce.
Storing and Bringing It Back to Life
Fridge Storage
Cool the shrimp balls to room temperature, then place them in an airtight container. Store in the refrigerator for up to 3 days. When reheating, use an oven at 375°F for 8–10 minutes, or a toaster oven, to restore crispness. Avoid microwaving; the heat will make the exterior soggy.
Freezer Friendly
Freeze the shrimp balls on a parchment‑lined tray until solid, then transfer to a freezer bag. They keep well for up to 2 months. Thaw overnight in the refrigerator before reheating. For best results, reheat in an oven or air fryer to maintain crunch.
Best Reheating Method
The secret to reviving frozen or refrigerated shrimp balls is to reheat them in a preheated oven at 375°F. Place the balls on a wire rack over a baking sheet to allow air circulation. Add a tiny splash of water to the baking sheet; the steam will keep the interior moist while the exterior stays crispy.