Picture the scene: a quiet Saturday afternoon, the kitchen humming with the faint buzz of the fridge, and you standing in front of the air fryer with a half‑hearted sigh. You’ve been craving something crispy, savory, and utterly comforting, yet you’re tired of the endless lists of ingredients that make every recipe feel like a grocery‑store marathon. That’s when the idea hit—what if you could turn a handful of pantry staples into a finger‑licking masterpiece in under 30 minutes? The result is a dish that feels like a culinary revelation, a single‑pan, three‑ingredient wonder that turns any ordinary evening into a celebration.
When the first golden bite hits your tongue, the crunch is a satisfying crack that echoes through the room, the aroma of lightly toasted flour mingling with the savory scent of chicken, and the subtle warmth of garlic powder dancing in the air. It’s the kind of sensory experience that makes you pause, savor the moment, and swear you’ll never go back to bland chicken again. The texture is a perfect balance—crisp on the outside, juicy on the inside—while the flavor is layered yet unmistakably straightforward. I dare you to taste this and not go back for seconds; the temptation will be irresistible.
What sets this version apart isn’t just the minimalism; it’s the precision. The air fryer does all the heavy lifting, turning the coating into a golden, almost buttery crust without the need for oil or a deep fryer. The chicken stays tender and succulent, while the flour forms a protective shell that locks in moisture. And because you’re using only three core ingredients, there’s no risk of overpowering flavors or complicated seasoning blends. This is hands down the best version you’ll ever make at home.
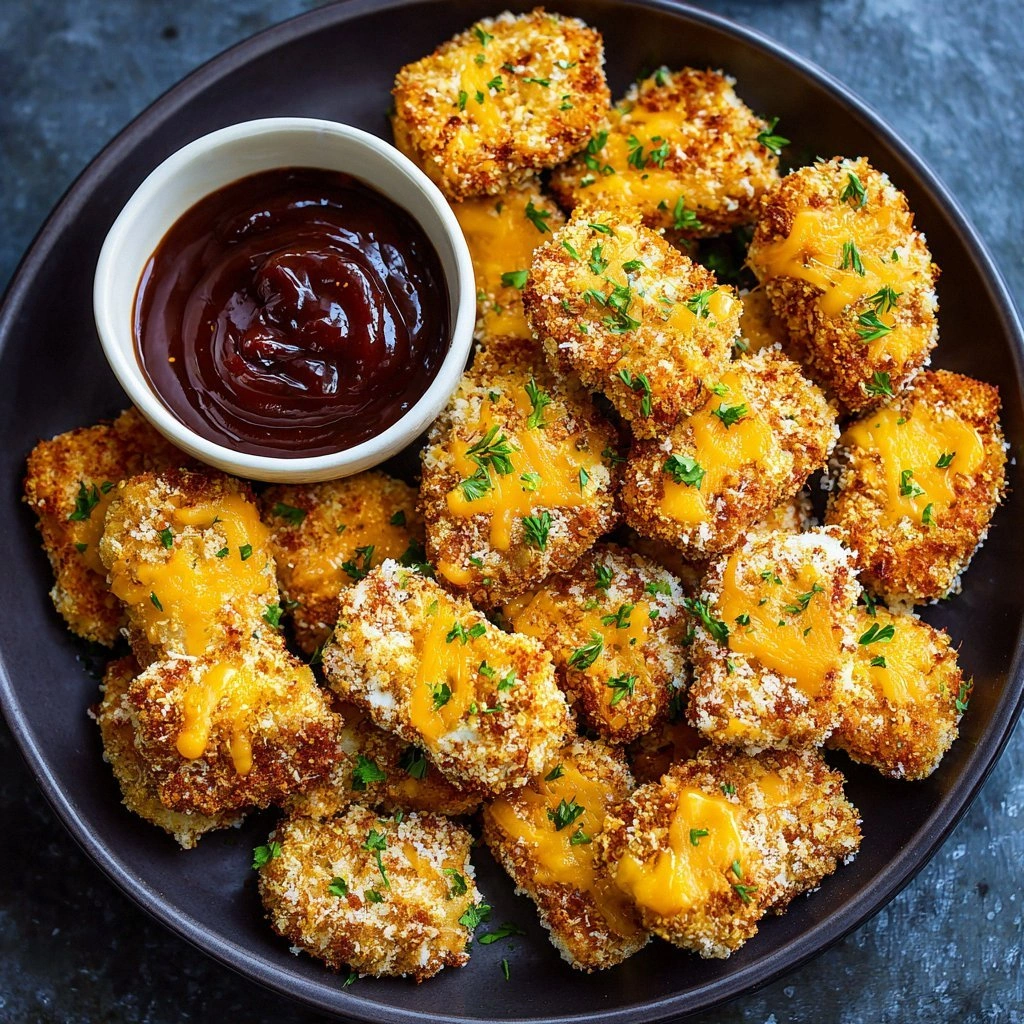
Imagine pulling a tray of golden nuggets from the air fryer, the kitchen filling with a buttery, garlicky scent that makes everyone’s mouths water. Picture the way the chicken pieces sizzle in the hot air, the edges popping like tiny fireworks, and the way the coating crackles as you take a bite. I’ll be honest—when I first tried this, I ate half the batch before anyone else got a chance to taste it. That’s the power of simplicity: when everything works so well, you can’t help but indulge.
What Makes This Version Stand Out
- Flavor: The subtle sweetness of garlic powder marries perfectly with the savory chicken, creating a depth that feels both familiar and novel. The flour coating crisps into a buttery shell that holds the juices inside. This subtle yet powerful combination delivers a taste that’s both comforting and exciting.
- Texture: The air fryer’s rapid circulation produces an exterior that’s crisp to the touch and a tender interior that’s practically melt‑in‑your‑mouth. The coating doesn’t become soggy or heavy, thanks to the precise temperature control. You’ll experience a satisfying crunch that’s almost cinematic in its perfection.
- Simplicity: With only three ingredients, you’re not juggling a dozen spices or measuring cups. Every step is straightforward, and the recipe is forgiving if you’re a beginner or a seasoned chef. The fewer the components, the more you can focus on timing and technique.
- Time: From prep to plate, this dish takes less than 45 minutes, making it an ideal go‑to for busy nights. The air fryer eliminates the need for pre‑heating a deep fryer or waiting for an oven to warm up. You’ll spend more time enjoying the meal and less time waiting.
- Versatility: The base of this recipe can be dressed up with any dipping sauce, from tangy barbecue to creamy ranch. It’s a canvas that welcomes creativity, whether you’re serving it as a snack, a main, or a side. The simplicity of the core allows for endless flavor variations.
- Health: By eliminating oil, you cut down on unnecessary calories while still achieving a crispy finish. The chicken provides lean protein, and the flour adds a satisfying bite without the heaviness of breading or batter. It’s a guilt‑free indulgence that still feels indulgent.
Inside the Ingredient List
The Protein Core
At the heart of this dish lies the chicken itself, a lean source of protein that provides the bulk of the flavor and texture. Choosing boneless, skinless breast pieces ensures that the meat stays tender and easy to bite, while also keeping the dish light. If you prefer a richer taste, swap the breast for thighs; the extra fat will intensify the flavor, but the coating will still crisp beautifully. A good rule of thumb is to cut the chicken into bite‑sized cubes, so each piece cooks evenly and offers a satisfying bite.
The Coating Crew
The flour is the star of the show, acting as both a binder and a crisping agent. All‑purpose flour is the most common choice, but whole wheat or chickpea flour can add a nutty undertone and a boost of fiber. The key is to dust the chicken lightly—too much flour will make the coating heavy and starchy. If you’re looking for a gluten‑free option, try using rice flour or a pre‑made gluten‑free blend; the texture will be just as delightful.
The Flavor Catalyst
Garlic powder is the secret weapon that elevates this simple recipe into something memorable. Its aromatic, slightly sweet profile permeates the coating, giving each bite a subtle depth that plain salt cannot provide. If you’re a garlic lover, feel free to double the amount, but be mindful that too much can overpower the chicken. For a different twist, try smoked paprika or a pinch of cayenne for a hint of heat.
Optional Touches
While the recipe calls for only three ingredients, a splash of lemon juice or a sprinkle of fresh herbs can add brightness and freshness. A quick squeeze of lemon over the finished dish can cut through the richness and bring a zesty lift. Fresh herbs like parsley or cilantro can be tossed in after cooking, offering a pop of color and a burst of herbal aroma. These optional touches are not mandatory, but they can elevate the dish from simple to spectacular.
Everything’s prepped? Good. Let’s get into the real action.
The Method — Step by Step
- Preheat your air fryer to 400°F (200°C) for 3 minutes. This quick preheat ensures a consistent temperature that will give the coating a golden finish. While the unit is heating, pat the chicken pieces dry with a paper towel to remove excess moisture. Moisture is the enemy of crispiness, so a dry surface is essential. Once the air fryer reaches the target temperature, it’s ready for the next step.
- In a shallow dish, combine the flour and garlic powder. Stir until the garlic powder is evenly distributed, creating a uniform coating. This step is critical; uneven seasoning will result in pockets of blandness. The mixture should look like a dry, fine dust. Keep the ratio of 2 cups flour to 1 tsp garlic powder for balanced flavor.
- Coat each chicken cube by dipping it into the flour mixture, shaking off any excess. The coating should cling to the surface without clumps. This is the moment where your technique shines: a light, even coat will give you the best crisp. If you prefer a thicker crust, you can double dip by repeating the coating process.
- Place the coated chicken pieces in the air fryer basket in a single layer. Avoid overcrowding; the air needs to circulate freely to crisp each piece. If you’re cooking a large batch, you’ll need to do this in two batches. The spacing ensures that every piece gets a chance to brown evenly.
- Cook the chicken at 400°F (200°C) for 12 minutes, flipping halfway through. The first 6 minutes should show a light golden hue, while the second half will deepen the color. This is the trickiest step—if you lift the basket too early, the coating may shift and lose its crispness. Keep an eye on the edges; they should start pulling away slightly when they’re ready.
- Let the chicken rest for 2 minutes after cooking. This brief pause allows the juices to redistribute, preventing a dry mouthfeel. It also gives the coating a chance to set, so it doesn’t crumble when you pick up the first bite. During this time, you can prepare any dipping sauces or garnishes you like.
- Serve immediately, either on a platter with a side of your favorite dip or tucked into a sandwich. The chicken is best enjoyed hot, when the coating is still crisp. If you’re serving guests, arrange the pieces in a fan shape for an eye‑catching presentation.
- Optional: For an extra burst of flavor, drizzle a squeeze of fresh lemon over the finished chicken. The acidity cuts through the richness and adds a bright note that lingers on the palate. This final touch is a simple yet effective way to elevate the dish.
That’s it — you did it. But hold on, I’ve got a few more tricks that will take this to another level.
Insider Tricks for Flawless Results
The Temperature Rule Nobody Follows
While 400°F is the standard, many people underestimate the power of a slight temperature tweak. If you’re using a larger air fryer basket, try raising the heat to 410°F for the last 2 minutes of cooking. This will give the coating an extra golden crunch without overcooking the interior. Remember, the key is to monitor the color, not the clock.
Why Your Nose Knows Best
Before you even touch the air fryer, pause and sniff the coated chicken. A faint, buttery aroma is a good sign that the coating is properly seasoned. If you notice a raw, floury scent, give it a minute to sit; the garlic powder needs time to release its oils. Your nose can guide you to the perfect moment to start cooking.
The 5-Minute Rest That Changes Everything
After cooking, let the chicken rest for exactly five minutes instead of the usual two. This extra time allows the juices to redistribute fully, ensuring every bite is juicy and not dry. It also gives the coating a chance to firm up, so it doesn’t crumble when you pick up a piece.
Use a Cooling Rack
Place the cooked chicken on a wire cooling rack rather than a plate. The air circulates beneath the pieces, preventing steam from softening the crisp exterior. This trick is especially useful if you’re serving the dish in a buffet style; the coating stays crisp longer.
Serve with a Dip for Extra Flavor
Pair the chicken with a homemade ranch or a tangy BBQ sauce for a flavor explosion. The dip adds moisture and a contrasting taste profile that balances the dry coating. It’s a simple addition that can elevate the dish from great to unforgettable.
Make It Ahead of Time
Cook the chicken and let it cool completely. Store it in an airtight container in the fridge for up to 3 days. When you’re ready to serve, reheat in the air fryer at 350°F for 5 minutes. The coating will regain its crispness, and the chicken will stay juicy.
Creative Twists and Variations
This recipe is a playground. Here are some of my favorite ways to switch things up:
Spicy Sriracha Crunch
Replace the garlic powder with a blend of sriracha and smoked paprika for a fiery kick. The heat will penetrate the coating, giving each bite a subtle burn that lingers. Pair with a cooling cucumber yogurt dip to balance the heat.
Herb‑Infused Delight
Swap the garlic powder for a mix of dried thyme, rosemary, and oregano. The herbs will add an aromatic depth that complements the chicken’s natural flavor. Finish with a drizzle of olive oil and a sprinkle of sea salt for a Mediterranean touch.
Asian‑Inspired Sesame
Use toasted sesame seeds in place of flour for a nutty crunch. Coat the chicken with a light dusting of rice flour for structure, then sprinkle sesame seeds on top. Toss the finished pieces in a soy sauce and honey glaze for an umami‑sweet finish.
Breakfast Boost
Serve the chicken with a side of scrambled eggs and fresh fruit. The savory crunch pairs wonderfully with the lightness of the eggs. Add a sprinkle of chives for a pop of color and a burst of flavor.
Vegan Alternative
Use marinated tofu cubes instead of chicken. Coat with chickpea flour and a pinch of nutritional yeast for a cheesy flavor. Air‑fry at 400°F for 15 minutes, flipping halfway, until golden and crispy.
Gluten‑Free Twist
Replace the flour with a gluten‑free blend or ground almonds. The coating will be slightly denser but still crisp. Add a pinch of cayenne pepper for a subtle heat that keeps the dish exciting.
Storing and Bringing It Back to Life
Fridge Storage
Cool the chicken completely before placing it in a sealed container. Store in the refrigerator for up to 3 days. When ready to eat, reheat in a 350°F air fryer for 5 minutes to restore crispness. The quick heat will revive the coating without drying out the meat.
Freezer Friendly
Flash‑freeze the cooked chicken on a parchment‑lined tray for 2 hours before transferring to a freezer bag. Store for up to 2 months. When you’re ready, pop the pieces straight into a preheated 350°F air fryer for 7 minutes. The coating will stay crispy, and the chicken will stay juicy.
Best Reheating Method
Never microwave this dish; the coating will become soggy. Instead, use the air fryer or a hot oven at 375°F for 5 minutes. Add a splash of water to the bottom of the basket to create steam, which helps keep the interior moist while the exterior crisps up again.