I was in the middle of a frantic Monday morning, coffee spilling on my favorite shirt, the toaster refusing to cooperate, and a sudden, unstoppable craving for something that felt both nostalgic and indulgent. I tossed a couple of stale slices of brioche onto the counter, stared at the empty toaster oven, and thought, “What if I could turn this mess into the most epic breakfast ever without even turning on the stove?” The answer arrived in the form of a simple, yet daring, baked French toast that would make even the most seasoned brunch‑lovers bow down. Picture this: the buttery aroma of cinnamon swirling through the kitchen, the gentle crackle of the toaster oven as it works its magic, and a golden‑brown crust that shatters like thin ice when you bite into it.
The moment I pulled the pan out, the whole house was hit with a sweet, custardy perfume that made my cat stare at me like I was a culinary deity. I took a bite, and the texture was a revelation—soft, custard‑laden interior hugging a crisp, caramelized edge that sang with every chew. I dare you to taste this and not go back for seconds; it’s literally the kind of breakfast that makes you question every other morning routine you’ve ever known. Most recipes get this completely wrong, either soggy or too dry, but this version hits the sweet spot with a balance that feels like a hug from a grandma who also happens to be a pastry chef.
What really sets this baked French toast apart is a tiny secret ingredient: a splash of heavy cream that turns the egg‑milk mixture into a velvety custard that clings to each slice like a love‑letter. I’ll be honest—I ate half the batch before anyone else got a chance to try it, and that’s because the flavor is so bold it practically leaps off the plate. And now the fun part: you’ll learn the exact technique that ensures the edges pull away from the pan at just the right moment, a sign that the caramelization is perfect. This isn’t just a recipe; it’s a game‑changer for anyone who’s ever struggled with soggy French toast.
Okay, ready for the game‑changer? Let me walk you through every single step — by the end, you’ll wonder how you ever made it any other way. Picture yourself pulling this out of the oven, the whole kitchen smelling incredible, the steam rising like a curtain unveiling a star performance. Stay with me here — this is worth it.
What Makes This Version Stand Out
- Flavor Explosion: The combination of vanilla, cinnamon, and a whisper of nutmeg creates a layered taste that evolves with each bite, like a symphony that starts soft and crescendos into pure joy.
- Texture Contrast: The crust is crisp enough to satisfy that need for crunch, while the interior stays luxuriously creamy, a texture duel that ends in harmony.
- Simplicity Meets Sophistication: Only pantry staples are required, yet the result feels like something you’d order at a five‑star brunch spot.
- Unique Ingredient Twist: A splash of heavy cream in the custard turns ordinary French toast into a silk‑smooth masterpiece.
- Crowd‑Pleaser: Even the pickiest eaters, from kids to coffee‑addicted adults, can’t resist the sweet aroma and golden finish.
- Ingredient Quality Matters: Using thick‑cut, slightly stale brioche or challah ensures the bread soaks up the custard without falling apart.
- Toaster Oven Magic: The confined heat creates an even bake, giving you that restaurant‑grade caramelization without a full‑size oven.
- Make‑Ahead Potential: You can prep the custard night before, letting the flavors meld, and still achieve the same flawless result.
Inside the Ingredient List
The Flavor Base
The backbone of this baked French toast is the custard made from eggs, milk, and heavy cream. Eggs provide structure and richness, while the milk adds moisture, and the heavy cream turns the mixture into a silk‑smooth custard that clings to each slice like a velvet blanket. Skipping the cream will give you a thinner batter that can’t coat the bread properly, resulting in a soggy interior. If you’re dairy‑free, a blend of soy milk and coconut cream works surprisingly well, though the flavor profile shifts toward a tropical note.
The Texture Crew
Bread is the star here; I recommend thick‑cut brioche or challah because their buttery crumb absorbs the custard without disintegrating. Choose a loaf that’s a day or two old—stale bread actually performs better, acting like a sponge that soaks up the custard evenly. If you’re in a pinch, lightly toast fresh slices for a minute to dry them out before dunking. Sugar not only sweetens but also helps with caramelization; using granulated sugar ensures an even golden crust, while a pinch of salt balances the sweetness and enhances the overall flavor.
The Unexpected Star
A dash of nutmeg and a generous spoonful of cinnamon add warmth that makes this dish feel like a cozy hug on a chilly morning. These spices are the secret weapons that elevate the flavor from “just good” to “hands down the best version you’ll ever make at home.” If you love a deeper spice profile, a pinch of ground cardamom can add an exotic twist without overwhelming the classic taste.
The Final Flourish
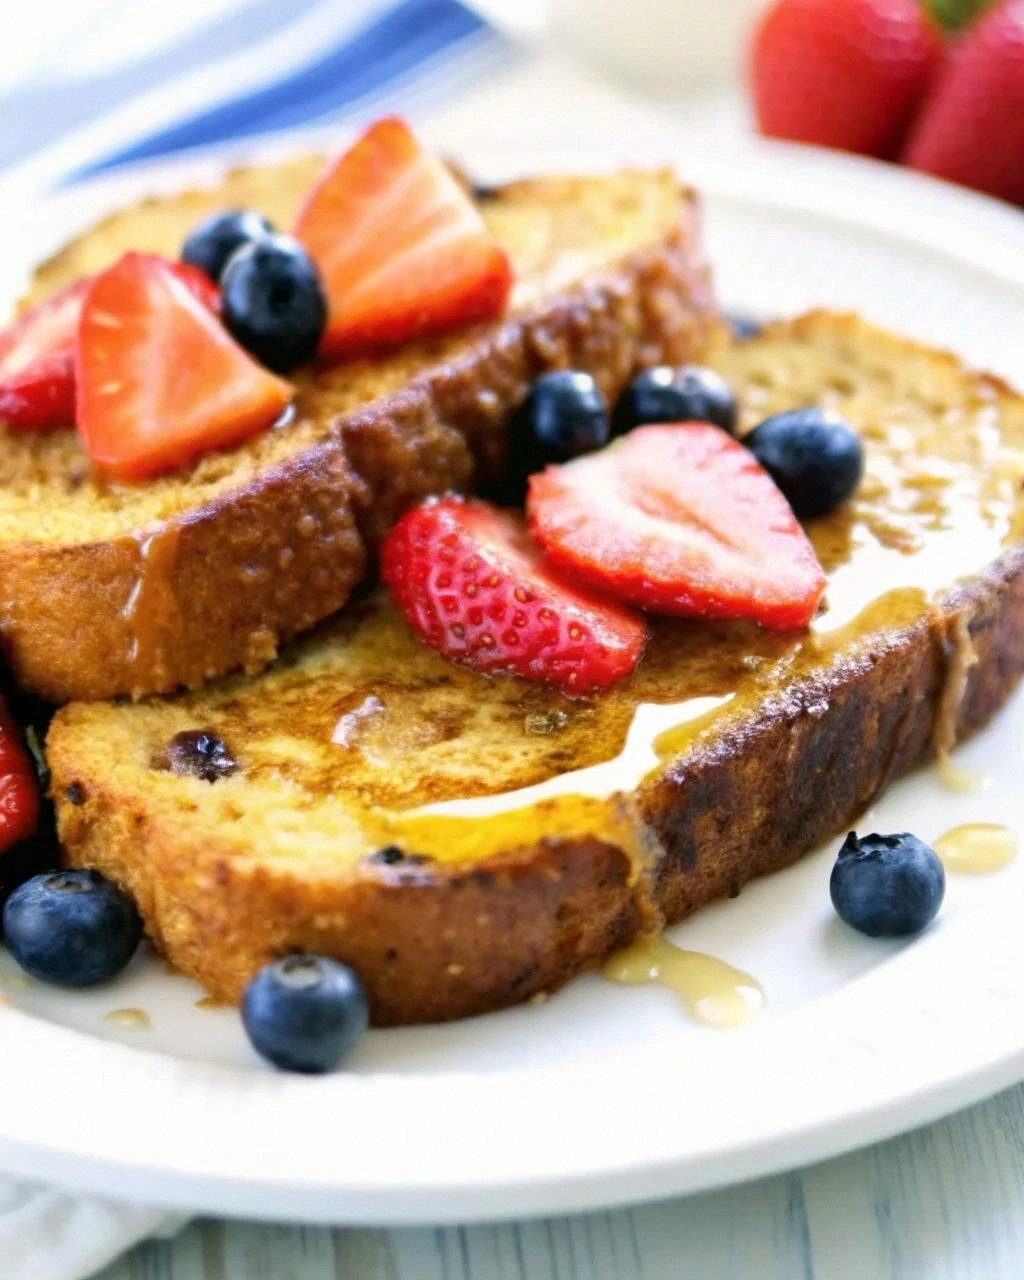
Vanilla extract is the aromatic glue that binds the sweet and spice notes together, creating a fragrant backdrop that lingers on the palate. A drizzle of melted butter before baking adds richness and helps the top turn a perfect caramel hue. Finally, a dusting of powdered sugar right after it comes out of the oven adds a delicate sparkle that makes the dish look as good as it tastes. Serve with real maple syrup for that classic sweet finish.
Everything's prepped? Good. Let’s get into the real action…
The Method — Step by Step
Preheat your toaster oven to 375°F (190°C). While it’s heating, line a medium baking dish with parchment paper; this prevents sticking and makes cleanup a breeze. I like to set the rack in the middle position so the heat circulates evenly, giving the top a beautiful golden hue while the bottom cooks through without steaming.
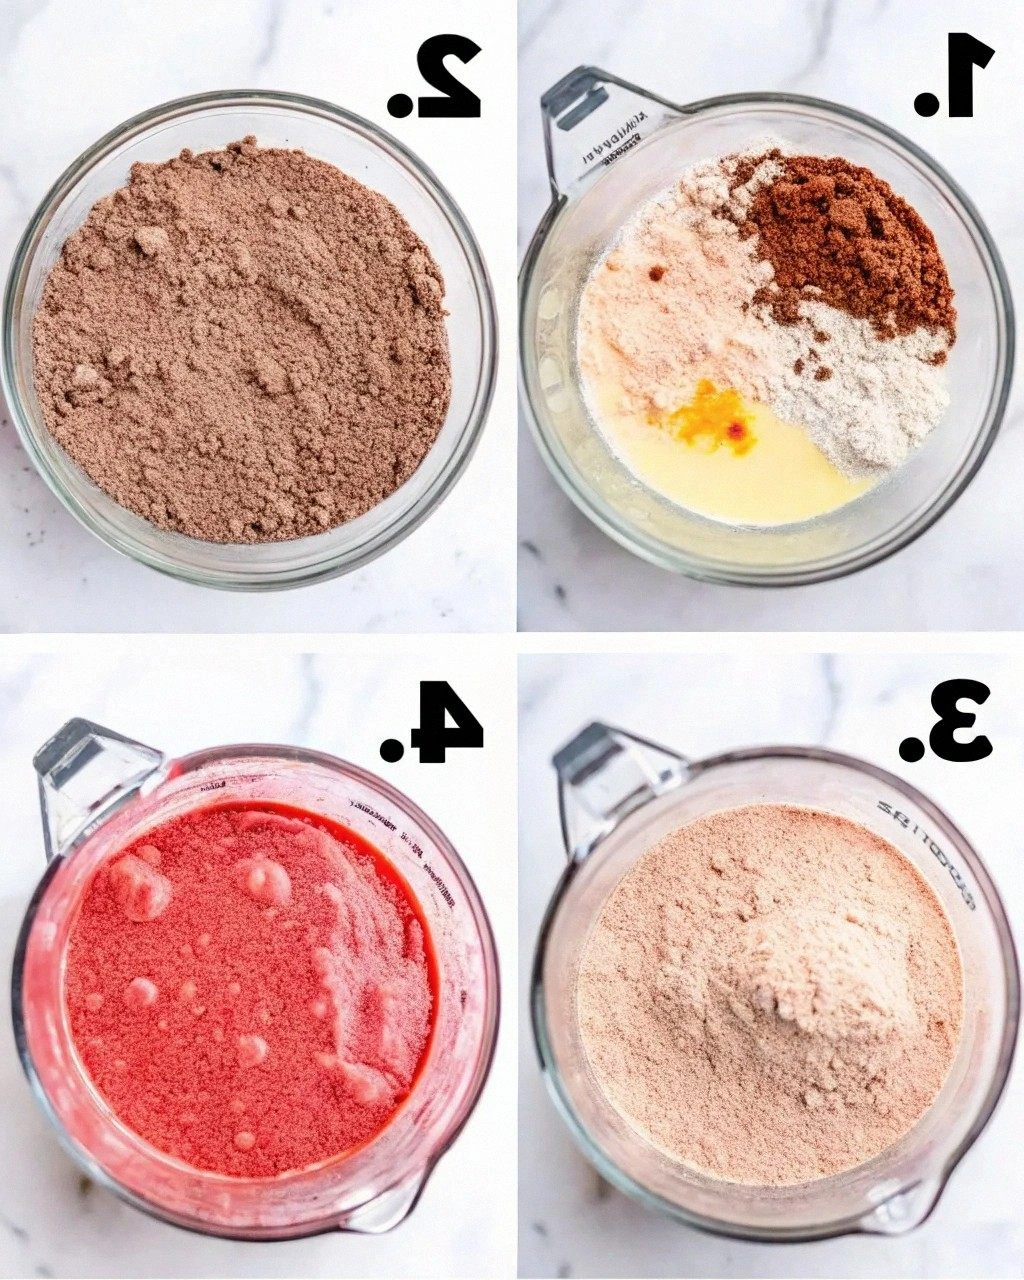
In a large mixing bowl, whisk together 4 large eggs, 1 cup whole milk, ½ cup heavy cream, 2 tbsp granulated sugar, 1 tsp vanilla extract, 1 tsp ground cinnamon, ¼ tsp nutmeg, and a pinch of salt. Whisk until the mixture is smooth and slightly frothy; you should hear a faint “whoosh” as the air incorporates, which is a good sign of a light custard.
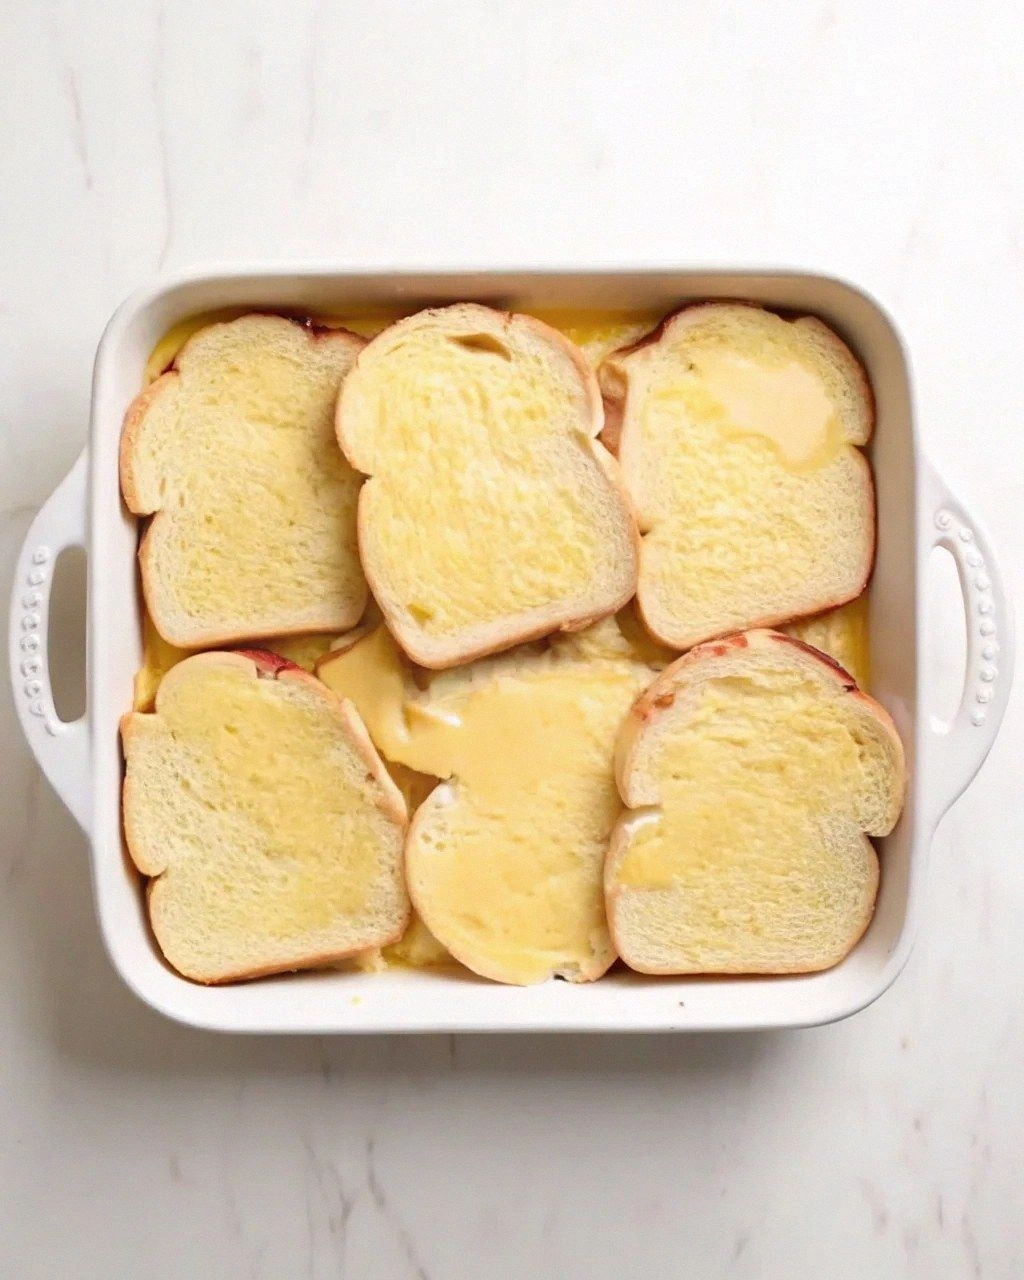
Kitchen Hack: Let the custard sit for 5 minutes after whisking; this allows the flour proteins to hydrate, resulting in a smoother coating that adheres better to the bread.Arrange the 8 thick slices of brioche in a single layer inside the prepared dish. Pour the custard over the bread, making sure each slice is fully submerged. Press gently with a spatula so the liquid seeps into every nook and cranny. The bread should look drenched but not swimming—if it looks overly wet, let it sit for a minute to absorb.
Cover the dish tightly with aluminum foil and let it rest for 10 minutes. This resting period is crucial; it gives the bread time to soak up the custard, ensuring a uniformly moist interior. I dare you to skip this step and you’ll notice the difference instantly—a dry, uneven texture that ruins the whole experience.
After the rest, remove the foil and drizzle 2 tbsp melted butter evenly over the top. The butter not only adds richness but also promotes a caramelized crust that will crackle like fireworks when you cut into it. If you love extra crunch, sprinkle a light layer of granulated sugar on top before sliding the dish into the oven.
Place the dish in the preheated toaster oven and bake for 20‑25 minutes, or until the edges start pulling away from the parchment and the top is a deep amber. Around the 15‑minute mark, peek through the oven window; you should see the surface bubbling gently, a sign that the custard is setting perfectly.
Watch Out: If your toaster oven has a broiler function, avoid using it here; the intense top heat can burn the sugar before the interior is fully set, leading to a bitter aftertaste.When the timer dings, switch the oven to the “broil” setting for a final 2‑3 minutes if you crave an extra‑crisp top. Keep a close eye—once the edges turn a dark amber, they’re done. The moment you see the crust start to crack, you know the caramelization is at its peak, and the interior will be custard‑soft.
Remove the dish from the oven and let it rest for 5 minutes. This short pause allows the juices to redistribute, preventing a soggy bottom. While it rests, dust the surface with a generous handful of powdered sugar; the snow‑like topping adds a visual contrast that makes the dish look as elegant as it tastes.
Slice the baked French toast into squares or wedges, drizzle with real maple syrup, and serve immediately. The syrup should mingle with the buttery crust, creating a glossy glaze that glistens under the morning light. If you’re feeding a crowd, keep the slices warm in a low oven (200°F) while you finish the batch—this keeps the texture perfect without drying out.
That’s it — you did it. But hold on, I’ve got a few more tricks that’ll take this to another level, from a quick fruit compote to a savory twist that’ll make brunchers swoon.
Insider Tricks for Flawless Results
The Temperature Rule Nobody Follows
Most home cooks set the oven to a scorching 425°F, assuming higher heat equals faster caramelization. In reality, a moderate 375°F gives the custard time to set while still allowing the top to brown evenly. I once tried the 425°F route and ended up with a burnt crust and a liquid center—a disaster that taught me the value of patience. Trust the lower temp; the result is a uniform golden hue and a custard that’s set just right.
Why Your Nose Knows Best
Your sense of smell is the secret indicator that the French toast is ready. When the kitchen fills with a sweet, buttery aroma and a hint of caramel, you’re at the perfect moment to check the edges. If the scent is faint or still milky, give it another 2‑3 minutes. This nose‑guided timing beats any timer by a mile.
The 5‑Minute Rest That Changes Everything
After baking, letting the dish rest for exactly five minutes is non‑negotiable. This pause allows the steam inside to settle, preventing the crust from becoming soggy when you cut into it. I once sliced immediately and the top collapsed like a soggy pancake—lesson learned. Set a timer; those five minutes are the bridge between good and unforgettable.
Butter‑Brush Blitz
A quick brush of melted butter on the top just before the final broil adds a glossy finish and intensifies the caramel notes. If you’re feeling extra indulgent, mix a teaspoon of brown sugar into the butter for a deeper, molasses‑like flavor. This tiny step transforms a nice dish into a show‑stopper.
The “Double‑Dip” Technique for Extra Custard
For those who love a super‑moist interior, dip each bread slice twice in the custard, letting the first coat set for a minute before the second dip. This creates a layered custard wall that holds more flavor without becoming soggy. A friend tried this once and claimed the result was “like biting into a cloud.”
Creative Twists and Variations
This recipe is a playground. Here are some of my favorite ways to switch things up:
Berry‑Burst Baked French Toast
Scatter fresh blueberries and raspberries over the top before baking. The berries release juices that mingle with the custard, creating pockets of tart sweetness that balance the buttery richness. Perfect for summer brunches or when you need a burst of antioxidants.
Chocolate‑Swirl Delight
Add 2 tbsp of cocoa powder to the custard and a handful of dark chocolate chips on top before baking. The result is a mocha‑infused French toast with melty chocolate pockets—ideal for chocolate lovers who still crave that classic breakfast feel.
Savory Herb Infusion
Swap the vanilla and sugar for ½ tsp dried thyme, ¼ tsp smoked paprika, and a pinch of grated Parmesan. Top with crisped bacon after baking. This turns the sweet treat into a hearty, savory brunch centerpiece that pairs beautifully with a crisp glass of cider.
Tropical Coconut‑Lime
Replace half the milk with coconut milk, add the zest of one lime, and drizzle with a pineapple‑coconut glaze after baking. The tropical notes transport you to a beachside sunrise, making it a fun twist for vacation vibes.
Nutty Apple Crunch
Layer thinly sliced apples and toasted walnuts on top before baking. The apples soften while the walnuts stay crunchy, delivering a textural contrast that feels like autumn in a bite. Serve with a drizzle of caramel sauce for an extra indulgent finish.
Storing and Bringing It Back to Life
Fridge Storage
Allow the baked French toast to cool completely, then transfer to an airtight container. It will keep fresh for up to 3 days. When you’re ready to eat, reheat a slice in the toaster oven at 350°F for 8‑10 minutes; the crust will revive its crispness.
Freezer Friendly
Portion the cooled slices onto a parchment‑lined tray and freeze for 2‑3 hours. Once solid, move them into a zip‑top freezer bag. They’ll last for up to 2 months. To reheat, bake straight from frozen at 375°F for 12‑15 minutes, then finish with a quick broil for that golden finish.
Best Reheating Method
For ultimate revival, place the slice on a baking sheet, sprinkle a tiny splash of water (about a teaspoon) around the edges, and cover loosely with foil. Bake at 300°F for 5‑7 minutes; the steam generated keeps the interior moist while the foil protects the crust from drying out. Remove the foil for the last minute to restore the crunch.