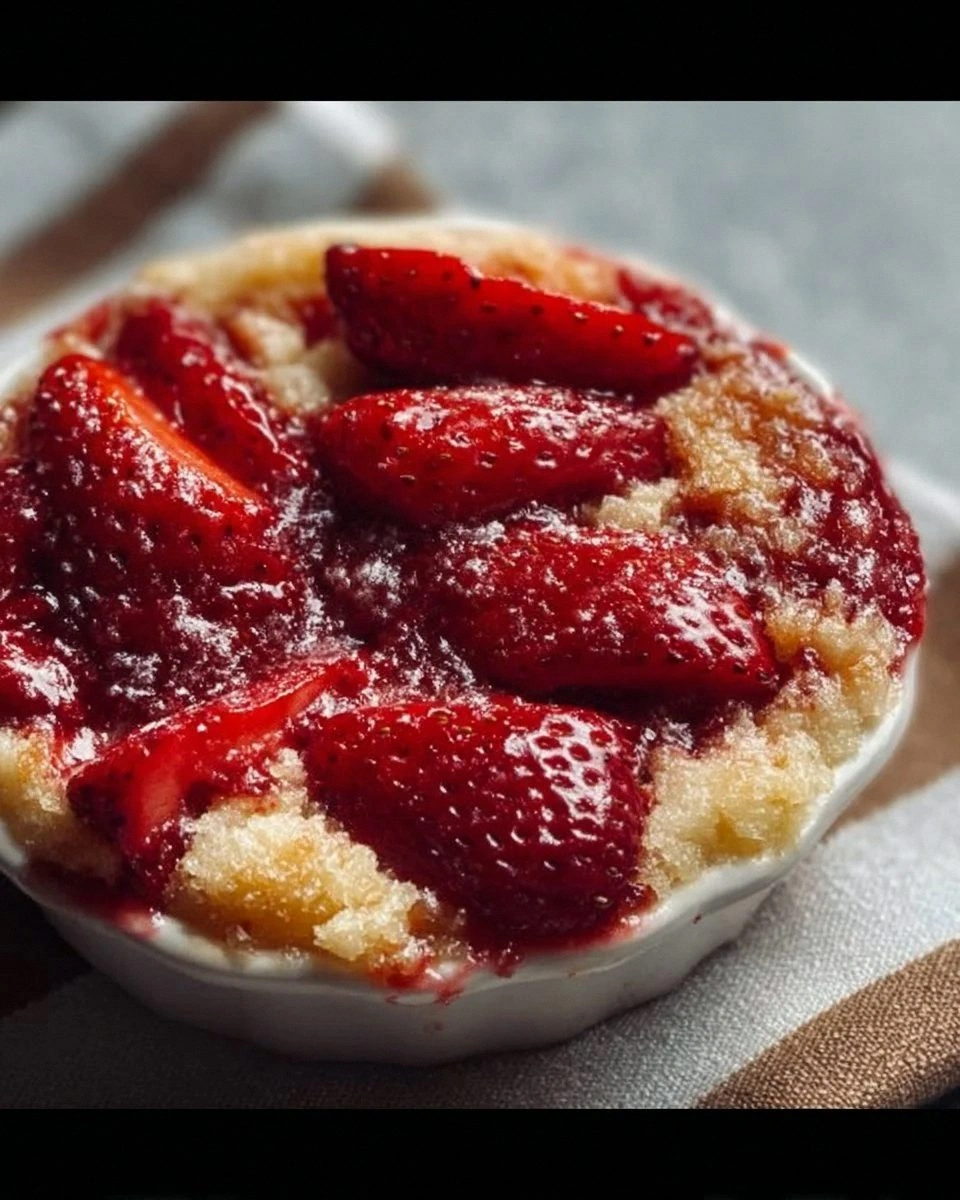
I was halfway through a frantic week of meetings, deadlines, and a fridge that looked like a barren desert when my roommate dared me to create a dessert that could stop a thunderstorm of cravings in its tracks. I laughed, grabbed the nearest box of cake mix, a tub of cream cheese, and a bag of frozen strawberries, and set the oven to a rebellious 350°F. Within minutes, the kitchen was humming with a buttery perfume that reminded me of a bakery on a Sunday morning, while the countertop was a battlefield of splattered milk and melted butter. Most dump cakes I’ve tried end up soggy, flavor‑less, and a little too much like “just another box cake.” Not this one. This version layers a silky cheesecake filling under a strawberry‑kissed crumb topping, creating a dessert that feels like a celebration in every bite.
Picture yourself pulling this out of the oven, the whole kitchen smelling like a strawberry field after a summer rain, the edges of the cake turning a caramel‑gold that shatters like thin ice when you cut into it. The interior? A creamy, tangy cheesecake core that’s as smooth as a silk scarf, surrounded by a fluffy, buttery cake that’s punctuated by juicy strawberry pockets that burst with bright, natural sweetness. I dare you to taste this and not go back for seconds; the contrast of textures is so addictive it practically whispers, “just one more slice.” Most recipes get this completely wrong, either drowning the cheesecake in a sea of batter or forgetting the crucial butter‑to‑flour ratio that gives the topping that perfect crumble. Here, we get it right, and the secret is a simple technique I’ll reveal a moment later.
I’ll be honest — I ate half the batch before anyone else got a chance to try it, and that’s a testament to how irresistibly good this is. The magic lies in the fact that you don’t need a fancy springform pan, a mixer, or a PhD in pastry science. Everything happens in one pan, and the “dump” part isn’t a lazy shortcut; it’s a strategic layering that lets the cheesecake melt into the cake base without becoming a soggy mess. The result is a dessert that feels upscale but is as easy as a Sunday morning pancake flip.
Okay, ready for the game‑changer? We’re going to use a vanilla cake mix as the structural backbone, but we’ll enrich it with melted butter and whole milk for that melt‑in‑your‑mouth crumb. Then we’ll whisk together cream cheese, sugar, vanilla, and eggs to create a cheesecake batter that spreads like a velvet curtain over the cake base. Finally, we’ll scatter fresh or thawed strawberries on top, letting their juices caramelize as the cake bakes. Let me walk you through every single step — by the end, you’ll wonder how you ever made it any other way.
What Makes This Version Stand Out
- Texture: The bottom layer is a light, buttery cake while the top is a rich, creamy cheesecake that holds its shape without wobbling.
- Flavor: Sweet vanilla meets tangy cream cheese, and bright strawberries add a fresh pop that cuts through the richness.
- Simplicity: One pan, no fancy equipment, and a total time under an hour — perfect for busy lives.
- Uniqueness: Most dump cakes are just cake; this one elevates the concept by integrating a full‑on cheesecake layer.
- Crowd Reaction: Guests often claim it’s “the best dessert they’ve ever had at a potluck,” and the look on their faces says it all.
- Ingredient Quality: Using real cream cheese and fresh strawberries makes the difference between “good” and “legendary.”
- Cooking Method: The bake‑and‑set technique ensures the cheesecake doesn’t crack, something many home bakers struggle with.
- Make‑Ahead Potential: You can assemble it the night before, refrigerate, and bake it fresh when guests arrive.
Inside the Ingredient List
The Flavor Base
The vanilla or white cake mix is the silent hero that gives structure without stealing the spotlight. It’s already pre‑flavored, which means you don’t need to add extra vanilla or spices unless you want a twist. If you skip the cake mix, you’ll lose that light, airy crumb that balances the dense cheesecake. A good tip: choose a mix with “real vanilla” on the label for a deeper flavor profile.
The Texture Crew
Cream cheese is the star of the show, providing that tangy, velvety core. Use a full‑fat, brand‑name cream cheese that’s been softened at room temperature; it blends more easily and avoids a grainy finish. The unsalted butter, melted, is folded into the cake mix to create a tender, buttery crumb that’s richer than a standard dump cake. Whole milk adds moisture and a subtle creaminess that ties the two layers together.
The Unexpected Star
Strawberries bring acidity, natural sweetness, and a pop of color that makes the dish Instagram‑ready. Fresh berries are best, but frozen (thawed and drained) work just as well and are often sweeter. If you forget to thaw them, the excess water can make the top soggy — that’s where a quick pat‑dry with paper towels saves the day.
The Final Flourish
A drizzle of melted butter over the top before baking encourages a golden crust that cracks just enough to reveal the strawberry jewels beneath. Optional toppings like whipped cream, fresh strawberry slices, or a handful of toasted nuts add a finishing touch that turns a simple dessert into a showstopper. Don’t over‑decorate; a little goes a long way.
Everything's prepped? Good. Let's get into the real action…
The Method — Step by Step
Preheat your oven to 350°F (175°C) and lightly grease a 9‑x‑13‑inch baking dish. The grease ensures the edges release cleanly, preventing that dreaded “stuck‑to‑the‑pan” drama. While the oven warms, line the pan with parchment paper for an extra safety net — you’ll thank yourself later when you flip the cake onto a serving plate.
Kitchen Hack: If you’re short on time, use a spray butter instead of greasing with a brush; it spreads evenly and adds a hint of flavor.In a large mixing bowl, combine the cake mix, melted butter, and whole milk. Stir just until the mixture is smooth and there are no dry spots. The batter should be thick but pourable; if it looks too stiff, add a splash of milk (no more than 2‑3 Tbsp). This is the foundation that will rise into a light, fluffy cake beneath the cheesecake.
Spread the cake batter evenly across the bottom of the prepared pan, using a spatula to smooth the surface. This is where the “dump” part truly begins — you’re literally dumping the cake base and letting it settle. The batter will look a bit lumpy; that’s okay because the cheesecake layer will smooth it out later.
Now, for the cheesecake layer: In a separate bowl, beat the softened cream cheese until it’s completely smooth, about 2‑3 minutes on medium speed. Add half of the granulated sugar (½ cup) and continue beating until the mixture lightens in color. Next, pour in the vanilla extract and the two eggs, one at a time, mixing well after each addition. The batter should be glossy and thick, resembling a rich frosting.
Watch Out: Over‑mixing after adding the eggs can incorporate too much air, causing the cheesecake to puff and then collapse. Stop mixing as soon as the eggs are fully incorporated.Gently spoon the cheesecake batter over the cake base, spreading it with a spatula so it covers the surface but doesn’t completely seal the edges. You’ll notice the batter sinking slightly into the cake base — that’s exactly what you want, because it creates a seamless transition between the two layers as they bake together.
Evenly distribute the diced strawberries over the cheesecake layer. If you’re using frozen strawberries, make sure they’re fully thawed and patted dry; excess moisture will turn the top soggy. The berries will release juices as they bake, creating pockets of caramelized fruit that add bursts of flavor.
Sprinkle the remaining ½ cup of granulated sugar over the strawberries. This light dusting helps the fruit caramelize, giving the top a glossy, slightly crunchy finish. If you love a deeper caramel note, you can swap half of the sugar for brown sugar.
Slide the pan into the preheated oven and bake for 30‑35 minutes, or until the edges of the cake are golden brown and a toothpick inserted into the center of the cake (avoiding the cheesecake area) comes out clean. The cheesecake should be set around the edges but still have a gentle jiggle in the middle — that’s the perfect doneness.
Kitchen Hack: Rotate the pan halfway through baking for an even golden crust, especially if your oven has hot spots.When the timer dings, turn off the oven, crack the door open a few inches, and let the cake sit for 10 minutes. This gentle cooling prevents the cheesecake from cracking and lets the flavors meld. Afterward, transfer the pan to a wire rack to cool completely, then refrigerate for at least 2 hours before serving.
That's it — you did it. But hold on, I've got a few more tricks that'll take this to another level…
Insider Tricks for Flawless Results
The Temperature Rule Nobody Follows
Never bake a cheesecake from a cold state. Let the cheesecake batter sit at room temperature for 10 minutes after mixing; this prevents the edges from cooking too fast and cracking. A subtle temperature rise also helps the batter spread evenly over the cake base. One friend tried to skip this step, and the result was a cheesecake that resembled a cracked desert floor.
Why Your Nose Knows Best
When the cake starts to smell nutty and the strawberries emit a caramel aroma, you’re at the sweet spot. Trust your senses more than the clock; ovens can vary by up to 25 °F. If the top looks a shade too dark before the timer, tent it with foil to avoid over‑browning while the interior finishes setting.
The 5‑Minute Rest That Changes Everything
After the bake, let the cake rest in the turned‑off oven with the door ajar for 5 minutes. This residual heat gently finishes the cheesecake set without shocking it, resulting in a smoother texture. Skipping this rest often leads to a slightly grainy mouthfeel, especially around the edges.
Whipped Cream vs. Heavy Cream
If you love a fluffy topping, whip heavy cream with a pinch of powdered sugar and a dash of vanilla. For a lighter, more airy garnish, fold in a spoonful of mascarpone; it adds richness without heaviness. The key is to add the topping just before serving so it stays airy and doesn’t melt into the warm cake.
The Secret of the Butter Drizzle
Melted butter poured over the top before baking creates those coveted golden edges that crackle like thin ice. Use clarified butter for an even richer flavor and a deeper color. If you’re watching calories, a light spray of butter works almost as well, but the texture won’t be quite as buttery.
Creative Twists and Variations
This recipe is a playground. Here are some of my favorite ways to switch things up:
Chocolate‑Swirl Delight
Add ¼ cup cocoa powder to the cake mix and swirl in 2 Tbsp melted dark chocolate into the cheesecake batter. The result is a mocha‑kissed version that pairs beautifully with a dollop of whipped cream.
Lemon‑Berry Burst
Replace half of the strawberries with raspberries and stir a tablespoon of lemon zest into the cheesecake batter. The citrus brightens the tang of the cream cheese and adds a zing that cuts through the richness.
Nutty Crunch
Fold ½ cup toasted chopped almonds or pistachios into the cake batter before spreading it. The nuts add a buttery crunch that contrasts with the silky cheesecake layer.
Caramel Drizzle
After the cake has cooled, drizzle a homemade caramel sauce over the top and sprinkle flaky sea salt. The sweet‑salty combo elevates the dessert to a gourmet level.
Vegan Version
Swap the cream cheese for a vegan cream cheese alternative, use coconut oil instead of butter, and choose a plant‑based cake mix. The texture changes slightly, but the flavor remains spectacular.
Storing and Bringing It Back to Life
Fridge Storage
Cover the cake tightly with plastic wrap or a reusable silicone lid and store in the refrigerator for up to 4 days. The cheesecake layer stays firm, and the strawberries retain their brightness.
Freezer Friendly
Slice the cake into individual portions, wrap each piece in parchment paper, then place them in a zip‑top freezer bag. Freeze for up to 2 months. When ready to serve, let it thaw in the fridge overnight, then warm gently in a 300°F oven for 10‑12 minutes to revive the crust.
Best Reheating Method
Before reheating, add a tiny splash (about 1 Tbsp) of water around the edges of the pan and cover loosely with foil. The steam will revive the cake’s moisture without making it soggy, and the top will regain its golden sheen.