It was a blizzard of a Thursday night, the kind where the snow outside looks like a white curtain and the oven light feels like a lone lighthouse. I was rummaging through the pantry, hunting for something that could turn the chaos into a sweet, comforting ritual, when my phone buzzed with a friend's dare: “Make the most unforgettable holiday sugar cookies and post them.” I laughed, because I had already tasted my own version of sugar cookies at a cousin’s party, but this time I was determined to rewrite the rulebook. I promised myself, and my taste buds, that this batch would be the one that lingers in memory like the scent of cinnamon on a winter morning.
Picture the kitchen: the air thick with butter’s buttery aroma, a faint hint of vanilla curling around the counter, the sound of the mixer humming like a contented cat. I could feel the dough’s silky texture under my fingertips, the gentle resistance of the flour as it swallows the sugar, the way the butter melts into a glossy sheen that reflects the kitchen light. My eyes catch the glint of sprinkles, the red food coloring just waiting to paint the dough into holiday hues. I hear the rhythmic tapping of the whisk, the clink of the measuring cups, the faint crackle of the oven preheating. All senses converge into a single, delicious promise: the cookies will be soft, sweet, and perfectly crisp around the edges, like snowflakes that melt into a caramelized kiss.
Why does this version stand out? Because it’s not just another cookie recipe; it’s a carefully orchestrated symphony of flavors and textures that defy the usual blandness of mass‑produced holiday treats. I’ve combined a classic sugar cookie base with a cream cheese glaze that adds a subtle tang, a splash of red food coloring for festive flair, and a secret sprinkle of powdered sugar that gives the dough a silky sheen. The result? Cookies that are buttery yet airy, sweet yet balanced, with a melt‑in‑your‑mouth finish that will keep people coming back for seconds. I dare you to taste this and not go back for seconds, because that’s the power of a cookie that knows how to keep you hooked.
I’ve spent countless nights experimenting with ratios, and I’ve learned that the secret lies in the harmony of the ingredients. Most recipes get this completely wrong by over‑baking or under‑mixing, resulting in flat, dry cookies that can’t compete with a simple butter‑cream frosting. This version, however, balances the leavening agents, the sweeteners, and the fats to create a cookie that is tender in the center and crisp on the edges, a texture that shatters like thin ice when you bite into it. Picture yourself pulling this out of the oven, the whole kitchen smelling incredible, and seeing those little hearts of sugar gleam like freshly fallen snow. Let me walk you through every single step — by the end, you’ll wonder how you ever made it any other way.
What Makes This Version Stand Out
- Flavor: The blend of granulated and powdered sugar creates a layered sweetness that evolves as you chew, unlike the one‑dimensional taste of ordinary sugar cookies.
- Texture: The inclusion of cream cheese in the dough gives a subtle tang that offsets the butter’s richness, producing a cookie that is soft inside and perfectly crisp outside.
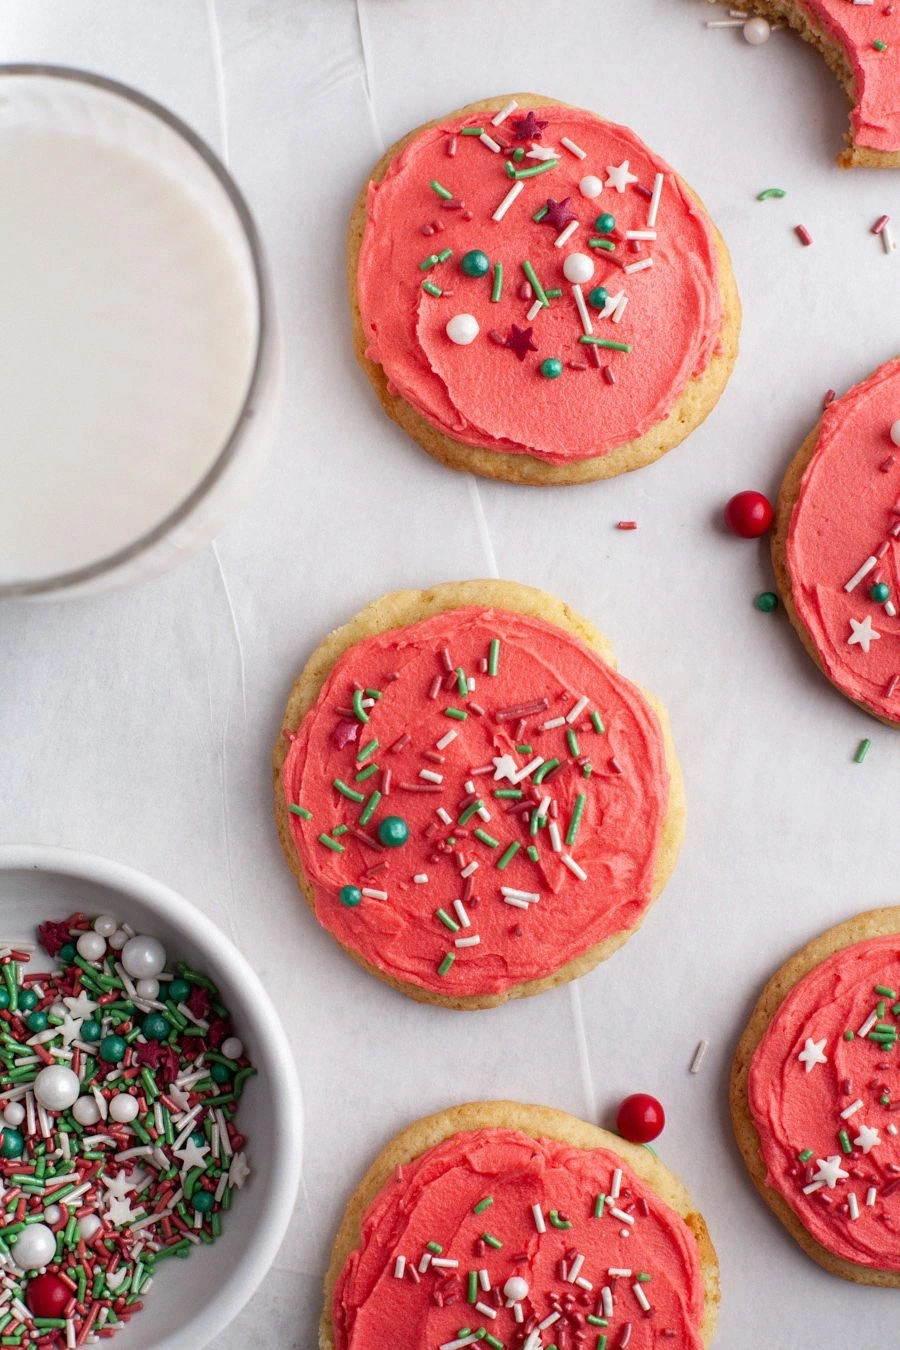
- Visual Appeal: Red food coloring turns the dough into a festive canvas, while sprinkles add a playful, eye‑catching finish that’s perfect for holiday gifting.
- Simplicity: Despite the wow factor, the recipe requires only 11 ingredients, making it a breeze to pull together even on the busiest of evenings.
- Make‑ahead Potential: The dough freezes well, and the glaze can be prepared ahead of time, so you can assemble cookies the night before the holiday rush.
- Ingredient Quality: Using high‑quality butter and fresh vanilla extract elevates the flavor profile, turning a simple cookie into a gourmet treat.
- Crowd Reaction: Friends who’ve tasted these cookies rave that they’re “the best version you’ll ever make at home” and can’t stop asking for the recipe.
- Versatility: The recipe’s structure allows for creative twists—add chocolate chips, change the glaze, or experiment with different colors—making it a playground for culinary creativity.
Alright, let's break down exactly what goes into this masterpiece…
Inside the Ingredient List
The Flavor Base
All-Purpose Flour (2 ¾ cups): The backbone of the cookie, providing structure and a subtle nutty undertone. Skipping flour would turn the dough into a sticky mess, while using whole wheat would drastically alter the flavor profile and texture. When buying flour, look for a brand with a fine, uniform texture; sift it to remove lumps and aerate it for a lighter crumb.
Granulated Sugar (¾ cup): Adds bulk sweetness and helps create the cookie’s signature crisp edges. If you prefer a slightly less sweet cookie, replace half of the granulated sugar with brown sugar for a caramel nuance. Keep the sugar at room temperature to ensure it dissolves quickly into the butter.
Powdered Sugar (¾ cup): Contributes to a smoother dough and a slightly finer crumb. If you’re aiming for a dusted finish, reserve an extra ½ cup for the final glaze. Powdered sugar also helps the dough stay moist during baking.
The Texture Crew
Butter (¾ cup + ⅓ cup): The two butter measurements serve distinct roles: the first for the dough’s richness, the second for the glaze’s silkiness. Butter should be softened to room temperature; if it’s too cold, it won’t incorporate properly, leading to uneven texture. Use unsalted butter to control sodium levels and keep the flavor pure.
Eggs (3): Bind the dough, add structure, and bring a glossy sheen. If you’re vegan, try a flax egg (1 Tbsp ground flaxseed + 3 Tbsp water) for each egg. Eggs also help the dough rise slightly, giving the cookies a lighter bite.
Vanilla (1 ½ tsp + 1 tsp): The two vanilla measures create depth: one is incorporated into the dough, the other into the glaze for a lingering aroma. Fresh vanilla beans yield a richer flavor than extract; if you’re short on time, a high‑quality vanilla extract will do.
The Unexpected Star
Cream Cheese (½ cup): Adds a subtle tang that cuts through the butter’s richness, giving the cookie a complex flavor profile. Cream cheese also improves the cookie’s chewiness, preventing it from becoming too dry. Keep it at room temperature to blend smoothly into the dough.
Red Food Coloring: A holiday essential that turns the dough into a festive canvas. Use gel food coloring for intense color without adding extra liquid. If you’re allergic or prefer a natural option, try beet juice or crushed pomegranate for a subtle hue.
The Final Flourish
Sprinkles: Add a pop of color and crunch. For a sophisticated look, use sugar crystals or edible glitter. If you’re looking for a healthier option, try dried fruit or nuts for a nutty crunch.
Whipping Cream (3 ½ Tbsp): Used in the glaze to create a silky, spreadable consistency. Substitute with milk or a dairy alternative for a lighter glaze, but expect a slightly thinner texture.
Powdered Sugar (2 ½ cups): The bulk of the glaze; it provides sweetness, structure, and a glossy finish. If you prefer a dusted look, reduce the amount slightly and fold in a pinch of sea salt to balance the sweetness.
Everything's prepped? Good. Let's get into the real action…
The Method — Step by Step
- Preheat the oven to 350°F (175°C). While the oven warms, line two baking sheets with parchment paper. The parchment prevents sticking and ensures even browning. Feel the anticipation as the kitchen fills with the scent of butter melting. This is the moment of truth where the dough’s destiny begins.
- Whisk the butter and both sugars. Use a stand mixer on medium speed until the mixture is light and fluffy, about 3 minutes. The batter should look pale and airy, like a cloud. If you’re mixing by hand, beat vigorously for at least 5 minutes to achieve the same texture. This step creates the foundation for the cookie’s crisp edges.
- Add the eggs, vanilla, and cream cheese. Beat until fully incorporated and the mixture is smooth. The cream cheese should melt into the butter, creating a silky blend. This combination brings depth and a slight tang that balances the sweetness. Watch the dough change color, becoming a creamy ivory.
- Sift the flour, baking soda, and baking powder together. Mix thoroughly to avoid clumps and ensure even distribution of leavening agents. The baking soda neutralizes the slight acidity of the cream cheese, while the baking powder provides lift. This dry mix is then folded into the wet mixture slowly, one handful at a time, until just combined.
- Stir in red food coloring. Add a few drops at a time until you reach a vibrant pink hue. The color should be intense enough to be visible but not so saturated that it appears artificial. The dough should look like a bright, festive canvas ready for decoration.
- Roll the dough into 1‑inch balls. Use a cookie scoop or spoon to portion the dough, then roll between your palms. Place them on the prepared sheets, spaced about 2 inches apart to allow for expansion. The dough should feel firm yet pliable, like a dough that’s been kneaded just enough.
- Flatten each ball slightly with a fork or the bottom of a glass. This creates a shallow shape that allows for even baking. Press gently, making sure not to crush the dough. The pattern should be simple but elegant, a subtle cross or diamond that adds a touch of class.
- Bake for 10‑12 minutes. The cookies should be set but still soft in the center. Remove them from the oven and let them cool on the sheet for 5 minutes before transferring to a wire rack. The aroma should be buttery with a hint of vanilla and a whisper of tang from the cream cheese.
- Prepare the glaze. In a small saucepan, combine the powdered sugar, whipping cream, and a splash of vanilla. Warm over low heat, whisking until smooth. The glaze should be thick enough to coat the cookie but pourable enough to drizzle. Once cooled slightly, spread or dip the cookies, allowing the glaze to set for 10 minutes before serving.
That's it — you did it. But hold on, I've got a few more tricks that'll take this to another level. These insider tips will help you avoid common pitfalls and elevate the overall experience, ensuring your cookies are not just good, but legendary.
Insider Tricks for Flawless Results
The Temperature Rule Nobody Follows
Many bakers bake sugar cookies at 375°F, but this recipe’s lower temperature of 350°F ensures even baking and prevents the edges from burning before the centers are set. If you’re using a convection oven, reduce the temperature by 25°F to avoid over‑browning. This subtle adjustment keeps the cookies tender and moist, with a golden crust that’s easy to break.
Why Your Nose Knows Best
During baking, the aroma of butter and vanilla will intensify, signaling when the cookies are ready to be taken out. Trust your nose: when the scent becomes rich and sweet, the cookies are almost done. If you’re prone to over‑baking, set a timer for 10 minutes and check the edges for a light golden color.
The 5‑Minute Rest That Changes Everything
After baking, let the cookies rest on the sheet for 5 minutes before transferring them to a rack. This short rest allows the structure to set, preventing cracks and ensuring a smooth glaze application. Skipping this step can result in fragile cookies that crumble under the glaze.
The Cream Cheese Balance
Adding cream cheese not only adds flavor but also acts as a stabilizer, preventing the dough from spreading too much. If you prefer a lighter cookie, reduce the cream cheese by ¼ cup and compensate with a pinch of baking soda. This tweak keeps the cookies airy while preserving the tangy note.
The Sweet Spot for Sprinkles
Sprinkles are best added just before glazing, ensuring they adhere to the cookie and don’t fall off. Lightly dust the cookies with sprinkles immediately after they cool, then apply the glaze to lock them in place. This technique guarantees a vibrant, festive look that doesn’t fade.
The Final Glaze Touch
For a glossy finish, whisk a tablespoon of melted butter into the glaze before it sets. The butter adds shine and a subtle buttery note that complements the cookie’s richness. If you’re vegan, use a dairy‑free butter alternative or a dash of coconut oil for the same effect.
Creative Twists and Variations
This recipe is a playground. Here are some of my favorite ways to switch things up:
Chocolate Chip Cheer
Fold in a cup of semi‑sweet chocolate chips into the dough before baking. The chips add a burst of chocolate that pairs wonderfully with the tangy glaze. Keep the chips in the dough rather than on top to prevent them from sinking.
Citrus Zest Surprise
Add the zest of one lemon or orange to the dough for a bright, citrusy lift. The zest will add a subtle aroma and a burst of freshness that contrasts the buttery sweetness. Use fresh zest for the most vibrant flavor.
Nutty Crunch
Sprinkle chopped almonds or pecans on top before glazing. The nuts add texture and a buttery, slightly sweet flavor that complements the cookie’s richness. Toast the nuts lightly for an extra crunch.
Herbal Infusion
Add a teaspoon of dried rosemary or thyme to the dough for an unexpected herbal note. The herbs provide a savory counterpoint to the sweet glaze, creating a sophisticated flavor profile. Use finely ground herbs to avoid lumps.
Caramel Swirl
Swirl caramel sauce into the dough before baking for a decadent touch. The caramel will melt into the cookie, creating pockets of gooey sweetness. Keep the caramel thick enough to hold its shape during baking.
Gluten‑Free Edition
Swap the all‑purpose flour for a 1:1 gluten‑free blend, adding an extra ¼ cup of cornstarch to maintain structure. The dough may be slightly denser, but the flavor remains unchanged. Ensure the blend contains xanthan gum for elasticity.
Storing and Bringing It Back to Life
Fridge Storage
Store finished cookies in an airtight container at room temperature for up to 5 days. The glaze will stay firm, and the cookies will retain their crisp edges. If the glaze softens, place the container in the fridge; it will firm up again when brought to room temperature.
Freezer Friendly
Freeze cookies in a single layer on parchment paper before transferring to a freezer bag. They can stay frozen for up to 3 months. When ready, thaw at room temperature for 30 minutes before reheating.
Best Reheating Method
Reheat frozen or chilled cookies in a preheated oven at 300°F (150°C) for 5 minutes. Add a tiny splash of water to the bottom of the pan to create steam, which keeps the cookies moist and the glaze shiny. Let them cool on a wire rack for 5 minutes before serving.