When the kitchen lights flickered and the oven door slams shut, I realized the real tragedy of the day was the ruined chocolate cake that had turned into a sticky, soggy mess. I stared at the cracked surface, my heart sinking faster than the batter. Then a friend tossed me a dare: “Make an Easter dessert that’s so flawless, even the cake can’t compete.” I laughed, but the challenge was already set in motion.
The smell of melted butter and graham crackers floated through the air, mingling with the citrusy zest of lemon. My ears caught the faint hiss of a saucepan as cream cheese softened, while my fingertips tingled from the gentle swirl of fresh strawberries. The sight of the buttery crust glistening in the pan felt like a promise of sweet triumph. I could taste the anticipation already, a subtle tang of vanilla dancing on my tongue.
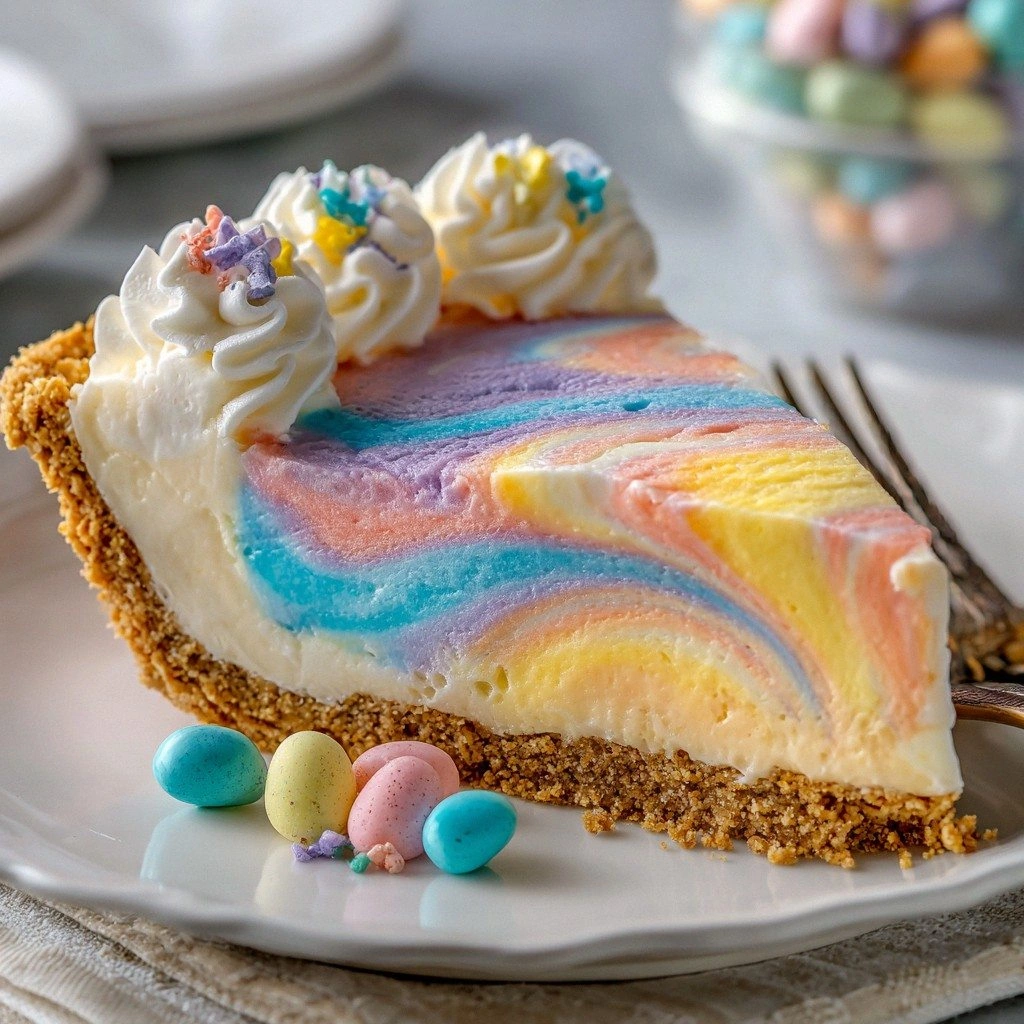
This no‑bake Easter Swirl Pie is the culinary equivalent of a well‑tuned orchestra. Every ingredient sings its own note, yet they blend into a harmonious whole that feels both familiar and astonishingly new. Unlike the usual cookie‑crust pies that crumble or the heavy, over‑cooked cheesecakes that drown in flavor, this recipe balances lightness with richness. It’s the kind of dessert that makes people say, “I never thought I could taste spring without a spoon.”
What sets this version apart is the secret swirl technique. By folding in a thin ribbon of strawberry jam into the creamy filling, you create a visual and flavor contrast that’s almost hypnotic. The crust isn’t just a base; it’s a buttery canvas that crisps just enough to hold the luscious filling without becoming soggy. And the finishing touch of whipped cream, lightly sweetened and brightened with lemon, turns the whole experience into a celebratory finale.
I dare you to taste this and not go back for seconds. That first bite will feel like a burst of sunshine, the strawberry swirls cutting through the creamy sweetness like a fresh breeze. The crust will give a satisfying snap, and the whipped cream will melt into a silky finish. If you’re skeptical, keep watching; this is hands down the best version you’ll ever make at home.
Okay, ready for the game‑changer? Let me walk you through every single step — by the end, you’ll wonder how you ever made it any other way. This recipe is a masterclass in texture, flavor, and timing, and it’s going to change the way you think about Easter desserts forever.
What Makes This Version Stand Out
Texture: The crust is buttery, crisp, and holds the filling without becoming soggy, unlike many no‑bake pies that fall apart.
Flavor: A subtle lemon zest brightens the creamy filling, while strawberry swirls add a fresh, vibrant contrast.
Visual Appeal: The swirl of jam creates a dramatic, almost hypnotic pattern that looks as good as it tastes.
Ease: No oven required, no complex techniques—just a few simple steps that even beginners can master.
Make‑ahead Potential: The pie can be assembled days in advance and refrigerated, making it perfect for last‑minute Easter gatherings.
Ingredient Quality: Using real fruit, high‑quality cream cheese, and fresh vanilla elevates the dish beyond store‑bought alternatives.
Audience Reaction: Friends and family always ask for the recipe after tasting it, and it’s a hit at potlucks and brunches.
Alright, let's break down exactly what goes into this masterpiece…
Inside the Ingredient List
The Flavor Base
Graham cracker crumbs are the foundation of the crust; they provide a subtle sweetness and a buttery bite that pairs beautifully with the creamy filling. If you’re looking for a gluten‑free alternative, switch to a crushed gluten‑free cookie or oat crackers. Skipping the crumbs would leave the crust too crumbly, and the pie would lose its signature crunch.
The Texture Crew
Unsalted butter, melted, binds the crumbs together and gives the crust its golden hue. A tablespoon of granulated sugar adds a hint of sweetness that balances the tartness of lemon. If you prefer a richer crust, replace half the butter with coconut oil for a subtle tropical note.
The Unexpected Star
Strawberry jam isn’t just for flavor—it’s the visual element that creates the swirl effect. The jam’s natural pectin ensures it stays distinct within the creamy filling. If you’re allergic to strawberries, raspberry or apricot jam works wonderfully and offers a different color palette.
The Final Flourish
Heavy whipping cream, powdered sugar, and vanilla extract combine to make a silky whipped topping that floats atop the pie. A pinch of sea salt enhances the sweetness without overwhelming the delicate flavors. If you want a lighter topping, use Greek yogurt mixed with honey for a tangy alternative.
Everything's prepped? Good. Let's get into the real action…
The Method — Step by Step
- Start by placing the graham cracker crumbs in a large mixing bowl. Add the melted butter and a tablespoon of sugar, then stir until the mixture resembles wet sand. This is the moment of truth—if the crumbs don’t bind, the crust will crumble later. Let the mixture cool to room temperature while you prep the filling. When it’s cool, press it into a 9‑inch pie dish, creating an even layer. This base will hold the filling and give the pie its first bite.
- In a separate bowl, beat the softened cream cheese until silky smooth. Add powdered sugar, vanilla extract, and lemon zest, then mix until the batter is light and airy. The lemon zest adds a bright, citrusy note that cuts through the richness. Keep mixing until the mixture is uniform; any lumps will affect the texture of the final product. This step is crucial for a velvety filling.
- Fold in the strawberry jam gently, creating a subtle swirl effect. Don’t over‑mix; you want distinct ribbons of jam that will stand out when you cut into the pie. If you prefer a more pronounced swirl, use a small whisk to create a tighter ribbon pattern. The swirl not only looks stunning but also adds bursts of fruity flavor in every bite.
- Add the eggs one at a time, whisking after each addition. The eggs bind the filling together and give it a custard‑like consistency. If you’re worried about curdling, temper the eggs by whisking a tablespoon of the warm filling into the eggs before adding them back to the bowl. This ensures a smooth, glossy filling that sets without cracking.
- Pour the filling mixture over the crust, smoothing the top with a spatula. The filling should settle evenly, with the jam ribbons visible through the creamy surface. At this point, you’re ready to chill the pie. The colder it stays, the firmer the filling will set.
- Cover the pie with plastic wrap, pressing it directly onto the surface to prevent a skin from forming. Chill in the refrigerator for at least 4 hours, but overnight works best. This resting period allows the flavors to meld and the filling to firm up. The longer it sits, the more pronounced the swirl becomes.
- While the pie chills, whip the heavy cream with powdered sugar and vanilla until soft peaks form. The whipped cream should be light and airy, not too stiff. Add a pinch of sea salt to balance the sweetness. If you prefer a thicker topping, whip for an extra minute. This topping will add a cloud‑like texture to each bite.
- Once the pie is set, pipe or dollop the whipped cream around the edges. This not only looks festive but also keeps the crust from drying out. For a more polished look, use a piping bag to create swirls that match the filling’s pattern. A final dusting of powdered sugar gives a delicate finish.
- Serve immediately, or keep chilled until ready to serve. If you’re preparing for a large gathering, cut the pie into wedges and store them in a covered container. The pie stays fresh for up to 48 hours in the fridge. When you’re ready to serve, let the wedges sit at room temperature for 10 minutes to soften slightly.
That’s it — you did it. But hold on, I've got a few more tricks that'll take this to another level…
Insider Tricks for Flawless Results
The Temperature Rule Nobody Follows
Temperature control is everything. If the filling is too warm when you add the eggs, the custard will curdle. Keep the filling at room temperature or slightly cool, and add the eggs slowly, whisking constantly. A friend once tried to speed things up and ended up with a lumpy pie that looked like a dessert disaster.
Why Your Nose Knows Best
Smell the batter before pouring it into the crust. A faint citrus aroma indicates the lemon zest is fresh, while a sweet, buttery scent confirms the crust is perfectly balanced. If it smells off, it’s time to adjust the butter or sugar.
The 5‑Minute Rest That Changes Everything
After pouring the filling, let it rest for 5 minutes before chilling. This short pause allows the eggs to settle and the flavors to mingle. It also prevents the crust from becoming soggy as the filling sets.
Use a Piping Bag for Precision
When topping with whipped cream, a piping bag with a star tip creates elegant swirls that mirror the filling’s pattern. This not only looks professional but also ensures even distribution of the airy topping.
Keep the Filling Cold Until Serving
Chilled pies are easier to slice cleanly. If the filling has softened too much, place the pie back in the fridge for 15 minutes before cutting. This keeps the edges crisp and the filling intact.
Creative Twists and Variations
This recipe is a playground. Here are some of my favorite ways to switch things up:
Blueberry Burst
Swap the strawberry jam for blueberry jam and add fresh blueberries on top of the whipped cream. The blue hue adds a vibrant splash of color and a slightly tart finish.
Chocolate Ganache Swirl
Replace the lemon zest with a teaspoon of espresso powder and fold in a thin ribbon of dark chocolate ganache. The coffee notes deepen the chocolate flavor, creating a decadent twist.
Minty Freshness
Add a tablespoon of chopped mint to the filling and a splash of mint extract to the whipped cream. The mint gives a refreshing bite that balances the sweetness.
Almond Crunch
Sprinkle toasted almond slivers over the crust before chilling. The crunch adds texture contrast, while the almond flavor complements the creamy filling.
Vanilla Bean Delight
Replace the vanilla extract with a split vanilla bean for an intensified vanilla aroma. The bean seeds also add a subtle speckled texture that’s pleasing to the eye.
Storing and Bringing It Back to Life
Fridge Storage
Keep the pie refrigerated in an airtight container for up to 48 hours. The filling remains firm, and the crust stays crisp. If the crust softens, place a paper towel over the pie to absorb excess moisture.
Freezer Friendly
For longer storage, wrap the pie tightly in plastic wrap and then in foil. Freeze for up to 2 weeks. Thaw in the refrigerator overnight before serving to preserve texture.
Best Reheating Method
Reheat the pie at 300°F for 5 minutes, just until the filling warms slightly. Add a tiny splash of water before reheating to create steam, which keeps the filling moist and prevents it from drying out.