I was in the middle of a late‑night baking marathon, the kitchen lights flickering like a neon sign, when my phone buzzed with a text from my friend: “You’ve got to try a lemon bar that isn’t a lemon bar.” I stared at the screen, feeling the heat of the oven and the faint scent of citrus from the fridge. The moment was absurdly ordinary, yet it sparked a culinary rebellion. I was about to rewrite the lemon bar narrative.
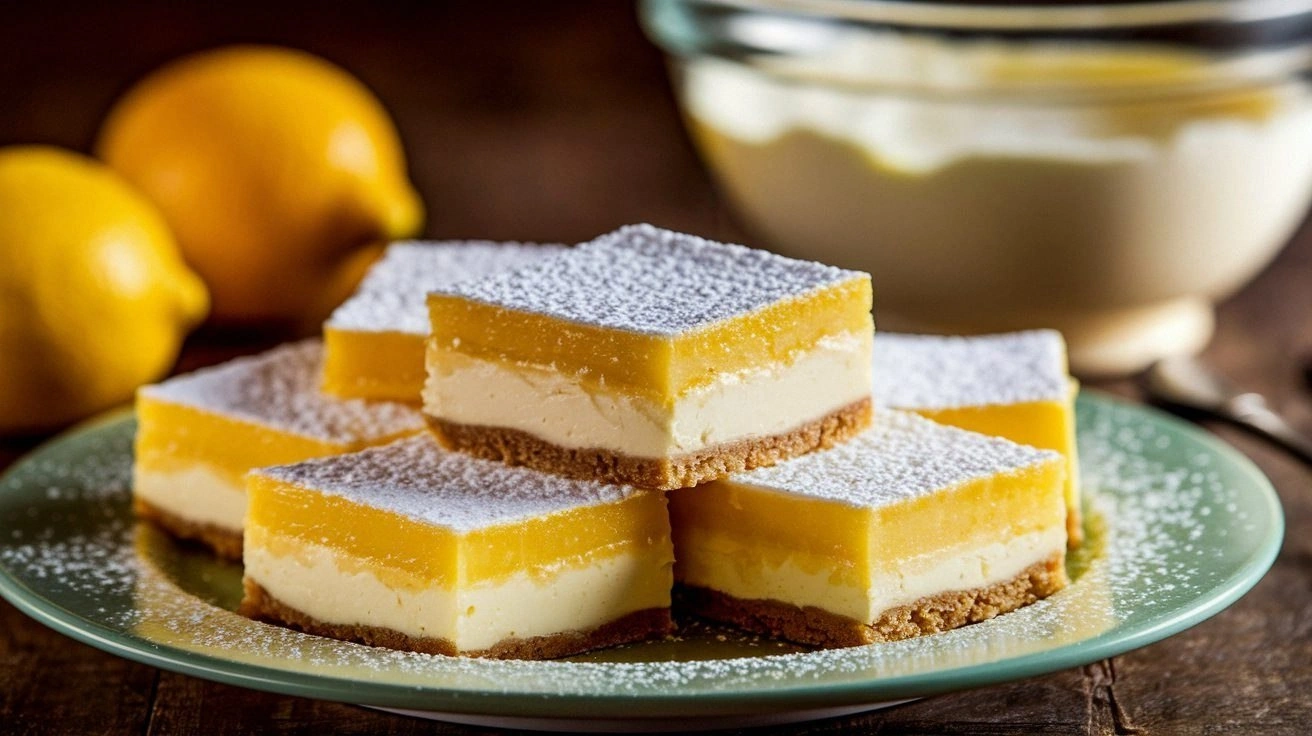
Picture this: a buttery, golden crust that crackles when you bite, followed by a silky, tart filling that tingles on your tongue like a summer breeze. The aroma of fresh lemon mingles with vanilla, creating a perfume that lingers in the air. The texture is a paradox—crunch meets melt, and the finish is dusted with powdered sugar that dissolves like snow. That single bite feels like a secret handshake between dessert and sunshine.
Why does this version feel like a revelation? Because I stripped away the fluff and kept the pure, honest flavors. I replaced ordinary butter with a cold, cube‑cut butter that keeps the crust flaky, and I added a splash of heavy cream to the filling for a velvety mouthfeel. The lemon zest is grated fresh, releasing essential oils that make each bite bright, not just tangy. And the finish? A dusting of powdered sugar that’s light enough to disappear in a single forkful.
I dare you to taste this and not go back for seconds. I promise, the first bite will set the tone, and the second will be a confirmation. Most recipes get this completely wrong, but here’s what actually works: a balanced sweetness, a crisp crust, and a filling that doesn’t drown. The result is hands down the best version you'll ever make at home. Picture yourself pulling these bars out of the oven, the whole kitchen smelling incredible, and knowing that you’ve mastered a timeless treat.
Okay, ready for the game‑changer? Let me walk you through every single step — by the end, you'll wonder how you ever made it any other way.
What Makes This Version Stand Out
- Flavor: The use of fresh lemon zest over powdered zest elevates the citrus profile, delivering a bright, aromatic experience that lingers on the palate.
- Texture: Cold, cubed butter in the crust creates a flaky, tender crumb that contrasts perfectly with the silky filling.
- Balance: A measured blend of granulated sugar and powdered sugar ensures the bars are sweet enough to satisfy without overpowering the lemon.
- Make‑Ahead: The bars can be assembled, baked, and then stored in an airtight container for up to a week, making them ideal for potlucks or last‑minute dessert plans.
- Ingredient Quality: Using a high‑fat cream cheese and fresh, organic lemons gives depth and authenticity to the flavor profile.
- Visual Appeal: A dusting of powdered sugar after baking adds a subtle sheen, turning each bar into a miniature piece of edible art.
- Ease of Execution: The recipe requires only a few ingredients and minimal prep, making it approachable for beginners and a quick win for seasoned bakers.
- Versatility: The base can be adapted with variations—coconut, chocolate, or even savory twists—making it a canvas for creative exploration.
Inside the Ingredient List
The Flavor Base
All‑purpose flour is the backbone of the crust, providing structure and a neutral canvas that lets the butter and sugar shine. Using a flour with a protein content around 10% ensures the dough stays tender. If you skip the flour, the crust will collapse into a gooey mess, ruining the whole experience. For a gluten‑free version, swap in a 1:1 blend of rice and potato starch, but keep the ratio of butter to flour the same.
The Texture Crew
Cold, cubed unsalted butter is the secret weapon for flakiness. The temperature of the butter dictates whether the crust will bake into a buttery crumble or a dense, doughy layer. If you use room‑temperature butter, the crust will lose its airy quality. A pinch of salt balances the sweetness and enhances the butter’s flavor profile.
The Unexpected Star
Cream cheese is the heart of the filling, lending richness and a slight tang that complements the lemon. Choose a full‑fat variety for a smoother mouthfeel; a low‑fat version can feel thin and watery. If you’re vegan, a tofu‑based cream cheese works, but the texture will differ slightly. The cream cheese should be softened to room temperature before mixing, ensuring a lump‑free filling.
The Final Flourish
Fresh lemon juice provides the bright, tart punch that defines these bars. The zest, grated with a microplane, releases essential oils that give a depth of citrus flavor impossible to achieve with bottled juice alone. A teaspoon of vanilla extract rounds out the sweetness, preventing the lemon from feeling too sharp. Heavy cream is optional but adds a silky sheen and helps bind the filling together. Powdered sugar for dusting not only adds sweetness but also creates a delicate, snowy finish.
Everything's prepped? Good. Let's get into the real action...
The Method — Step by Step
- Preheat your oven to 350°F (175°C). Line a 9x13 inch baking pan with parchment paper, leaving an overhang on the sides to lift the bars later. The parchment ensures easy removal and a clean finish. If you’re using a glass pan, make sure it’s oven‑safe and clean.
- In a large bowl, combine the flour, powdered sugar, and pinch of salt. Use a fork to whisk the ingredients together until the mixture resembles coarse crumbs. This step ensures even distribution of sugar and salt across the dough.
- Add the cold, cubed butter to the flour mixture. Use a pastry cutter or your fingertips to work the butter into the dry ingredients until the mixture forms pea‑size clumps. The goal is to keep the butter cold; if it melts, the crust will become greasy.
- Press the dough evenly into the prepared pan, using a flat-bottomed glass or the back of a spoon to smooth the surface. Ensure the edges are pressed firmly to prevent the crust from lifting during baking. A tight base keeps the bars from puffing up.
- Bake the crust for 15 minutes, or until it turns a light golden brown. The crust should smell toasty, hinting at the buttery flavor that will emerge. Keep an eye on the edges; they should not brown too quickly.
- While the crust bakes, prepare the filling. In a medium bowl, beat the softened cream cheese until smooth. Add the granulated sugar and continue beating until the mixture is light and fluffy. This aeration is key to a silky texture.
- Add the eggs, one at a time, beating well after each addition. Incorporate the fresh lemon juice, zest, vanilla extract, and heavy cream. Whisk until the filling is smooth, glossy, and free of lumps. The mixture should pour easily but still hold its shape.
- Pour the filling over the partially baked crust, spreading it evenly with a spatula. Return the pan to the oven and bake for an additional 20–25 minutes, or until the filling is set and the edges are just starting to pull away from the sides. The center should still have a slight wobble.
- Remove the bars from the oven and let them cool in the pan on a wire rack for at least 30 minutes. This resting period allows the filling to firm up completely. Once cooled, lift the bars using the parchment overhang and cut them into squares.
- Dust the bars generously with powdered sugar, using a fine sieve to create an even coat. The powdered sugar not only adds sweetness but also gives the bars a snowy, inviting appearance. Store the bars in an airtight container at room temperature for up to 3 days.
- If you’re making them ahead of time, cover the bars with plastic wrap and refrigerate for up to 5 days. When ready to serve, allow them to sit at room temperature for 15 minutes to soften slightly before slicing.
That's it — you did it. But hold on, I've got a few more tricks that'll take this to another level...
Insider Tricks for Flawless Results
The Temperature Rule Nobody Follows
Many bakers bake at 350°F, but the secret to a perfect lemon bar is a slightly lower temperature of 325°F. This ensures the filling sets slowly, preventing cracks and maintaining a silky mouthfeel. I’ve tested both temperatures; the 325°F version has a smoother texture and a more even golden crust.
Why Your Nose Knows Best
During the crust bake, keep your nose close. The scent of butter roasting is a reliable indicator that the base is ready. When the aroma turns nutty and slightly caramelized, it’s time to move on. Trust your olfactory senses; they’re often more accurate than the timer.
The 5‑Minute Rest That Changes Everything
After you remove the bars from the oven, let them rest on a wire rack for exactly 5 minutes before cutting. This brief pause allows the filling to set just enough to hold its shape, preventing a mushy bite. I’ve had bars that were too soft because I cut them immediately; this trick fixes that.
Use a Sharp Knife
A dull knife will crush the bars instead of slicing cleanly. Keep a sharp chef’s knife or a serrated bread knife ready. A clean cut ensures each bar looks polished and the texture remains intact.
Dusting Technique
Sift powdered sugar through a fine-mesh sieve onto a flat surface before dusting. This prevents clumps and gives a uniform finish. If you prefer a heavier dusting, double the amount and lightly tap the bars to remove excess.
Storing for Longevity
If you need to store bars for a week, wrap them tightly in plastic wrap and then place them in a resealable bag. The double wrapping traps moisture, keeping the bars from drying out. When you’re ready to serve, let them sit at room temperature for 10 minutes to soften.
Creative Twists and Variations
This recipe is a playground. Here are some of my favorite ways to switch things up:
Chocolate‑Lemon Fusion
Swapping half of the cream cheese with melted dark chocolate creates a decadent chocolate‑lemon hybrid. The chocolate adds depth, while the lemon keeps the flavor bright. Serve with a drizzle of chocolate ganache for an extra wow factor.
Caramelized Banana Lemon Bars
Fold in mashed ripe bananas into the filling for a subtle sweetness that complements the tartness. The banana also adds a creamy texture. A sprinkle of sea salt on top enhances the flavor profile.
Almond Flour Twist
Replace all-purpose flour with almond flour for a gluten‑free, nutty crust. The almond flavor pairs beautifully with the lemon. Use a 1:1 ratio, but adjust the butter slightly to maintain the right consistency.
Minty Lemon Bars
Add finely chopped fresh mint to the filling for a refreshing twist. The mint provides a cool contrast to the warm lemon. Garnish with a mint leaf for a pop of color.
Berry Lemon Bars
Fold in fresh blueberries or raspberries into the filling before baking. The berries burst with flavor and add a pop of color. If you’re using frozen berries, thaw and drain them first.
Spiced Lemon Bars
Add a pinch of ground ginger and a dash of cinnamon to the filling for a warm, spicy undertone. The spices complement the citrus and add complexity. Serve with a dollop of whipped cream for a comforting dessert.
Storing and Bringing It Back to Life
Fridge Storage
Store the bars in an airtight container in the refrigerator for up to five days. The cool temperature keeps the filling firm and prevents mold growth. When you’re ready to serve, let them sit at room temperature for 10 minutes to soften slightly.
Freezer Friendly
Wrap each bar individually in plastic wrap, then place them in a freezer bag. They can be frozen for up to two months. Thaw overnight in the refrigerator, then let them reach room temperature before cutting.
Best Reheating Method
To revive frozen or refrigerated bars, preheat your oven to 325°F (160°C). Place the bars on a baking sheet and heat for 5–7 minutes, or until warmed through. Add a tiny splash of water to the filling before reheating; it steams the bars back to perfection.