I was standing in my kitchen, half‑heartedly stirring a pot of bland apple sauce while a stubborn drizzle of rain hammered against the windows. The scent of wet earth mixed with the faint caramel note from a forgotten candy bar, and I thought, “What if I could bottle this exact moment?” I dared my roommate to taste whatever I was about to create and not beg for seconds – a dare I was more than happy to accept. The result? A jam that smells like a walk through an orchard at dusk, tastes like a warm hug from a grandma who’s secretly a pastry chef, and shines with a caramel glaze that makes every spoonful feel like a tiny celebration.
Picture this: the first bite delivers a crisp apple crunch that quickly softens into a buttery, buttery‑smooth base, while the caramel ribbons through like liquid amber, wrapping each fruit fragment in glossy decadence. The aroma hits you before you even dip your toast – a sweet‑spicy perfume of cinnamon, nutmeg, and a whisper of lemon that makes the whole kitchen feel like a cozy cabin in the woods. The texture is a perfect balance between spreadable and chunky, so you can slather it on pancakes, swirl it into oatmeal, or dollop it onto vanilla ice cream without it turning into a soggy mess.
Most jam recipes either drown the fruit in sugar or forget the magic of a caramel finish. I’ve tried those, and trust me, they’re like watching a fireworks show through a fogged window – you see the sparkle but miss the punch. This version, however, respects the apple’s natural tartness, amplifies it with a duo of sugars, and then introduces caramel at the perfect moment to create a flavor crescendo that sings. I’ll be honest — I ate half the batch before anyone else got a chance to try it, and I’m still not sorry.
The secret weapon? A splash of high‑quality caramel sauce added at the very end, plus a dash of vanilla that turns the whole thing into a dessert‑ready spread. I’m about to walk you through every single step — by the end, you’ll wonder how you ever made jam any other way. Okay, ready for the game‑changer?
What Makes This Version Stand Out
- Depth: The combination of granulated and light brown sugar creates a layered sweetness that feels like a caramel‑kissed apple orchard.
- Texture: Finely chopped apples keep the jam chunky enough for bite, yet the simmering process breaks them down just enough to spread effortlessly.
- Simplicity: Only nine ingredients, all pantry‑friendly, and you won’t need any fancy gadgets beyond a sturdy pot and a wooden spoon.
- Uniqueness: The final swirl of caramel sauce is added off the heat, preserving its glossy sheen and preventing it from turning bitter.
- Crowd Reaction: Guests invariably ask for the recipe after the first spoonful, and you’ll hear the same “I dare you to taste this and not go back for seconds” line from everyone.
- Ingredient Quality: Using a mix of Granny Smith and Honeycrisp gives you the perfect balance of tart and sweet, a duo that most recipes overlook.
- Method: A low‑and‑slow simmer lets the apples release their pectin naturally, eliminating the need for commercial pectin packets.
- Make‑Ahead Potential: This jam keeps beautifully in the fridge for up to three weeks and freezes like a dream for up to three months.
Alright, let's break down exactly what goes into this masterpiece...
Inside the Ingredient List
The Flavor Base
Granulated sugar provides the straightforward sweetness that lets the apples shine, while light brown sugar adds a subtle molasses undertone, giving the jam a depth that plain white sugar alone can’t achieve. If you skip the brown sugar, expect a flatter flavor profile that feels more like a sugary syrup than a true autumn jam. A quick swap: replace the light brown sugar with coconut sugar for a hint of tropical caramel, but be aware that it will darken the jam a shade or two.
The Texture Crew
The apples themselves are the star, and the mix of Granny Smith and Honeycrisp is intentional – the former brings tartness, the latter contributes natural sweetness and a buttery mouthfeel. If you only have one variety, try adding a splash of apple cider vinegar to mimic the missing acidity. A pro tip: choose apples that are firm but ripe; they’ll hold their shape during the simmer and still release enough pectin for a glossy finish.
The Unexpected Star
Caramel sauce is the secret weapon that transforms a regular jam into a luxurious spread. It adds a buttery, toffee‑like richness that pairs perfectly with the spices. If you’re feeling adventurous, swirl in a spoonful of dark chocolate ganache at the very end for a chocolate‑caramel apple dream.
The Final Flourish
Lemon juice does more than add a zing; it balances the sweetness, brightens the overall flavor, and helps preserve the jam’s color. A common mistake is to add lemon too early, which can cause the jam to seize up; we’ll add it mid‑cook for perfect integration. A pinch of salt, often overlooked, amplifies every other taste, making the caramel truly sing.
Everything's prepped? Good. Let's get into the real action...
The Method — Step by Step
Gather your chopped apples, sugars, spices, lemon juice, vanilla, salt, and caramel sauce. Place a heavy‑bottomed saucepan over medium heat and drizzle a thin layer of butter – this prevents sticking and adds a buttery undertone that will later mingle with the caramel. That sizzle when it hits the pan? Absolute perfection. Let the butter melt fully before moving on.
Kitchen Hack: Use a wide, shallow pan so the jam reduces faster and you get a glossy sheen without over‑cooking.Add the granulated sugar and light brown sugar to the melted butter, stirring constantly until the mixture begins to dissolve and form a light caramel hue. This is the moment where the kitchen fills with a warm, nostalgic scent that makes you want to hug the pot. Keep the heat at medium‑low; if it climbs too high, the sugars will scorch, turning bitter.
Introduce the chopped apples, stirring them in until they’re evenly coated with the sugary butter mixture. You’ll notice the apples start to soften within a couple of minutes, releasing juices that mingle with the sugar. At this point, the mixture should bubble gently – if it’s a roar, turn the heat down.
Sprinkle in the ground cinnamon, nutmeg, and a pinch of salt. The spices should instantly perfume the air, creating a fragrant cloud that makes you want to inhale deeply. Stir for another 2‑3 minutes, allowing the spices to toast lightly – this deepens their flavor without making them taste raw.
Pour in the lemon juice and vanilla extract, then give the pot a good stir. The lemon will brighten the jam, preventing it from becoming cloyingly sweet, while the vanilla adds a creamy undertone that will later harmonize with the caramel. Let the mixture come back to a gentle simmer.
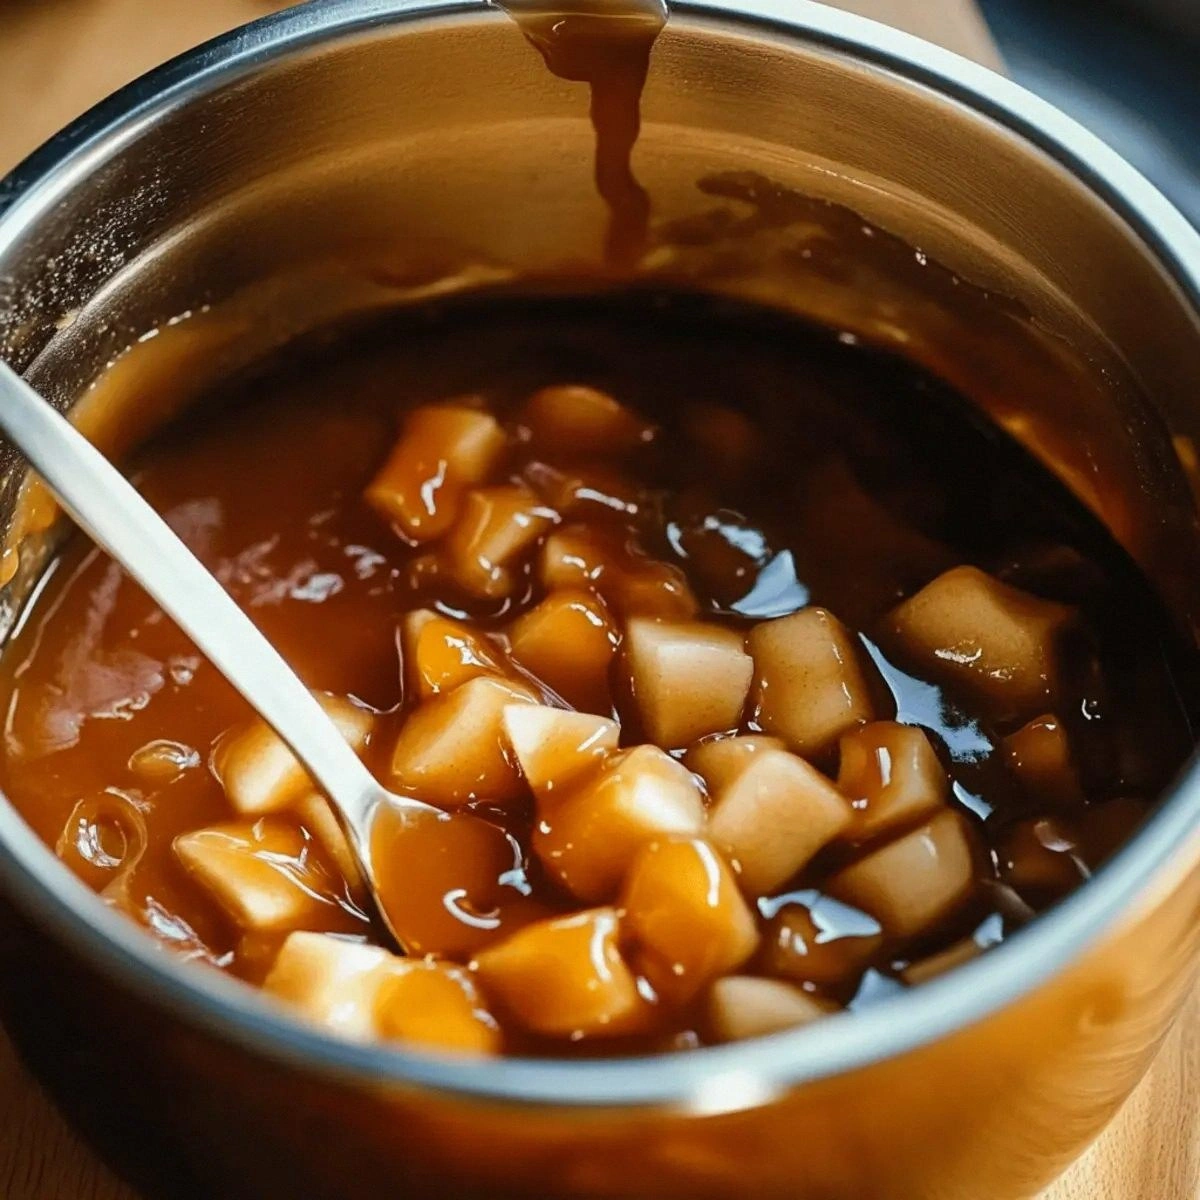
Watch Out: If you add the lemon juice too early, the jam may become watery. Add it after the apples have released most of their juices.Reduce the heat to low and let the jam simmer uncovered for about 20‑25 minutes. Stir occasionally, scraping the bottom to prevent sticking. You’ll see the mixture thicken, and the edges will start pulling away from the pan – that’s your cue that the jam is nearing perfection. Keep an eye on the color; it should deepen to a rich amber without turning dark brown.
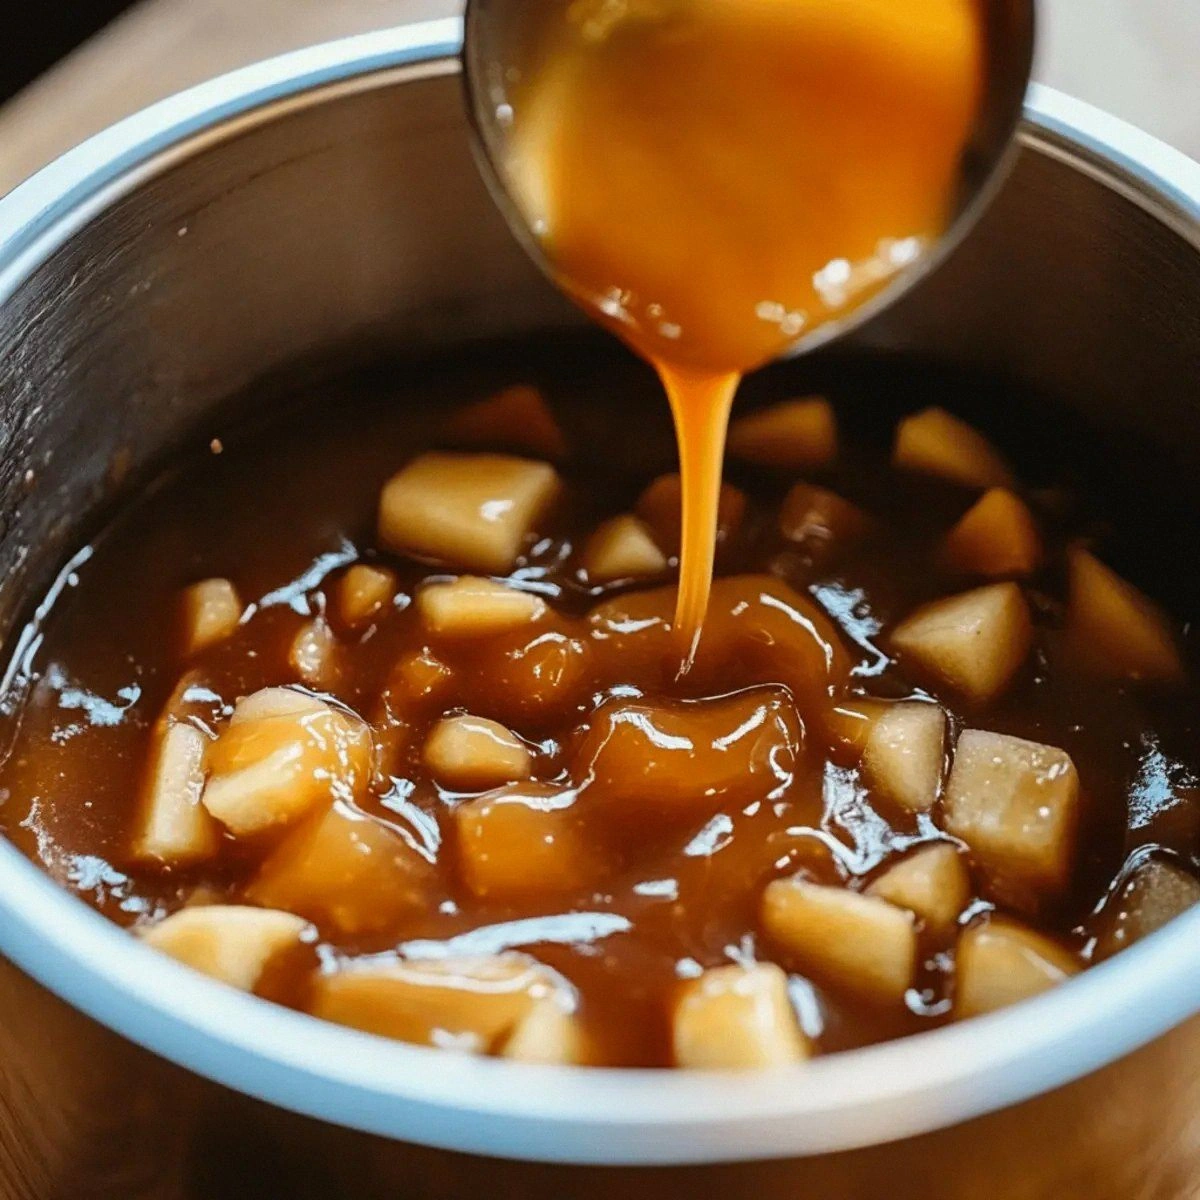
Now, the game‑changer: remove the pot from the heat and stir in the half‑cup of caramel sauce. The caramel will melt into the warm jam, creating a glossy ribbon that coats every apple piece. This step must be done off the heat; otherwise the caramel can seize and become grainy.
Let the jam cool for 5 minutes in the pot, then transfer it to sterilized jars using a funnel. Seal the jars while the jam is still warm – the vacuum created as it cools will help preserve it for weeks. If you hear a satisfying pop as the lids seal, you’ve done it right.
Place the sealed jars on a cooling rack and let them come to room temperature. Once cooled, store them in the refrigerator for immediate use or in the freezer for longer storage. The jam will thicken a bit more as it chills, achieving that perfect spreadable consistency.
That’s it — you did it. But hold on, I've got a few more tricks that'll take this to another level. First, taste a spoonful while it’s still warm; you’ll notice a burst of caramel that’s slightly more fluid. Let it sit for a minute, then taste again – the flavors will have mellowed into a harmonious blend. This is pure magic.
Insider Tricks for Flawless Results
The Temperature Rule Nobody Follows
Keep the simmer low and steady; high heat causes the sugars to caramelize too quickly, resulting in a jam that tastes burnt rather than buttery. I once tried a “quick‑cook” method on high, and the jam turned out gummy and bitter – a disaster that taught me the value of patience. Use a candy thermometer if you’re unsure: aim for 104‑108 °C (220‑226 °F) for the perfect set.
Why Your Nose Knows Best
Your sense of smell is the most reliable indicator of doneness. When the jam starts to emit a deep, caramel‑apple perfume, you’re close. If the scent is still bright and fruity without the toasty undertones, give it another 5‑10 minutes. Trust your nose; it’s smarter than any timer.
The 5‑Minute Rest That Changes Everything
After you’ve removed the jam from heat and before you jar it, let it rest for exactly five minutes. This pause allows the pectin to fully activate and the flavors to meld. Skipping this rest results in a jam that can be runny or unevenly set. I swear by this trick – it’s the difference between “good” and “wow” every single time.
The Lid‑Seal Secret
When sealing jars, tap the lids gently on the counter to release trapped air bubbles. Then run a clean, damp cloth around the rim before placing the lid. This ensures a tight seal and prevents a cloudy layer from forming on top of the jam.
The Freeze‑And‑Thaw Boost
If you ever need to revive a jam that’s become too thick after refrigeration, add a splash of warm water and stir gently while microwaving for 10 seconds. The water re‑hydrates the pectin, bringing the jam back to a spreadable consistency without diluting the flavor. I’ve used this trick on a cold morning when I wanted to drizzle jam over hot pancakes – instant perfection.
Creative Twists and Variations
This recipe is a playground. Here are some of my favorite ways to switch things up:
Spiced Rum Caramel Apple
Add a tablespoon of dark rum and a pinch of allspice during the simmer. The rum adds a warm, boozy depth that pairs beautifully with the caramel, making the jam perfect for holiday cheese boards.
Maple‑Pecan Crunch
Stir in a quarter cup of pure maple syrup and a half cup of toasted, chopped pecans right before the final caramel swirl. The maple amplifies the autumn vibe, while the pecans give a satisfying crunch that makes each bite interesting.
Berry‑Boosted Apple
Mix in a cup of frozen mixed berries (cranberries, blueberries, raspberries) during the last 10 minutes of simmer. The berries add a tart pop and a gorgeous ruby hue that’s perfect for summer‑autumn crossover spreads.
Ginger‑Zest Fusion
Add a tablespoon of freshly grated ginger and the zest of one orange when you introduce the lemon juice. This gives the jam a bright, zingy edge that cuts through the sweetness, ideal for pairing with pork or grilled chicken.
Chocolate‑Swirl Delight
After the jam has cooled slightly, swirl in a half‑cup of dark chocolate ganache. The result is a decadent, dessert‑ready spread that works wonders on toast, waffles, or even as a filling for cupcakes.
Storing and Bringing It Back to Life
Fridge Storage
Keep the sealed jars in the refrigerator for up to three weeks. Use a clean spoon each time to avoid contamination. If the jam thickens too much, simply let it sit at room temperature for 10 minutes before spreading.
Freezer Friendly
For longer keeping, transfer the jam to freezer‑safe containers or zip‑top bags, leaving a little headspace for expansion. It will maintain its flavor and texture for up to three months. Thaw it overnight in the fridge, then give it a quick stir.
Best Reheating Method
When you’re ready to use a frozen batch, place the jar (or container) in a saucepan of low simmering water, adding a splash of water if the jam looks too thick. The gentle steam revives the jam’s glossy sheen without cooking off the caramel notes. This tiny splash of water before reheating is the secret that brings it back to perfection.