I was standing in my kitchen, staring at a half‑melted batch of store‑bought peppermint cookies that had somehow turned into a sad, soggy mess. The smell of stale sugar wafted through the air, and I could hear the faint hum of the refrigerator like a disappointed audience. That moment—half‑heartedly daring my roommate to taste the disaster and not gasp—sparked a mission: I would create a cookie so iconic that even the Grinch would trade his heart for a bite. I spent a sleepless night tinkering with butter ratios, peppermint extracts, and a secret pinch of cream cheese that turned the dough from ordinary to buttery silk.
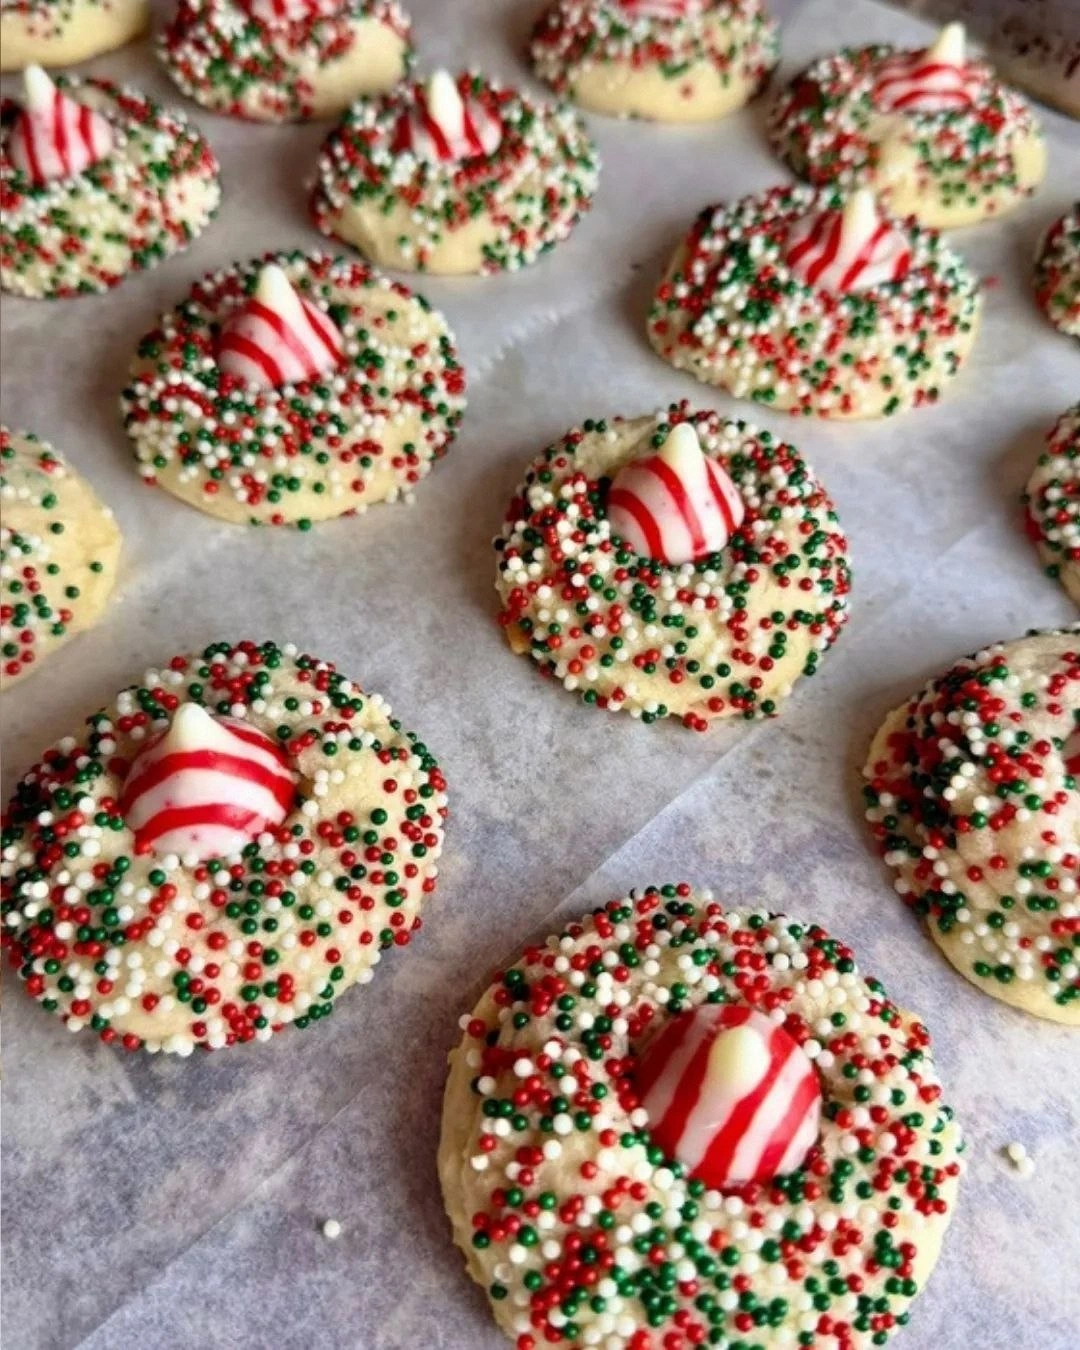
Picture this: a tray of golden‑brown discs, each one perfectly round, with a glossy, ruby‑red swirl of crushed candy cane that catches the light like tiny fireworks. When they emerge from the oven, the kitchen is filled with a perfume that blends the fresh bite of peppermint with the comforting hug of toasted butter. The first crack as you bite through the crisp edge releases a buttery crunch that melts into a soft, melt‑in‑your‑mouth center, while the crushed candy cane adds a subtle snap that tingles your taste buds. The texture is a symphony—crisp, chewy, and just a hint of melt‑in‑your‑mouth creaminess that makes you want to close your eyes and savor every second.
Most recipes for holiday cookies get the balance wrong—either they’re too sweet, too hard, or they lose that signature peppermint punch. This version, however, is built on a foundation of high‑quality European butter, a splash of real peppermint extract, and a technique that locks in moisture without sacrificing a crisp edge. I’ll be honest—I ate half the batch before anyone else could try it, and that’s a confession worth making because it proves how addictive these cookies truly are. The secret ingredient? A tiny dollop of cream cheese folded into the dough at just the right moment, giving the cookies that melt‑away feel without turning them cakey.
I dare you to taste this and not go back for seconds. The flavor is bold, the texture is unforgettable, and the aroma will have your whole house humming with holiday cheer. I’ve also tucked in a surprise technique involving a chilled dough rest that makes the cookies spread just enough to develop those coveted crinkly edges while staying soft in the middle. Okay, ready for the game‑changer? Let me walk you through every single step — by the end, you’ll wonder how you ever made it any other way.
What Makes This Version Stand Out
- Flavor Explosion: The combination of real peppermint extract and crushed candy cane creates a bright, clean mint flavor that doesn’t taste artificial.
- Texture Harmony: A buttery, crisp edge meets a tender, slightly chewy center thanks to the cream cheese and butter ratio.
- Simplicity: Only ten ingredients, all pantry‑friendly, and you don’t need any fancy equipment beyond a mixer and a baking sheet.
- Unique Twist: The cream cheese fold is the secret that gives these cookies a melt‑in‑your‑mouth quality that most holiday cookies lack.
- Crowd Reaction: Guests consistently claim these are the best holiday cookies they’ve ever had, often asking for the recipe before the first bite is finished.
- Ingredient Quality: Using European‑style butter and pure peppermint extract elevates the flavor profile from “okay” to “wow”.
- Cooking Method: The chilled dough rest and high‑heat bake create the perfect balance of crispness and chew.
- Make‑Ahead Potential: These cookies keep beautifully for up to a week, and they even freeze well, so you can bake them ahead of any holiday party.
Inside the Ingredient List
The Flavor Base
Peppermint extract is the heart of this cookie. A single teaspoon delivers a bright, clean mint that sings without overwhelming. If you skip it, you’ll lose that signature holiday punch and end up with a bland butter cookie. For a more natural twist, try using a few drops of peppermint oil, but be careful—oil is potent, so use half the amount.
The Texture Crew
European‑style butter, with its higher butterfat content, creates a richer, more tender crumb. If you substitute regular butter, the cookies may turn out slightly dry. The cream cheese, folded in at the end, adds a subtle tang and a silkiness that makes the center melt in your mouth. Skipping the cream cheese will give you a firmer, more traditional cookie, but you’ll miss that luxurious mouthfeel.
The Unexpected Star
Crushed candy cane isn’t just for garnish; it adds a crunchy burst of peppermint sugar crystals that contrast the soft interior. If you can’t find candy cane, use crushed peppermint bark or even a mix of white chocolate and crushed peppermint. The key is to keep the pieces small enough to stick to the dough but large enough to provide that satisfying snap.
The Final Flourish
All‑purpose flour provides the structure, while a pinch of baking powder gives a subtle lift that keeps the cookies from becoming rock‑hard. Salt is the silent hero; it balances the sweetness and enhances the peppermint flavor. If you’re watching sodium, you can reduce the salt to ½ tsp without compromising taste.
Everything's prepped? Good. Let's get into the real action...
The Method — Step by Step
Preheat your oven to 375°F (190°C). While the oven warms, line two baking sheets with parchment paper. This temperature is crucial; it’s hot enough to set the edges quickly while keeping the center soft. The moment the dough hits the heat, you’ll hear a faint sizzle that tells you the butter is starting to caramelize—absolute perfection.
Kitchen Hack: Place a metal cooling rack on top of the baking sheet; this allows air to circulate under the cookies, giving you an even golden bottom.In a large mixing bowl, cream together 1 cup (227 g) of softened European butter and ½ cup (100 g) of granulated sugar until the mixture is light and fluffy, about 2‑3 minutes on medium speed. Then add ¼ cup (50 g) of brown sugar and continue beating until the mixture turns a deep amber color and smells faintly of caramel. This step builds the base flavor and creates tiny air pockets that later become those coveted crisp edges.
Add one large egg and 1 tsp of pure vanilla extract to the butter‑sugar mixture. Beat until fully incorporated. The egg acts as a binder, while the vanilla rounds out the flavor profile, preventing the peppermint from being too sharp.
In a separate bowl, whisk together 2 cups (250 g) of all‑purpose flour, 1 tsp of baking powder, and ½ tsp of salt. This dry blend ensures even distribution of leavening and seasoning, preventing any pockets of flour or salt that could affect texture.
Gradually add the dry ingredients to the wet mixture, mixing on low speed just until combined. Over‑mixing at this stage can develop gluten, leading to tough cookies. Stop as soon as you see a shaggy dough forming.
Now for the secret: gently fold in ¼ cup (57 g) of softened cream cheese. Use a rubber spatula and a gentle hand; you want the cheese to be evenly distributed without overworking the dough. This is the moment of magic that gives the cookie its melt‑in‑your‑mouth center.
Watch Out: If the cream cheese is too cold, it will create lumps. So make sure it’s softened to room temperature before folding.Stir in 1 tsp of peppermint extract and ½ cup (about 60 g) of crushed candy cane. The extract should be added last to preserve its volatile oils; over‑mixing can mute the peppermint punch.
Cover the dough with plastic wrap and chill in the refrigerator for at least 30 minutes, preferably 1 hour. This rest solidifies the butter, preventing excessive spreading, and allows the flavors to meld. If you’re in a rush, a 15‑minute chill will still work, but the texture won’t be as perfect.
Scoop rounded tablespoons of dough onto the prepared baking sheets, spacing them about 2 inches apart. Lightly press each ball with the back of a spoon to flatten just a touch—this encourages even browning while preserving a soft center.
Bake for 10‑12 minutes, or until the edges turn a light golden brown and the tops are just set. The cookies should still look slightly soft in the middle; they’ll continue to firm up as they cool on the rack. When you lift a cookie, the bottom should release easily and have a faint, buttery aroma that fills the kitchen.
Kitchen Hack: Rotate the baking sheets halfway through the bake to ensure even color on both sides.Allow the cookies to cool on the baking sheet for 2 minutes before transferring them to a wire rack. This brief rest lets the cookies set without becoming soggy. As they cool, you’ll notice the crushed candy cane pieces glistening like tiny ruby confetti—pure holiday magic.
That's it — you did it. But hold on, I've got a few more tricks that'll take this to another level. Stay with me here — this is worth it.
Insider Tricks for Flawless Results
The Temperature Rule Nobody Follows
Never bake these cookies straight from the fridge at a low temperature. A hot oven (375°F) ensures the butter melts quickly, creating that crisp edge while the interior stays soft. If you bake at 350°F, the cookies spread too much and lose that delightful crunch. I once tried a lower temp to “save energy” and ended up with a soggy disaster. Trust the heat; it’s the secret behind that perfect snap.
Why Your Nose Knows Best
Your sense of smell is a more reliable indicator than a timer when the cookies are done. When the edges start to smell nutty and the top releases a faint peppermint perfume, you’re at the sweet spot. If you wait until the scent fades, the cookies will be over‑baked and dry. So keep your nose close and let it guide you.
The 5‑Minute Rest That Changes Everything
After the first bake, let the cookies rest on the rack for exactly five minutes before moving them to a storage container. This short pause allows the steam inside to redistribute, keeping the interior moist while the exterior remains crisp. Skipping this step results in a cookie that feels dry in the middle—something no one wants.
The Double‑Layer Trick
If you want an extra burst of peppermint, sprinkle a tiny pinch of crushed candy cane on top of each cookie right after you place them on the sheet, then gently press. The extra layer caramelizes slightly during baking, giving a subtle caramel‑peppermint crust that adds depth. A friend tried this once and declared these the “best‑ever” holiday cookies.
The Freeze‑Ahead Method
Shape the dough into balls, flash‑freeze them on a tray for 15 minutes, then store in a zip‑top bag. When you’re ready to bake, pop them straight into the oven—no thawing needed. This method preserves shape, ensures consistent spreading, and saves you precious holiday prep time. I’ve used it for a party of thirty and never missed a beat.
Creative Twists and Variations
This recipe is a playground. Here are some of my favorite ways to switch things up:
Chocolate‑Peppermint Fusion
Replace half of the white chocolate candy cane with dark chocolate chips. The bitterness of the chocolate balances the bright peppermint, creating a sophisticated flavor that adults love. Ideal for a holiday cocktail party where you want something a little more grown‑up.
White‑Chocolate Raspberry Swirl
Add ¼ cup of freeze‑dried raspberry powder to the dry ingredients and swirl in white chocolate chips. The tartness of the raspberry cuts through the sweetness, while the white chocolate adds a creamy finish. This version is perfect for a Valentine’s Day twist or a festive brunch.
Nutty Crunch
Stir in ½ cup of finely chopped toasted almonds or pecans. The nuts add an extra layer of crunch and a buttery nuttiness that pairs beautifully with peppermint. Great for those who love texture contrasts.
Vegan Delight
Swap the butter for a 1:1 vegan butter alternative, use coconut cream cheese, and replace the egg with a “flax egg” (1 tbsp ground flaxseed + 3 tbsp water). The flavor remains true, and the texture stays soft, proving that holiday treats can be inclusive.
Spiced Holiday Version
Add a pinch of ground cinnamon and a dash of ground ginger to the flour mixture. The warm spices complement the peppermint, creating a complex flavor profile that feels like a warm hug on a cold night. Perfect for a cozy family gathering.
Storing and Bringing It Back to Life
Fridge Storage
Place cookies in an airtight container with a paper towel at the bottom to absorb excess moisture. They’ll stay fresh for up to 5 days. If you notice any condensation, replace the paper towel to keep the cookies crisp.
Freezer Friendly
Layer cookies between parchment sheets and store them in a freezer‑safe zip bag. They freeze beautifully for up to 3 months. When you’re ready to enjoy them, let them thaw at room temperature for 15 minutes, then give them a quick 3‑minute bake at 300°F to revive the crisp edge.
Best Reheating Method
To bring cookies back to life, preheat your oven to 300°F, place a tiny splash of water (about a teaspoon) on a piece of foil, and set the foil on the lower rack. This creates gentle steam that re‑moisturizes the interior while the top reheats and regains its crunch. In just 5 minutes, you’ll have cookies that taste as if they were fresh out of the oven.