I’ll be honest — I ate half the batch before anyone else got to try it, and that was only because the kitchen smelled like a citrus‑infused carnival. The story started on a rainy Tuesday when my sister dared me to bake something that could survive a road trip, a picnic, and a midnight snack binge without losing its zing. I grabbed a lemon, a bag of poppy seeds, and a vague memory of a grandma’s bar recipe that always turned out soggy. After three failed attempts that left me with a bland, crumbly mess, I decided to go back to basics and add a glossy glaze that would lock in flavor like a sweet, tart armor.
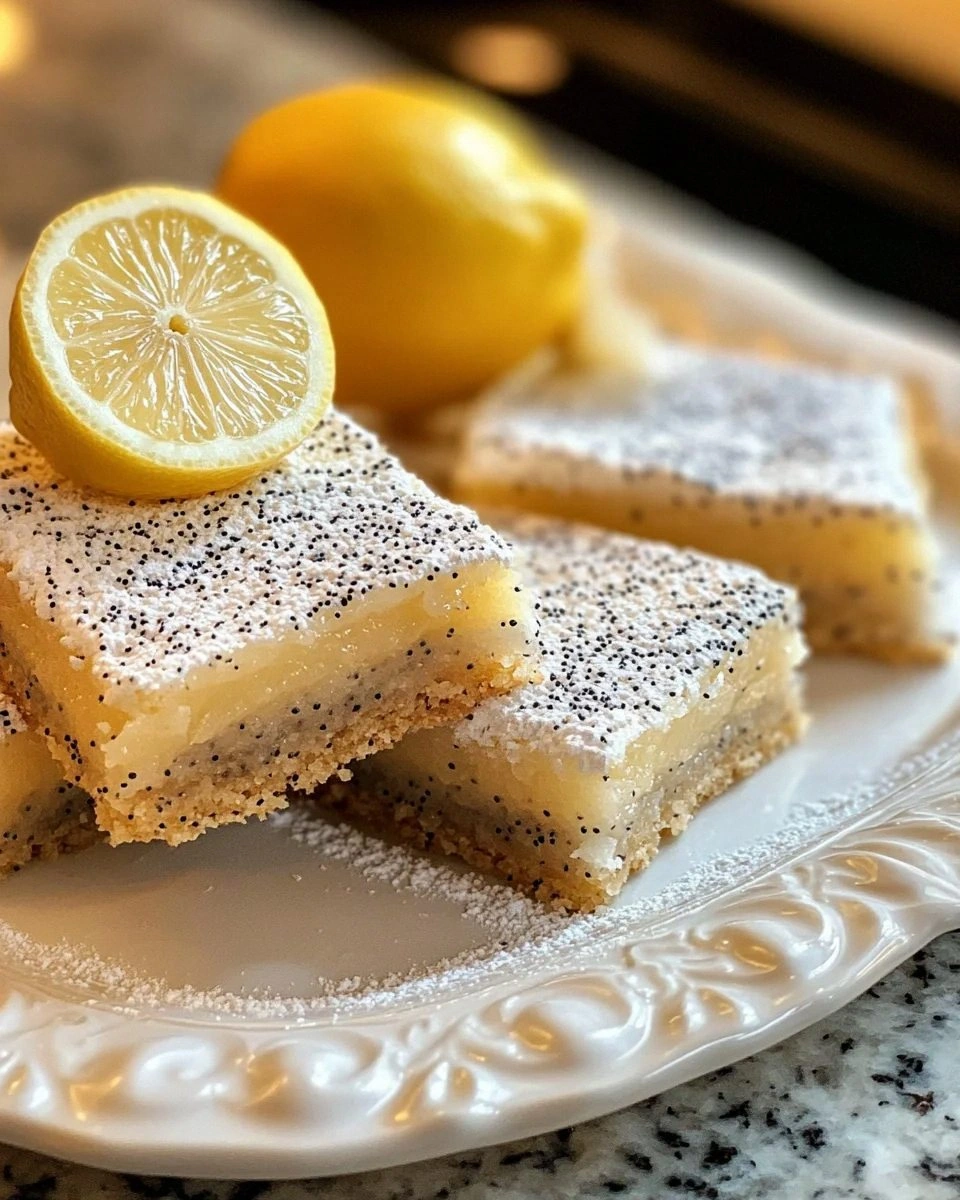
Picture yourself pulling this out of the oven, the whole kitchen smelling incredible, a golden crust giving way to a buttery interior that’s speckled with tiny black poppy seeds like a galaxy of flavor. The glaze, a thin, lemon‑kissed veil, spreads across the surface, catching the light and promising a burst of sunshine with every bite. When you cut into a bar, the top shatters with a satisfying snap, the crumb holds together just enough to lift with a spatula, and the first forkful releases a bright citrus pop that dances on the tongue while the poppy seeds add a subtle, nutty crunch.
Most recipes get this completely wrong. They either drown the bars in a syrup that makes them soggy, or they forget the poppy seeds, stripping away that signature texture. I’ve cracked the code by balancing the wet and dry components, using room‑temperature butter for a tender crumb, and finishing with a glaze that sets without becoming gummy. The secret? A splash of lemon juice in the batter and a double‑whisked glaze that coats each bar like a thin, glossy film of sunshine.
I dare you to taste this and not go back for seconds. The tangy lemon doesn’t just sit on top; it permeates the crumb, while the poppy seeds provide a delicate crunch that you’ll swear is impossible to achieve without a professional baker’s touch. This version stands out because it’s simple enough for a weekday treat yet impressive enough to wow guests at a brunch spread. Okay, ready for the game‑changer? Let me walk you through every single step — by the end, you’ll wonder how you ever made it any other way.
What Makes This Version Stand Out
- Flavor Explosion: The combination of fresh lemon zest and juice creates a bright, aromatic core that’s balanced by a sweet, buttery glaze. Each bite feels like sunshine on a summer day, even if you’re baking in the middle of winter.
- Texture Harmony: A crisp, golden top gives way to a tender, slightly crumbly interior, while the poppy seeds add a gentle pop that keeps the mouthfeel interesting from start to finish.
- Simplicity Meets Sophistication: Only pantry staples and a few fresh ingredients are required, yet the result feels like something you’d order at a high‑end café.
- Ingredient Quality: Using real lemon zest (not the bottled stuff) and high‑quality unsalted butter makes a world of difference in flavor depth and mouthfeel.
- Crowd Reaction: These bars have a habit of disappearing within minutes; guests keep asking for the recipe, and you’ll find yourself handing out extra servings like a generous host.
- Make‑Ahead Magic: The bars keep their texture and flavor for up to three days in an airtight container, and the glaze actually improves as it settles.
- Versatile Base: The recipe can be tweaked for gluten‑free, vegan, or even a more indulgent version with almond flour and coconut oil without losing its core identity.
- Cooking Method: Baking at a moderate temperature ensures an even rise and a uniform golden crust, while the glaze is set on the warm bars for a flawless finish.
Inside the Ingredient List
The Flavor Base
Lemon zest is the hero here, providing an aromatic oil that’s far more potent than juice alone. Zest contains the essential oils that give the bars their punchy citrus note; skipping it would make the flavor flat, like a song without a chorus. If you’re out of fresh lemons, a teaspoon of high‑quality lemon extract can substitute, but the zest is non‑negotiable for that authentic zing. When buying lemons, look for ones that feel heavy for their size and have a bright, glossy skin—those are the juiciest and most fragrant.
The Texture Crew
All‑purpose flour provides structure, while the butter adds richness and creates that melt‑in‑your‑mouth crumb. The butter should be softened, not melted, to trap tiny air pockets that expand during baking, giving the bars a light lift. The poppy seeds are the surprise element; they’re tiny but pack a nutty, slightly sweet flavor that complements the lemon. If you’re allergic or don’t have poppy seeds, substitute with chia seeds for a similar visual effect, though the flavor will shift.
The Unexpected Star
The glaze is where the magic truly happens. Powdered sugar dissolves into a glossy, silky coating that hardens just enough to give a snap but stays tender enough to melt on your tongue. Fresh lemon juice in the glaze ties the whole bar together, echoing the batter’s citrus notes. A tablespoon of melted butter adds a subtle richness that prevents the glaze from being overly sweet or chalky. Skipping the butter in the glaze would result in a dry, powdery finish that feels like chewing on sugar crystals.
The Final Flourish
A pinch of salt amplifies every other flavor, while baking powder gives the bars a gentle rise, ensuring they’re not too dense. The eggs act as a binder, creating a cohesive batter that holds the poppy seeds in place. If you’re aiming for a vegan version, replace each egg with a “flax egg” (1 tbsp ground flax + 3 tbsp water) and the texture will stay just as delightful. Remember, the glaze should be applied while the bars are still warm; this ensures it spreads evenly and sets with a glossy sheen.
Everything's prepped? Good. Let’s get into the real action…
The Method — Step by Step
- Preheat and Prepare: Set your oven to 350°F (175°C) and line a 9‑inch square pan with parchment paper, leaving an overhang for easy removal. This overhang is a lifesaver; it lets you lift the whole slab out without breaking the bars. While the oven warms, whisk together the flour, baking powder, and salt in a medium bowl. You’ll notice the mixture looking dry and powdery—that’s exactly how you want it before the butter joins the party.
- Cream Butter and Sugar: In a large mixing bowl, beat 1 cup softened butter with 1/2 cup granulated sugar until the mixture is pale, fluffy, and smells faintly of caramel. This should take about 3‑4 minutes on medium speed. The key is to incorporate air; if the mixture looks greasy, you’ve under‑creamed, and the bars will be dense. As you beat, you’ll hear a gentle whooshing sound—think of it as the butter “breathing” and getting ready to lift the batter.
- Eggs and Flavor Add‑Ins: Add 2 large eggs one at a time, beating well after each addition. Then stir in 1 tsp vanilla extract, 1 tsp lemon zest, and 3 tbsp fresh lemon juice. The batter will look slightly curdled; that’s perfectly normal and indicates the lemon juice is reacting with the eggs, creating a tender crumb. If the batter seems too thick, add a tablespoon of milk to loosen it—just enough to keep the mixture glossy.
- Combine Dry and Wet: Gently fold the flour mixture into the butter‑egg mixture using a spatula. The batter should be thick but spreadable, with a few streaks of flour that will disappear as you continue to fold. Add 2 tbsp poppy seeds and give one final gentle stir. The poppy seeds will speckle the batter like tiny constellations, promising that satisfying crunch.
- Transfer and Bake: Spread the batter evenly in the prepared pan, smoothing the top with the back of a spoon or an offset spatula. The surface should be level; if it’s uneven, the glaze will pool in the low spots and create a sticky mess. Slide the pan into the oven and bake for 25‑30 minutes, or until the edges turn a light golden brown and a toothpick inserted in the center comes out with just a few moist crumbs. The aroma at this point is intoxicating—a blend of butter, lemon, and toasted poppy seeds that fills the kitchen like a warm hug.
- While Baking—Glaze Prep: While the bars are in the oven, whisk together 1 cup powdered sugar, 2 tbsp fresh lemon juice, and 1 tbsp melted butter until smooth. The glaze should be pourable but not runny; if it’s too thick, add a splash more lemon juice, a teaspoon at a time. This glaze is the secret sauce that will coat the bars like a glossy, lemon‑kissed veil.
- Glaze Application: As soon as you pull the bars from the oven, place the pan on a cooling rack and drizzle the warm glaze over the top, using a spatula to spread it if needed. The glaze will sizzle gently as it meets the hot bars—That sizzle when it hits the pan? Absolute perfection. Let the glaze set for about 10 minutes; it will firm up to a glossy finish that’s firm enough to cut cleanly but still soft under the fork.
- Cool, Cut, and Serve: Allow the bars to cool completely in the pan; this lets the crumb set and prevents them from crumbling when you cut. Using the parchment overhang, lift the slab onto a cutting board and slice into 12 equal squares. The edges should have a slight crisp, the interior should be buttery and tender, and the glaze should have a subtle sheen that catches the light. Serve at room temperature, or chill for an hour if you prefer a firmer texture. That first bite? It’s a zesty delight that makes you wonder how you ever lived without it.
That's it — you did it. But hold on, I've got a few more tricks that'll take this to another level. Stay with me here — this is worth it.
Insider Tricks for Flawless Results
The Temperature Rule Nobody Follows
Never bake these bars straight from a cold fridge. Let the batter sit at room temperature for 10‑15 minutes before spreading it in the pan. This prevents the butter from solidifying too quickly in the oven, which can cause uneven rising and a gummy center. One of my friends tried skipping this step once and ended up with a dense, doughy mess that resembled a shortbread that never quite set.
Why Your Nose Knows Best
Trust the scent cues more than the timer. When the edges start to turn a light amber and you catch a faint citrus perfume wafting from the oven, the bars are likely done even if the timer still shows a few minutes left. Over‑baking dries out the crumb and makes the glaze hard as glass. Keep a close eye on the color and aroma; they’re the true indicators of perfection.
The 5‑Minute Rest That Changes Everything
After glazing, let the bars rest uncovered for exactly five minutes before cutting. This short pause allows the glaze to set just enough to hold its shape while staying soft enough to melt on the tongue. Cutting too early results in a smeared glaze; waiting too long makes it brittle and prone to cracking.
Poppy Seed Toasting Trick
For an extra depth of flavor, toast the poppy seeds in a dry skillet for 30 seconds before folding them into the batter. The heat releases their nutty oils, giving the bars a richer, more complex backdrop that pairs beautifully with the bright lemon. Be careful not to burn them; a quick, gentle stir is all that's needed.
Glaze Consistency Control
If you prefer a thicker glaze that creates a slight crunch, add an extra tablespoon of powdered sugar and reduce the lemon juice by half. Conversely, for a thinner, more drizzle‑like coating, increase the lemon juice by a teaspoon. Adjusting the glaze is like tuning a musical instrument—small changes yield big differences in the final texture.
Creative Twists and Variations
This recipe is a playground. Here are some of my favorite ways to switch things up:
Berry Burst
Swap half of the lemon juice for fresh orange juice and fold in a handful of dried cranberries. The sweet‑tart berries complement the poppy seeds, creating a festive bar perfect for holiday brunches.
Almond Joy
Replace half the all‑purpose flour with almond flour and add 1/4 cup shredded coconut to the batter. The nutty almond flavor pairs wonderfully with the lemon, and the coconut adds a chewy texture that makes each bite more interesting.
Spiced Autumn
Add 1/2 tsp ground ginger and a pinch of ground cinnamon to the dry ingredients, and use maple syrup instead of granulated sugar. This twist gives the bars a warm, comforting flavor that’s perfect for crisp fall evenings.
Vegan Velvet
Swap the butter for coconut oil, the eggs for flax eggs, and use agave nectar in place of granulated sugar. The result is a plant‑based bar that still boasts a buttery crumb and a glossy glaze, proving that vegan baking can be just as indulgent.
Chocolate Drizzle
After glazing, drizzle melted dark chocolate over the top and let it set. The bittersweet chocolate adds a sophisticated contrast to the bright lemon, turning the bars into an elegant dessert for dinner parties.
Storing and Bringing It Back to Life
Fridge Storage
Place the bars in an airtight container and store them in the refrigerator for up to three days. The cool environment keeps the glaze from getting sticky, and the crumb stays moist. Before serving, let them sit at room temperature for 15 minutes or microwave for 10 seconds to revive the buttery texture.
Freezer Friendly
Wrap the entire slab tightly in plastic wrap, then foil, and freeze for up to one month. When you’re ready to enjoy them, thaw overnight in the fridge, then bring to room temperature. The glaze may appear a little dull after freezing; a quick brush of fresh glaze restores its shine.
Best Reheating Method
To reheat, preheat the oven to 300°F (150°C) and bake the bars for 8‑10 minutes, or until warmed through. Adding a tiny splash of water (about a teaspoon) to the pan before reheating creates a gentle steam that revives the crumb without drying it out. The result is a bar that feels freshly baked, with the glaze still glossy.