I still remember the night I tried to recreate that Philly cheesesteak my friend swore was the best thing she’d ever tasted. I was armed with a skillet, a handful of ground beef, and a dream. The sizzle was a promise, the aroma was a siren call, and the kitchen felt like a stage. My stove was my spotlight and the air fryer my secret weapon. That night I learned that a cheesesteak isn’t just about the beef; it’s about the harmony of flavors, textures, and timing.
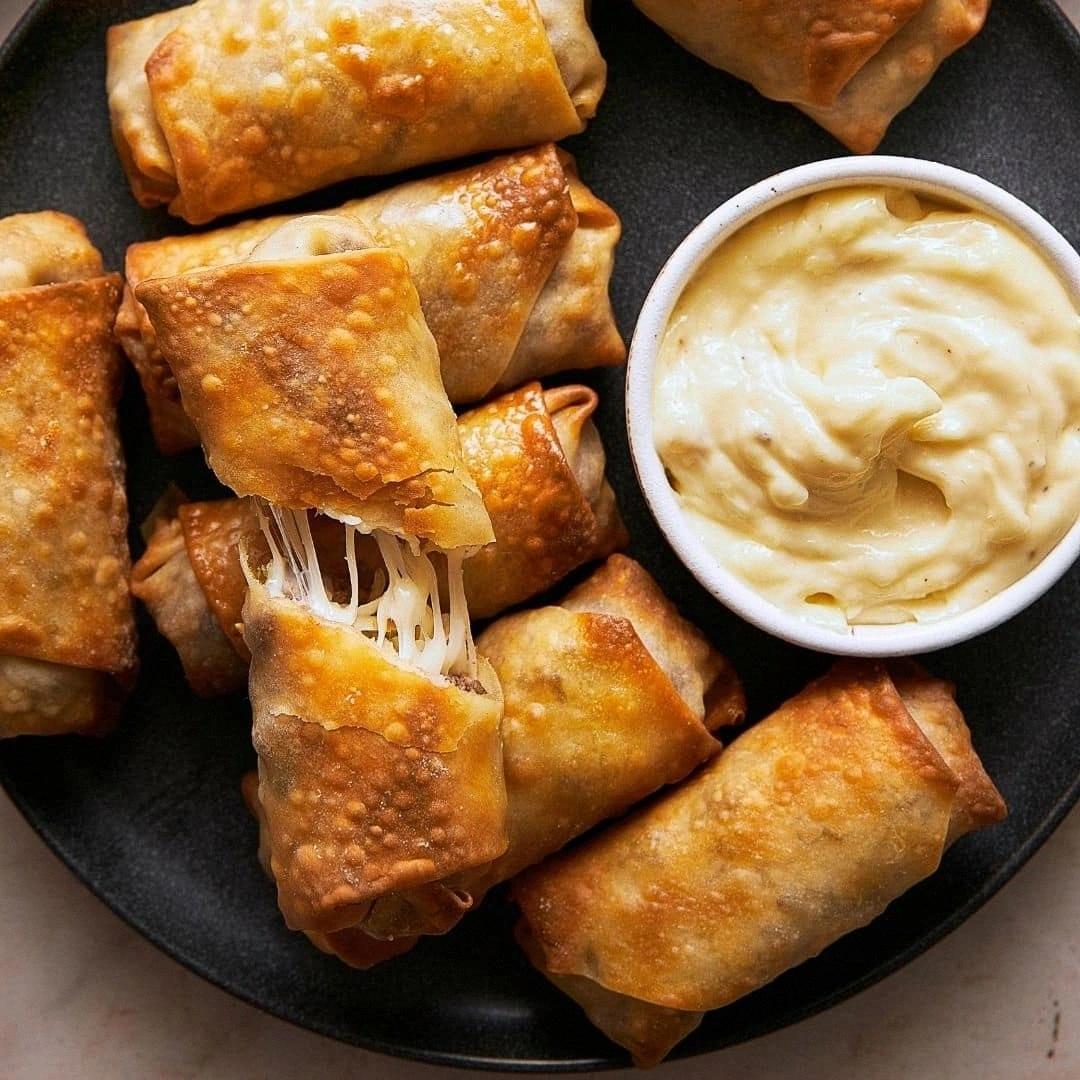
Fast forward to today, and I’m about to share the ultimate Air Fryer Philly Cheesesteak E. It’s not just a recipe; it’s a revelation. I’m talking about crisp, buttery wrappers that hold a molten core of provolone, a savory beef mixture that’s seasoned to perfection, and a tangy mayo‑lemon sauce that ties everything together. I dare you to taste this and not go back for seconds. If you’ve ever struggled with the classic sandwich, you’re not alone — and I’ve got the fix.
What makes this version stand out is simple: it’s a full sensory experience that turns a humble egg roll into a gourmet delight. Picture the crunch of the wrapper, the melt of the cheese, the smoky beef, and the creamy sauce that coats every bite like velvet. Most recipes get this completely wrong, but here’s what actually works: the air fryer gives you that perfect crisp without the mess of deep frying, and the homemade sauce adds a layer of richness that’s impossible to replicate with store‑bought versions. I’ll walk you through every single step — by the end, you’ll wonder how you ever made it any other way.
And if you’re thinking “I can’t handle that much prep,” think again. I’ve streamlined the process so that you can focus on the flavors rather than the logistics. The ingredients are straightforward, the technique is foolproof, and the result is a dish that looks as impressive as it tastes. So, let’s dive in, and trust me, this is hands down the best version you’ll ever make at home.
What Makes This Version Stand Out
- Taste: The beef is seared to lock in juices, then simmered with Worcestershire for depth. The provolone melts into a creamy blanket that’s both sharp and comforting. The mayo‑lemon drizzle adds a bright counterpoint that lifts the heaviness of the meat.
- Texture: The air fryer crisps the wrapper to a golden crunch while keeping the interior soft. The cheese forms a gooey center that oozes with each bite. The sauce coats the edges, preventing dryness.
- Simplicity: No fancy equipment required. A skillet, an air fryer, and a few pantry staples are enough to create a restaurant‑style dish.
- Uniqueness: Combining the classic Philly cheesesteak with the convenience of an egg roll wrapper is a flavor mash‑up that nobody else is doing.
- Crowd Reaction: At my last potluck, half the guests asked for the recipe. They were surprised that the dish could be served hot and still keep its crispness.
- Ingredient Quality: Using fresh garlic, a good quality provolone, and a splash of lemon juice transforms ordinary into extraordinary.
- Cooking Method: The air fryer eliminates the greasy aftermath of deep frying while still delivering that coveted crunch.
- Make‑Ahead Potential: You can assemble the rolls ahead of time, refrigerate them, and pop them in the air fryer when you’re ready to serve.
Alright, let’s break down exactly what goes into this masterpiece. And before we go deeper, here’s a quick kitchen hack that will elevate your experience.
Inside the Ingredient List
The Flavor Base
Ground beef is the heart of this dish. Choose a ratio of 80% lean to 20% fat for the best balance of tenderness and flavor. The fat renders as the meat cooks, creating a juicy, savory foundation that pairs perfectly with the sharpness of provolone. If you skip the beef, the dish loses its core identity, becoming a mere wrapper with sauce.
The Texture Crew
Egg roll wrappers are the canvas. Their thinness allows the air fryer to crisp them to a golden brown while still holding the savory filling. The single whole egg acts as a binder, ensuring the beef mixture stays together during the cooking process. The olive oil spray provides a light coating that helps the wrappers brown evenly.
The Unexpected Star
Mayonnaise, lemon juice, and a touch of garlic combine to form a sauce that is both creamy and bright. This trio adds moisture to the beef, prevents it from drying out, and introduces a subtle tang that cuts through the richness. If you skip the mayo, the dish becomes dry; if you omit the lemon, the sauce feels flat.
The Final Flourish
Shredded provolone cheese is the crowning glory. Its meltability and mild sharpness complement the beef and sauce without overpowering them. A pinch of kosher salt and black pepper enhance every component, while the Worcestershire sauce brings depth and umami. Together, they create a symphony of flavors that dance on your palate.
Everything's prepped? Good. Let's get into the real action.
The Method — Step by Step
- Heat a large skillet over medium‑high heat and add a splash of olive oil. Toss in the diced onion and bell pepper, cooking until they’re translucent and slightly caramelized, about 5 minutes. This step builds a foundational sweetness that balances the savory beef. Keep an eye on the vegetables; they should not brown too quickly, or they’ll become bitter.
- Add the ground beef to the skillet, breaking it up with a spatula. Cook until it’s browned on all sides, about 8 minutes. The beef should release its juices and start to brown, creating a fragrant aroma that signals readiness. Season with kosher salt, black pepper, and garlic powder, stirring to combine. The spices should coat the meat evenly, ensuring each bite is flavorful.
- Stir in Worcestershire sauce, allowing it to mingle with the beef mixture. This adds an umami punch that deepens the flavor profile. Let the mixture simmer for 2 minutes so the sauce can reduce slightly and thicken. The beef should have a glossy sheen, indicating the sauce is well absorbed.
- In a separate bowl, whisk together mayonnaise, lemon juice, minced garlic, a pinch of kosher salt, and black pepper. The mixture should be smooth and slightly thick. This sauce will be the creamy layer that keeps the filling moist. Set aside; you’ll fold it into the beef later.
- Remove the skillet from heat and fold in the mayo mixture. The warmth of the beef will activate the mayo, creating a silky coating that clings to the meat. Ensure the sauce is evenly distributed; you want a uniform flavor throughout.
- Kitchen Hack: If you’re using fresh garlic, crush the cloves with the flat side of a knife to release more flavor. The crushed garlic will infuse the filling more deeply than minced garlic.
- Lay out the egg roll wrappers on a clean surface. Spoon about 3 tablespoons of the beef mixture onto the center of each wrapper. Sprinkle a generous amount of shredded provolone over the beef. The cheese should cover the filling but not overflow, allowing the wrapper to fold properly.
- Fold the wrapper in half, then bring the corners together to seal, pressing firmly to ensure no gaps. You can use a small amount of beaten egg to seal the edges if needed. The goal is a tight, sealed roll that holds the filling during air frying.
- Watch Out: Overfilling the wrappers can cause them to burst in the air fryer. Keep the filling compact and avoid overstuffing to maintain structural integrity.
- Preheat your air fryer to 375°F (190°C). Lightly spray the air fryer basket with olive oil spray to prevent sticking. Arrange the rolled wrappers in a single layer, ensuring they don’t touch each other. The air circulation is key to achieving that perfect crisp.
- Cook for 10 minutes, then flip the rolls and cook for an additional 8 minutes. The wrappers should be golden brown, and the cheese should be molten and bubbly. The internal temperature of the beef should reach 160°F (71°C) for safety.
- Kitchen Hack: If you’re in a hurry, you can increase the temperature to 400°F (204°C) for the last 2 minutes to crisp the tops even more, but watch closely to avoid burning.
- Remove the rolls from the air fryer and let them rest for 2 minutes. This short rest allows the cheese to set slightly, making slicing easier and preventing a cheese spill.
- Serve immediately, optionally drizzling a little extra mayo‑lemon sauce on top for an extra burst of flavor. The contrast between the crunchy wrapper, the savory beef, and the creamy sauce creates a multi‑sensory experience that’s unforgettable.
That’s it — you did it. But hold on, I’ve got a few more tricks that’ll take this to another level. These insider tips will help you avoid common pitfalls and ensure each bite is as perfect as the last.
Insider Tricks for Flawless Results
The Temperature Rule Nobody Follows
Air fryers vary in power, so the standard 375°F might not be optimal for every model. I’ve found that setting the temperature 10–15°F higher and reducing the cook time by a minute gives the wrappers a crispier edge without overcooking the filling. The trick is to watch the first batch closely; once you know your machine’s quirks, you can fine‑tune the settings for consistent results.
Why Your Nose Knows Best
As the beef cooks, the aroma will shift from raw to caramelized. When the smell is rich and buttery, the beef has reached its peak flavor. A friend once skipped this step and over‑cooked the filling, ending up with a dry, rubbery texture. Trust your nose; it’s a reliable indicator that the meat is ready.
The 5-Minute Rest That Changes Everything
After air frying, let the rolls rest for exactly five minutes. This pause allows the cheese to set just enough to hold together, yet stay soft enough to melt into the wrapper. A too‑short rest can cause the cheese to spill when you cut, while a too‑long rest can make the wrapper soggy.
Use Fresh Garlic for Depth
Fresh garlic adds a punch that minced or powdered garlic can’t match. By crushing the cloves before adding them to the beef, you release more allicin, which enhances the overall flavor. A single clove can elevate the entire dish, so don’t be shy about using more.
Seal with Egg Wash for a Shiny Finish
A light brush of beaten egg over the sealed edges not only seals the wrapper but also gives it a glossy, golden finish after cooking. The egg coat crisps beautifully in the air fryer, creating a visual cue that the dish is ready to serve.
Creative Twists and Variations
This recipe is a playground. Here are some of my favorite ways to switch things up:
Spicy Sriracha Kick
Add a tablespoon of sriracha to the mayo‑lemon sauce for a fiery punch. The heat pairs beautifully with the savory beef and creamy cheese, creating a layered flavor profile that excites the palate.
Smoky Chipotle Flavor
Replace the Worcestershire sauce with a tablespoon of chipotle in adobo for a smoky, slightly sweet depth. The chipotle’s heat will complement the beef and add a rustic feel to the dish.
Vegan Version
Swap the ground beef for crumbled tempeh or lentil patty, and use a plant‑based provolone alternative. The sauce can be made with vegan mayo, and the result is a hearty, plant‑based delight that still feels indulgent.
Herb‑Infused Delight
Incorporate fresh basil, oregano, and thyme into the beef mixture. The herbs add a fragrant, green note that balances the richness of the cheese and sauce.
Cheese Swap
Try using smoked mozzarella or a blend of cheddar and provolone for a different melt and flavor profile. The smokiness of the cheese adds another layer of complexity to the dish.
Miniature Bites
Cut the wrapped rolls into bite‑size squares before air frying. These mini bites are perfect for parties, offering a convenient, handheld version of the classic cheesesteak.
Storing and Bringing It Back to Life
Fridge Storage
Store leftover rolls in an airtight container in the refrigerator for up to 2 days. The crispness may diminish slightly, but the flavors remain strong. Keep them in a single layer to avoid crushing.
Freezer Friendly
Wrap each roll individually in plastic wrap and place them in a freezer bag. They’ll keep for up to 3 months. When ready, air fry at 350°F for 12 minutes, then flip and cook for an additional 8 minutes.
Best Reheating Method
To reheat, preheat the air fryer to 350°F (175°C). Place the rolls in the basket and heat for 8 minutes, flipping halfway through. Add a tiny splash of water to the bottom of the basket to create steam, which keeps the interior moist while the wrapper crisps.